
A guide to train a YOLO object detection algorithm on your dataset. It’s based on the YOLOv5 open source repository by Ultralytics.
All the code for this blogpost is available in our dedicated GitHub repository. And you can test it in our AI Training, please refer to our documentation to boot it up.
Introduction
Computer Vision
” Computer vision is a specific field that deals with how computers can gain high-level understanding from digital images or videos. “
” From the perspective of engineering, it seeks to understand an automate tasks that the human visual system can do. “
Wikipedia
The use cases are numerous …
- Automotive: autonomous car
- Medical: cell detection
- Retailing: automatic basket content detection
- …
Object Detection
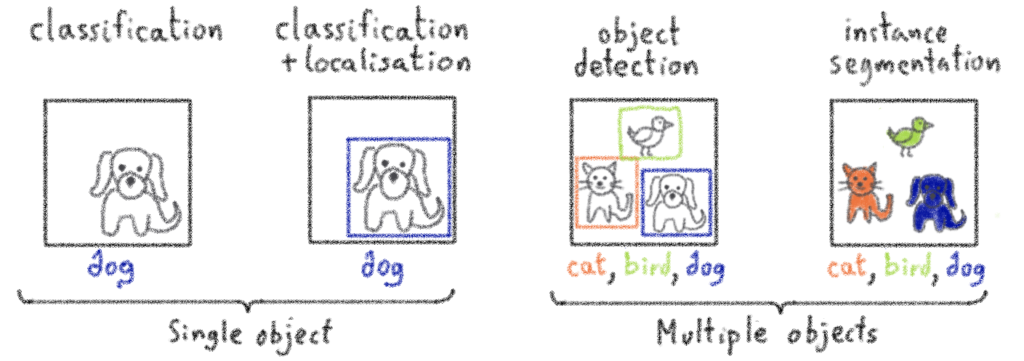
Object detection is a branch of computer vision that identifies and locates objects in an image or video stream. This technique allows objects to be labelled accurately. Object detection can be used to determine and count objects in a scene or to track their movement.
Objective
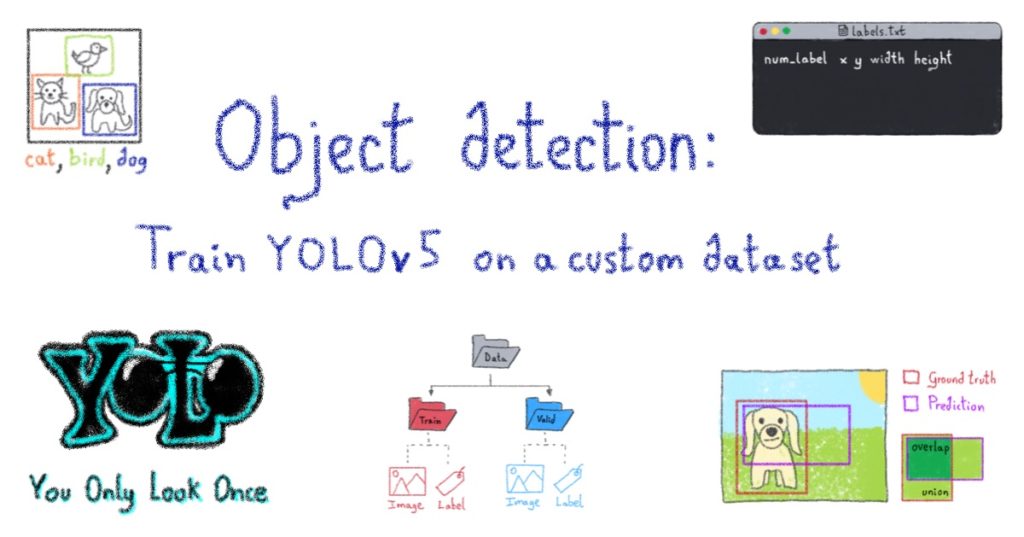
The purpose of this article is to show how it is possible to train YOLOv5 to recognise objects. YOLOv5 is an object detection algorithm. Although closely related to image classification, object detection performs image classification on a more precise scale. Object detection locates and categorises features in images.
It is based on the YOLOv5 repository by Ultralytics.
Use case: COCO dataset
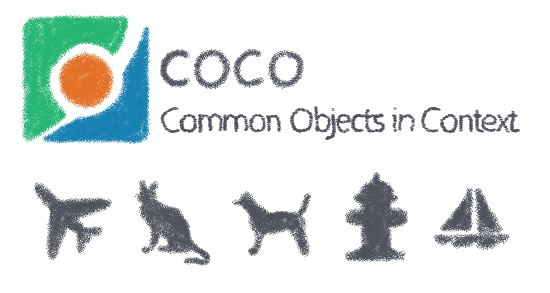
COCO is a large-scale object detection, segmentation, and also captioning dataset. It has several features:
- Object segmentation
- Recognition in context
- Superpixel stuff segmentation
- 330K images
- 1.5 million object instances
- 80 object categories
- 91 stuff categories
- 5 captions per image
- 250 000 people with keypoints
⚠️ Next, we will see how to use and train our own dataset to train a YOLOv5 model. But for this tutorial, we will use the COCO dataset.
OVHcloud disclaims to the fullest extent authorized by law all warranties, whether express or implied, including any implied warranties of title, non-infringement, quiet enjoyment, integration, merchantability or fitness for a particular purpose regarding the use of the COCO dataset in the context of this notebook. The user shall fully comply with the terms of use that appears on the database website (https://cocodataset.org/).
Create your own dataset
To train our own dataset, we can refer to the following steps:
- Collecte your training images: to get our object detector off the ground, we need to first collect training images.
⚠️ You must pay attention to the format of the images in your dataset. Think of putting your images in .jpg format!
- Define the number of classes: we have to make sure that the number of objects in each class is uniformly distributed.
- Annotation of your training images: to train our object detector, we need to supervise its training using bounding box annotations. We have to draw a box around each object we want the detector to see and label each box with the object class we want the detector to predict.
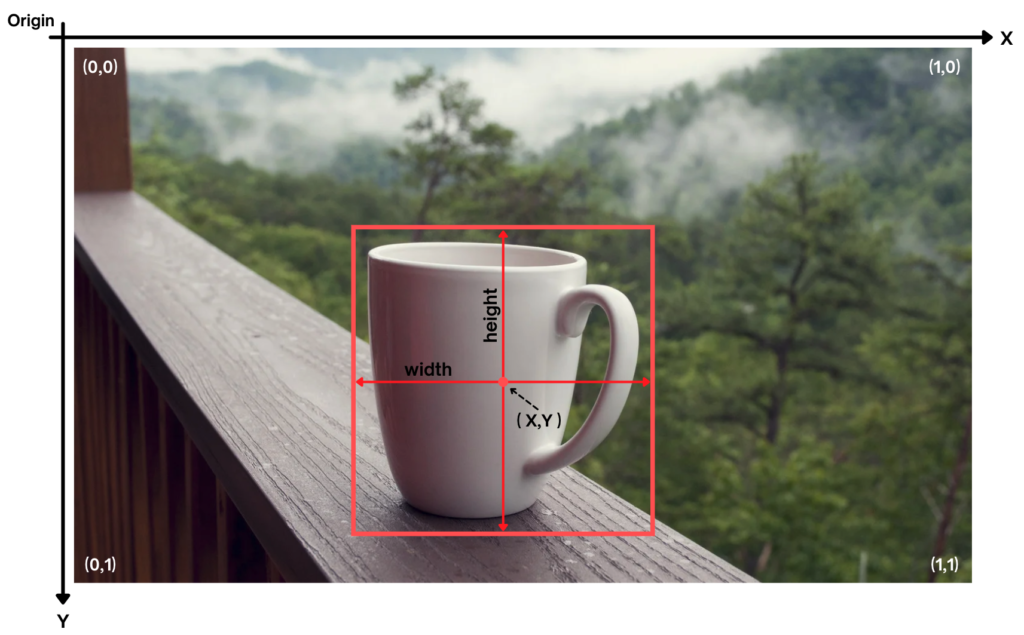
↪️ Labels should be written as follows:
- num_label: label (or class) number. If you have n classes, the label number will be between 0 and n-1
- X and Y: correspond to the coordinates of the centre of the box
- width: width of the box
- height: height of the box
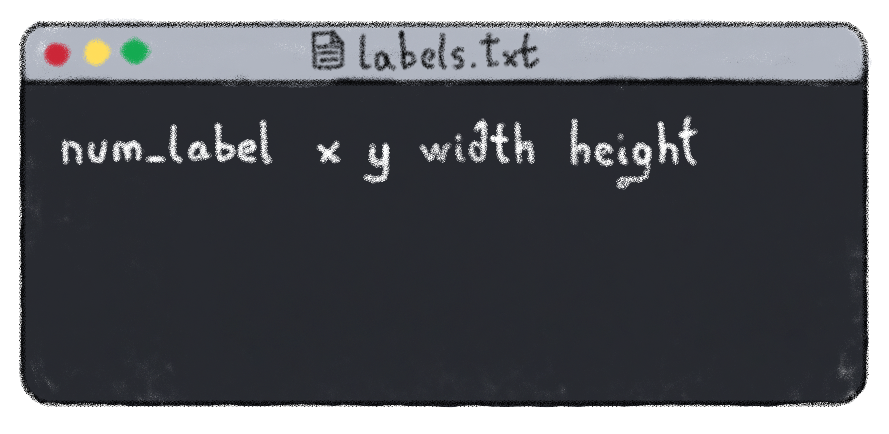
If an image contains several labels, we write a line for each label in the same .txt file.
- Split your dataset: we choose how to disperse our data (for example, keep 80% data in the training set and 20% in the validation set).
⚠️ Images and labels must have the same name.
Exemple:
data/train/images/img0.jpg # image data/train/labels/img0.txt # label
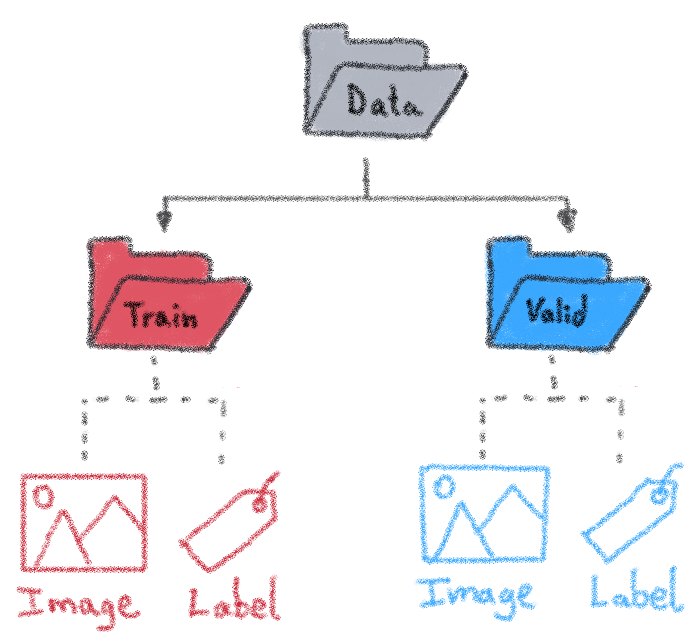
- Set up files and directory structure: to train the YOLOv5 model, we need to add a .yaml file to describe the parameters of our dataset.
We have to specify the train and validation files.
train: /workspace/data/train/imagesval: /workspace/data/valid/images
After that, we define number and names of classes.
nc: 80names: ['aeroplane', 'apple', 'backpack', 'banana', 'baseball bat', 'baseball glove', 'bear', 'bed', 'bench', 'bicycle', 'bird', 'boat', 'book', 'bottle', 'bowl', 'broccoli', 'bus', 'cake', 'car', 'carrot', 'cat', 'cell phone', 'chair', 'clock', 'cow', 'cup', 'diningtable', 'dog', 'donut', 'elephant', 'fire hydrant', 'fork', 'frisbee', 'giraffe', 'hair drier', 'handbag', 'horse', 'hot dog', 'keyboard', 'kite', 'knife', 'laptop', 'microwave', 'motorbike', 'mouse', 'orange', 'oven', 'parking meter', 'person', 'pizza', 'pottedplant', 'refrigerator', 'remote', 'sandwich', 'scissors', 'sheep', 'sink', 'skateboard', 'skis', 'snowboard', 'sofa', 'spoon', 'sports ball', 'stop sign', 'suitcase', 'surfboard', 'teddy bear', 'tennis racket', 'tie', 'toaster', 'toilet', 'toothbrush', 'traffic light', 'train', 'truck', 'tvmonitor', 'umbrella', 'vase', 'wine glass', 'zebra']
Let’s follow the different steps!

Install YOLOv5 dependences
1. Clone YOLOv5 repository
git clone https://github.com/ultralytics/yolov5 /workspace/yolov52. Install dependencies as necessary
Now, we have to go to the /yolov5 folder and install the “requirements.txt” file containing all the necessary dependencies.
cd /workspace/yolov5⚠️ Before installing the “requirements.txt” file, you have to modify it.
To access it, follow this path:workspace -> yolov5 -> requirements.txt
Then we have to replace the line opencv-python>=4.1.2 by opencv-python--headless.
Now we can save the “requirements.txt” file by selecting File in the Jupyter toolbar, then Save File.
Then, we can start the installation!
pip install -r requirements.txtIt’s almost over!
The last step is to open a new terminal:File -> New -> Terminal
Once in our new terminal, we run the following command: pip uninstall setuptools
We confirm our action by selecting Y.
And finally, run the command: pip install setuptools==59.5.0
The installations are now complete.
⚠️ Reboot the notebook kernel and follow the next steps!
Import dependencies
import torch
import yaml
from IPython.display import Image, clear_output
from utils.plots import plot_results
We check GPU availability.
print('Setup complete. Using torch %s %s' % (torch.__version__, torch.cuda.get_device_properties(0) if torch.cuda.is_available() else 'CPU'))Define and train YOLOv5 model
1. Define YOLOv5 model
We go to the directory where the “data.yaml” file is located.
cd /workspace/data

with open("data.yaml", 'r') as stream:
    num_classes = str(yaml.safe_load(stream)['nc'])
The model configuration used for the tutorial is YOLOv5s.
cat /workspace/yolov5/models/yolov5s.yaml# YOLOv5 🚀 by Ultralytics, GPL-3.0 license# Parametersnc: 80 # number of classes
depth_multiple: 0.33 # model depth multiple
width_multiple: 0.50 # layer channel multiple
anchors:
- [10,13, 16,30, 33,23] # P3/8
- [30,61, 62,45, 59,119] # P4/16
- [116,90, 156,198, 373,326] # P5/32# YOLOv5 backbone
backbone:
# [from, number, module, args]
[[-1, 1, Focus, [64, 3]], # 0-P1/2
[-1, 1, Conv, [128, 3, 2]], # 1-P2/4
[-1, 3, C3, [128]],
[-1, 1, Conv, [256, 3, 2]], # 3-P3/8
[-1, 9, C3, [256]],
[-1, 1, Conv, [512, 3, 2]], # 5-P4/16
[-1, 9, C3, [512]],
[-1, 1, Conv, [1024, 3, 2]], # 7-P5/32
[-1, 1, SPP, [1024, [5, 9, 13]]],
[-1, 3, C3, [1024, False]], # 9
]# YOLOv5 head
head:
[[-1, 1, Conv, [512, 1, 1]],
    [-1, 1, nn.Upsample, [None, 2, 'nearest']],
    [[-1, 6], 1, Concat, [1]], # cat backbone P4
    [-1, 3, C3, [512, False]], # 13

    [-1, 1, Conv, [256, 1, 1]],
    [-1, 1, nn.Upsample, [None, 2, 'nearest']],
    [[-1, 4], 1, Concat, [1]], # cat backbone P3
    [-1, 3, C3, [256, False]], # 17 (P3/8-small)

    [-1, 1, Conv, [256, 3, 2]],
    [[-1, 14], 1, Concat, [1]], # cat head P4
    [-1, 3, C3, [512, False]], # 20 (P4/16-medium)

    [-1, 1, Conv, [512, 3, 2]],
    [[-1, 10], 1, Concat, [1]], # cat head P5
    [-1, 3, C3, [1024, False]], # 23 (P5/32-large)

    [[17, 20, 23], 1, Detect, [nc, anchors]], # Detect(P3, P4, P5)
   ]
2. Run YOLOv5 training
Parameters definitions:
- img: refers to the input images size.
- batch: refers to the batch size (number of training examples utilized in one iteration).
- epochs: refers to the number of training epochs. An epoch corresponds to one cycle through the full training dataset.
- data: refers to the path to the yaml file.
- cfg: define the model configuration.
We will train YOLOv5s model on custom dataset for 100 epochs.
Evaluate YOLOv5 performance on COCO dataset
Image(filename='/workspace/yolov5/runs/train/yolov5s_results/results.png', width=1000)
# view results.png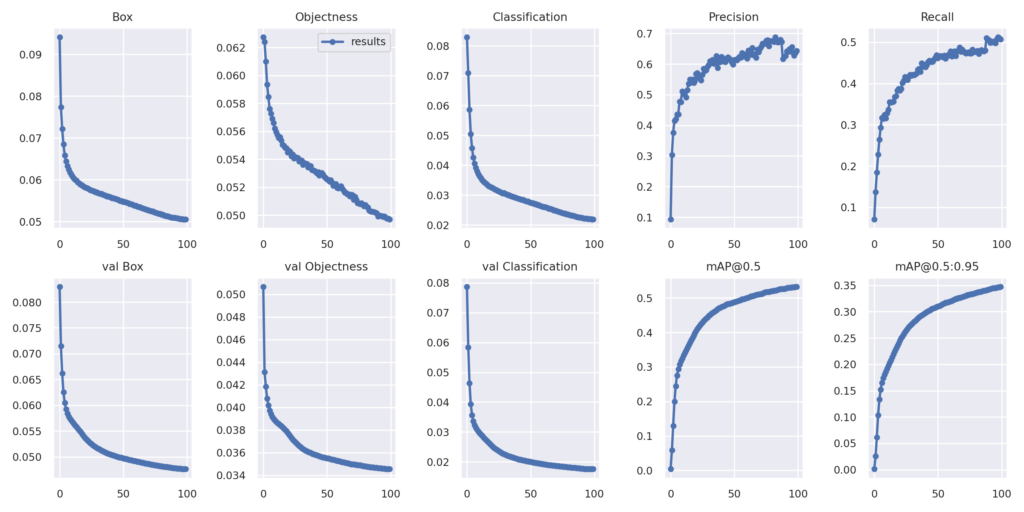
Graphs and functions explanation
Loss functions:
For the training set:
- Box: loss due to a box prediction not exactly covering an object.
- Objectness: loss due to a wrong box-object IoU [1] prediction.
- Classification: loss due to deviations from predicting ‘1’ for the correct classes and ‘0’ for all the other classes for the object in that box.
For the valid set (the same loss functions as for the training data):
- val Box
- val Objectness
- val Classification
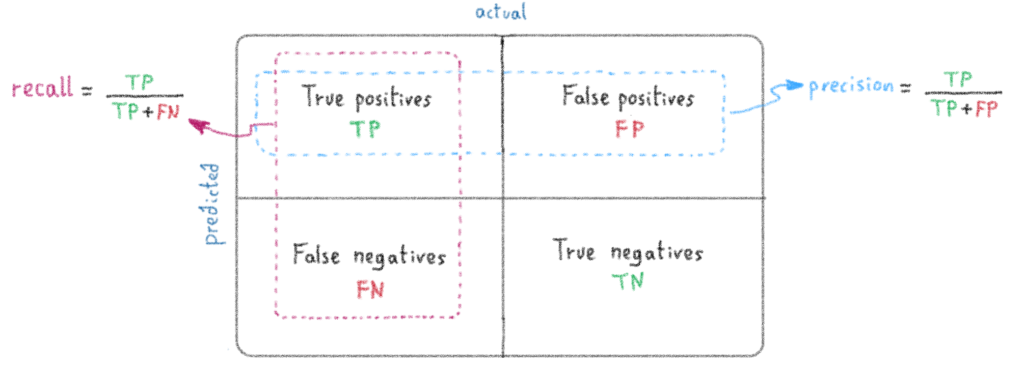
Precision & Recall:
- Precision: measures how accurate are the predictions. It is the percentage of your correct predictions
- Recall: measures how good it finds all the positives
How to calculate Precision and Recall ?
Accuracy functions:
mAP (mean Average Precision) compares the ground-truth bounding box to the detected box and returns a score. The higher the score, the more accurate the model is in its detections.
- mAP@ 0.5:when IoU is set to 0.5, the AP [2] of all pictures of each category is calculated, and then all categories are averaged : mAP
- mAP@ 0.5:0.95:represents the average mAP at different IoU thresholds (from 0.5 to 0.95 in steps of 0.05)
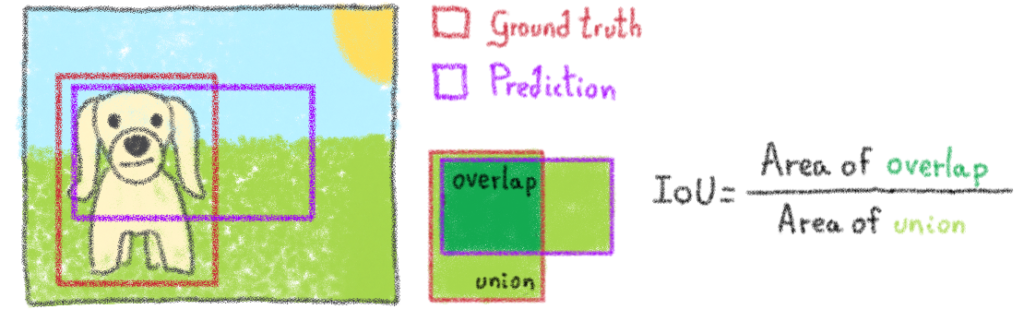
[1] IoU (Intersection over Union) = measures the overlap between two boundaries. It is used to measure how much the predicted boundary overlaps with the ground truth
How to calculate IoU ?
[2] AP (Average precision) = popular metric in measuring the accuracy of object detectors. It computes the average precision value for recall value over 0 to 1
Inference
1. Run YOLOv5 inference on test images
We can perform inference on the contents of the /data/images folder. Images can be adde of your choice in the same folder in order to perform tests.
First, our trained weights saved in the weights folder. We can use the best weights and print the test images list.
cd /workspace/yolov5/
python detect.py --weights runs/train/yolov5s_results/weights/best.pt --img 416 --conf 0.4 --source data/images --name yolov5s_results
/workspace/yolov5
detect: weights=['runs/train/yolov5s_results/weights/best.pt'], source=data/images, imgsz=416, conf_thres=0.4, iou_thres=0.45, max_det=1000, device=, view_img=False, save_txt=False, save_conf=False, save_crop=False, nosave=False, classes=None, agnostic_nms=False, augment=False, visualize=False, update=False, project=runs/detect, name=yolov5s_results, exist_ok=False, line_thickness=3, hide_labels=False, hide_conf=False, half=False YOLOv5 🚀 v5.0-306-g4495e00 torch 1.8.1 CUDA:0 (Tesla V100S-PCIE-32GB, 32510.5MB) Fusing layers... Model Summary: 308 layers, 21356877 parameters, 0 gradients, 51.3 GFLOPs
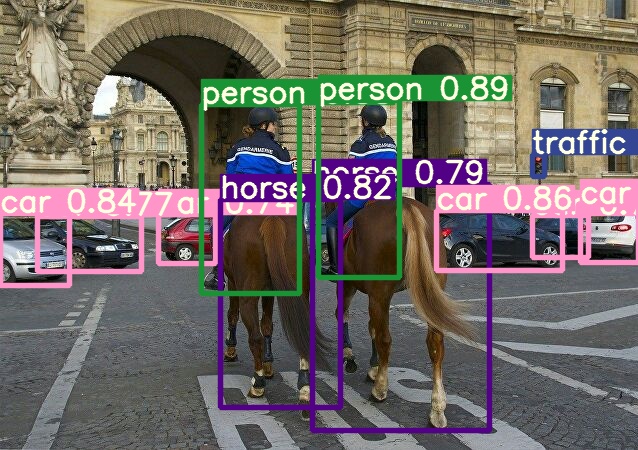
Then, we have the the classes number of occurrences present in the image.
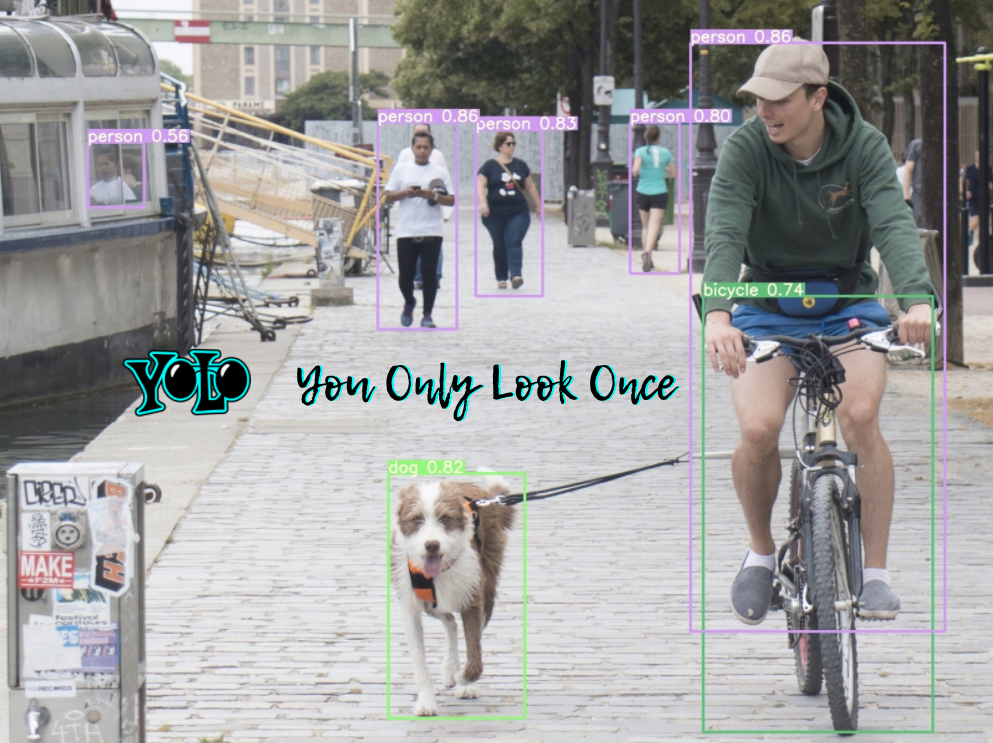
image 1/3 /workspace/yolov5/data/images/dog_street.jpg: 416x416 1 bicycle, 1 dog, 5 persons, Done. (0.017s)
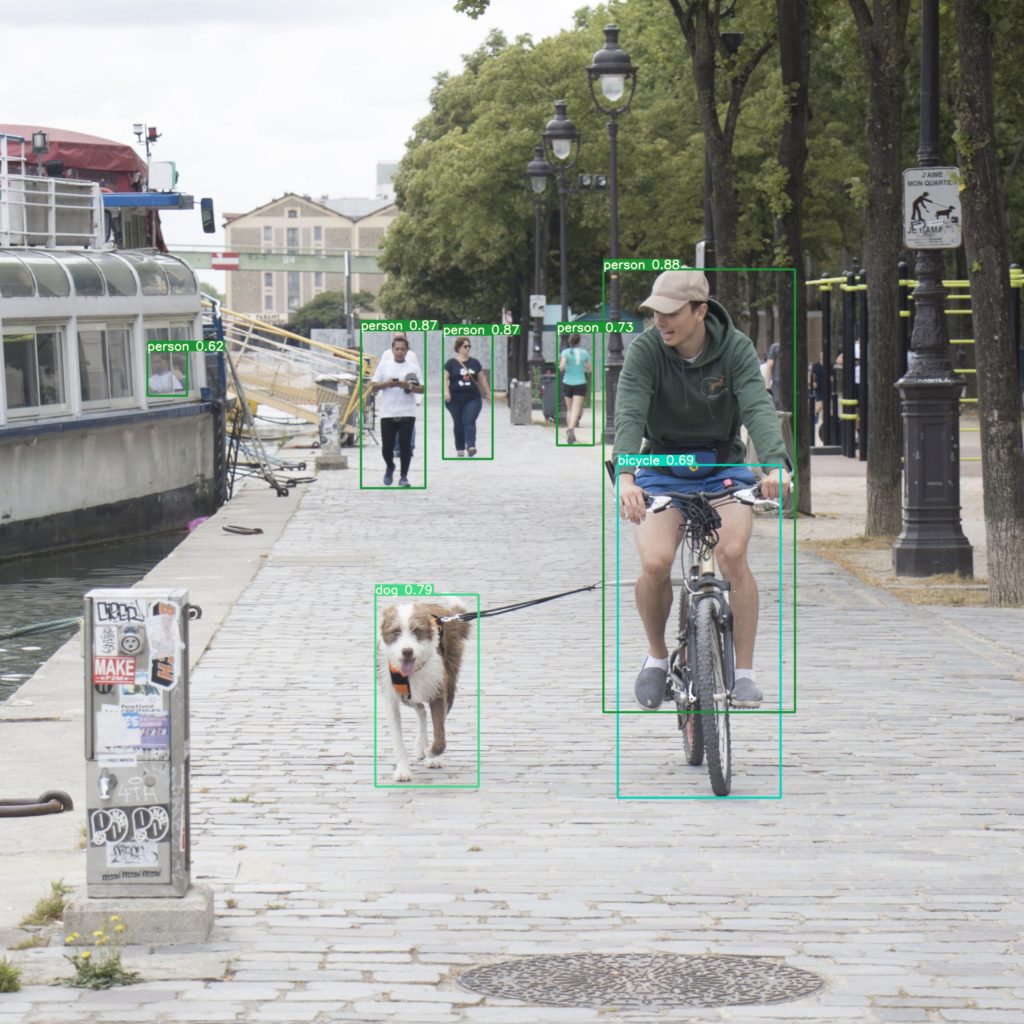
image 2/3 /workspace/yolov5/data/images/lunch_computer.jpg: 288x416 1 broccoli, 1 cell phone, 1 cup, 1 diningtable, 1 fork, 1 keyboard, 1 knife, Done. (0.021s)
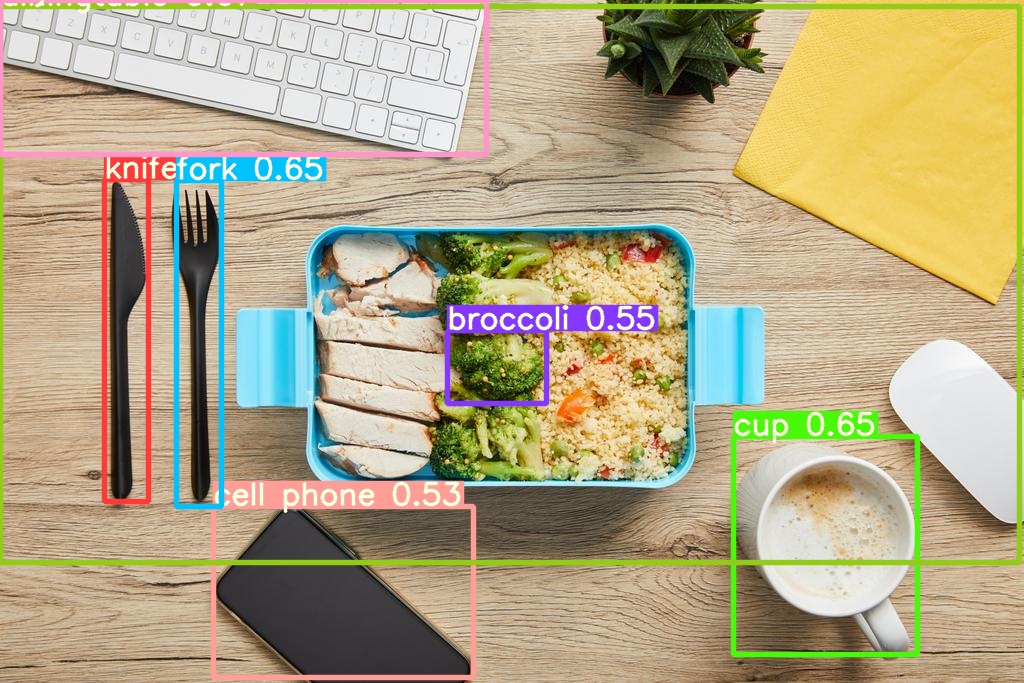
image 3/3 /workspace/yolov5/data/images/policeman_horse.jpg: 320x416 6 cars, 2 horses, 2 persons, 1 traffic light, Done. (0.020s)
Results saved to runs/detect/yolov5s_results
Done. (0.322s)
2. Export trained weights for future inference
Our weights are saved after training our model over 100 epochs.
Two weight files exist:
– the best one: best.pt
– the last one: last.pt
We choose the best one and we will start by renaming it
cd /workspace/yolov5/runs/train/yolov5s_results/weights/
os.rename("best.pt","yolov5s_100epochs.pt")
Then, we copy it in a new folder where we can put all the weights generated during your trainings.
cp /workspace/yolov5/runs/train/yolov5s_results/weights/yolov5s_100epochs.pt /workspace/models_train/yolov5s_100epochs.pt
Conclusion
The accuracy of the model can be improved by increasing the number of epochs, but after a certain period we reach a threshold, so the value should be determined accordingly.
The accuracy obtained for the test set is 93.71 %, which is a satisfactory result.
Want to find out more?
- Notebook
You want to access the notebook? Refer to the GitHub repository.
To launch and test this notebook with AI Notebooks, please refer to our documentation.
- App
You want to access the tutorial to create a simple app? Refer to the GitHub repository.
To launch and test this app with AI Training, please refer to our documentation.
References

Solution Architect @OVHcloud