
Raise your hands off the keyboard and chat with your LLM by voice with this Audio Virtual Assistant!

Nowadays, the creation of virtual assistants has become more accessible than ever, thanks to advances in AI (Artificial Intelligence), particularly in the field of SpeechAI and the GenAI models.
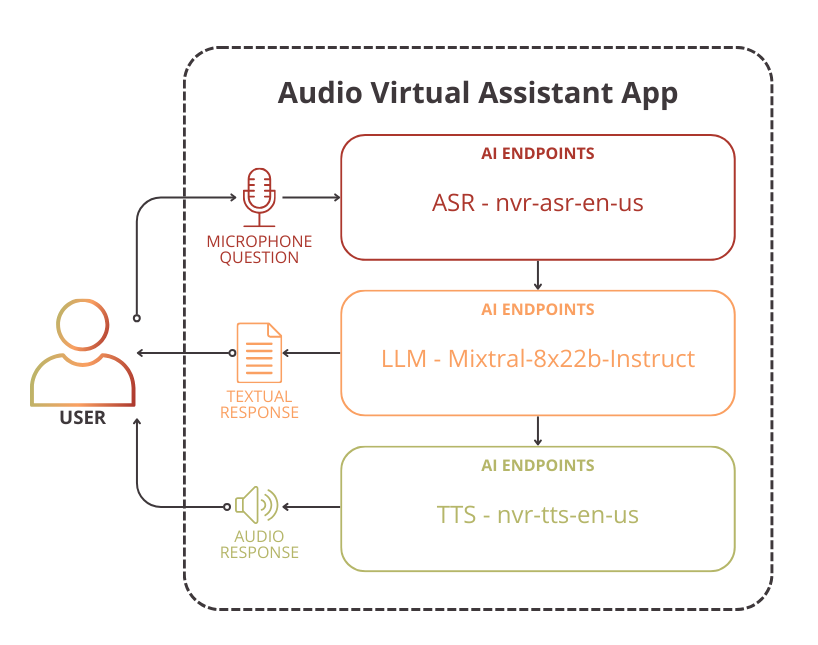
We will explore how OVHcloud AI Endpoints can be leveraged to design and develop an Audio Virtual Assistant capable of processing and understanding verbal questions, providing accurate answers, and returning answers verbally through speech synthesis.
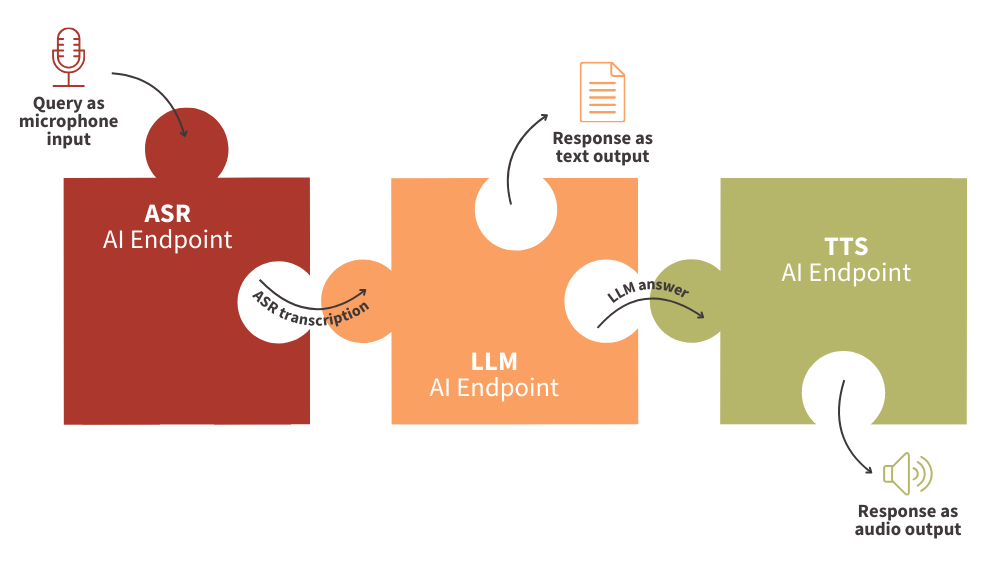
In this step-by-step tutorial, we will take a look at how to send audio through the microphone to the LLM (Large Language Models) via a written transcript of the ASR (Automatic Speech Recognition). The response is then formulated orally by a TTS (Text To Speech) model.
Objectives
Whatever your level in AI, whether you’re a beginner or an expert, this tutorial will enable you to create your own powerful Audio Virtual Assistant in just a few lines of code.
How to?
By connecting your AI Endpoints like puzzles!
- Retrieve the written transcript of your oral question with ASR endpoint
- Get the answer to your question with an LLM endpoint
- Take advantage of the TTS endpoint with the oral reply
👀 But first of all, a few definitions are needed to fully understand the technical implementation that follows.
Concept
To better understand the technologies that revolve around the Audio Virtual Assistant, let’s start by examining the models and notions of ASR, LLM, TTS…
AI Endpoints in a few words
AI Endpoints is a new serverless platform powered by OVHcloud and designed for developers.
The aim of AI Endpoints is to enable developers to enhance their applications with AI APIs, whatever their level and without the need for AI expertise.
It offers a curated catalog of world-renowned AI models and Nvidia’s optimized models, with a commitment to privacy as data is not stored or shared during or after model use.
AI Endpoints provides access to advanced AI models, including Large Language Models (LLMs), natural language processing, translation, speech recognition, image recognition, and more.
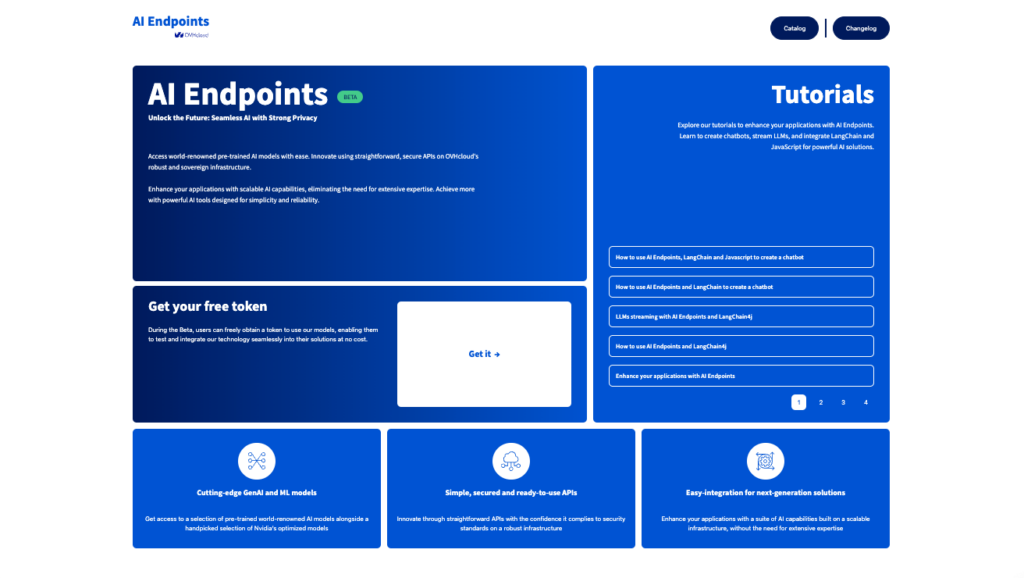
To know more about AI Endpoints, refer to this website.
AI Endpoints proposes several ASR APIs in different languages… But what means ASR?
Questioning with ASR
Automatic Speech Recognition (ASR) technology, also known as Speech-To-Text, is the process of converting spoken language into written text.
This process consists of several stages, including preparing the speech signal, extracting features, creating acoustic models, developing language models, and utilizing speech recognition engines.
With AI Endpoints, we simplify the use of ASR technology through our ready-to-use inference APIs. Learn how to use our APIs by following this link.
These APIs can be used to transcribe a recorded audio question into text, which can then be sent to a Large Language Model (LLM) for an answer.
Answering using LLM
LLMs, or Large Language Models, are known for producing text that is similar to how humans write.
They use complex algorithms to predict patterns in human language, understand context, and provide relevant responses. With LLM, virtual assistants can engage in meaningful and dynamic conversations with users.
If you want to learn more, the best way is to try it out for yourself! You can do so by following this link.
In this particular application, the LLM will be configured to answer the user question based on the results of the ASR (Automatic Speech Recognition) endpoint.
🤯 Would you like a verbal response? Don’t worry, that’s what TTS is for.
Expressing orally through TTS
TTS stands for Text-To-Speech, which is a type of technology that converts written text into spoken words.
This technology uses Artificial Intelligence algorithms to interpret and generate human-like speech from text input.
It is commonly used in various applications such as voice assistants, audiobooks, language learning platforms, and accessibility tools for individuals with visual or reading impairments.
With AI Endpoints, TTS is easy to use thanks to the turnkey inference APIs. Test it for free here.
🤖 Are you ready to start coding the Audio Virtual Assistant? Here we go: 3, 2, 1, begin!
Technical implementation of the Audio Virtual Assistant
This technical section covers the following points:
- the use of the ASR endpoint inside Python code to transcribe audio request
- the implementation of the TTS function to convertLLM response into spoken words
- the creation of a Chatbot app using LLMs and Streamlit
➡️ Access the full code here.
To build the Audio Virtual Assistant, start by setting up the environment.
Set up the environment
In order to use AI Endpoints APIs easily, create a .env file to store environment variables.
ASR_AI_ENDPOINT=https://whisper-large-v3.endpoints.kepler.ai.cloud.ovh.net/api/openai_compat/v1
TTS_GRPC_ENDPOINT=nvr-tts-en-us.endpoints-grpc.kepler.ai.cloud.ovh.net:443
LLM_AI_ENDPOINT=https://mixtral-8x7b-instruct-v01.endpoints.kepler.ai.cloud.ovh.net/api/openai_compat/v1
OVH_AI_ENDPOINTS_ACCESS_TOKEN=<ai-endpoints-api-token>
⚠️ **Make sure to replace the token value (`OVH_AI_ENDPOINTS_ACCESS_TOKEN`) by yours.** If you do not have one yet, follow the instructions in the AI Endpoints – Getting Started guide.
In this tutorial, we will be using the Whisper-Large-V3 and Mixtral-8x7b-Instruct-V01 models. Feel free to change it by models available on the AI Endpoints catalog.
In the next step, install the needed Python dependencies.
Create the requirements.txt file with the following libraries and launch the installation.
⚠️The environnement workspace is based on Python 3.11
openai==1.68.2streamlit==1.36.0
streamlit-mic-recorder==0.0.8nvidia-riva-client==2.15.1
python-dotenv==1.0.1
pip install -r requirements.txtOnce this is done, you can create a Python file named audio-virtual-assistant-app.py.
Then, import Python librairies as follow:
import os
import numpy as np
from openai import OpenAI
import riva.client
from dotenv import load_dotenv
import streamlit as st
from streamlit_mic_recorder import mic_recorder
After these lines, load and access the environnement variables of your .env file:
# access the environment variables from the .env file
load_dotenv()

ASR_AI_ENDPOINT = os.environ.get('ASR_AI_ENDPOINT')
TTS_GRPC_ENDPOINT = os.environ.get('TTS_GRPC_ENDPOINT')
LLM_AI_ENDPOINT = os.environ.get('LLM_AI_ENDPOINT')
OVH_AI_ENDPOINTS_ACCESS_TOKEN = os.environ.get('OVH_AI_ENDPOINTS_ACCESS_TOKEN')
Next, define the clients that will be used to interact with the models:
llm_client = OpenAI(
    base_url=LLM_AI_ENDPOINT,
    api_key=OVH_AI_ENDPOINTS_ACCESS_TOKEN
)

tts_client = riva.client.SpeechSynthesisService(
    riva.client.Auth(
        uri=TTS_GRPC_ENDPOINT,
        use_ssl=True,
        metadata_args=[["authorization", f"bearer {OVH_AI_ENDPOINTS_ACCESS_TOKEN}"]]
    )
)

asr_client = OpenAI(
    base_url=ASR_AI_ENDPOINT,
    api_key=OVH_AI_ENDPOINTS_ACCESS_TOKEN
)
💡 You are now ready to start coding your web app!
Transcribe input question with ASR
First, create the Automatic Speech Recognition (ASR) function in order to transcribe microphone input into text:
def asr_transcription(question, asr_client):
    return asr_client.audio.transcriptions.create(
        model="whisper-large-v3",
        file=question
    ).text
How it works?
- The audio input is sent from microphone recording, as
question - A call is made to the ASR AI Endpoint named
whisper-large-v3 - The text from the transcript response is returned by the function
🎉 Congratulations! Your ASR function is ready to use. You are ready to transcribe audio files.
Generate LLM response to input question
Now, create a function that calls the LLM client to provide responses to questions:
def llm_answer(input, llm_client):
    response = llm_client.chat.completions.create(
                model="Mixtral-8x7B-Instruct-v0.1",
                messages=input,
                temperature=0,
                max_tokens=1024,
            )
    msg = response.choices[0].message.content

    return msg
In this function:
- The conversation/messages are retrieved as parameters
- A call is made to the chat completion LLM endpoint, using the `Mixtral8x7B` model.
- Extracts the model’s response and returns the final message text.
⏳ Almost there! All that remains is to implement the TTS to transform the LLM response into spoken words.
Return the response using TTS
Then, build the Text To Speech (TTS) function in order to transform the written answer into oral reply:
def tts_synthesis(response, tts_client):

    # set up config
    sample_rate_hz = 48000
    req = {
            "language_code"  : "en-US",                           # languages: en-US
            "encoding"       : riva.client.AudioEncoding.LINEAR_PCM ,
            "sample_rate_hz" : sample_rate_hz,                    # sample rate: 48KHz audio
            "voice_name"     : "English-US.Female-1"              # voices: `English-US.Female-1`, `English-US.Male-1`
    }

    # return response
    req["text"] = response
    synthesized_response = tts_client.synthesize(**req)

    return np.frombuffer(synthesized_response.audio, dtype=np.int16), sample_rate_hz
In practice?
- The LLM response is retrieved
- A call is made to the TTS AI Endpoint named
nvr-tts-en-us - The audio sample and the sample rate are returned to play the audio automatically
⚡️ You’re almost there! Now all you have to do is build your Chatbot app.
Build the LLM chat app with Streamlit
In this last step, create the Chatbot app using Streamlit, an open-source Python library that allows to quickly create user interfaces for Machine Learning models and demos. Here is a working code example:
What to do?
- Create a first Streamlit container to put the title using
st.container()andst.title() - Add a second container for bot and user messages thanks to the following components:
st.container();st.session_state();st.chat_message() - Use a third container for the microphone recording, the usage of the ASR, LLM, TTS, and the automatic audio player.
# streamlit interface
with st.container():
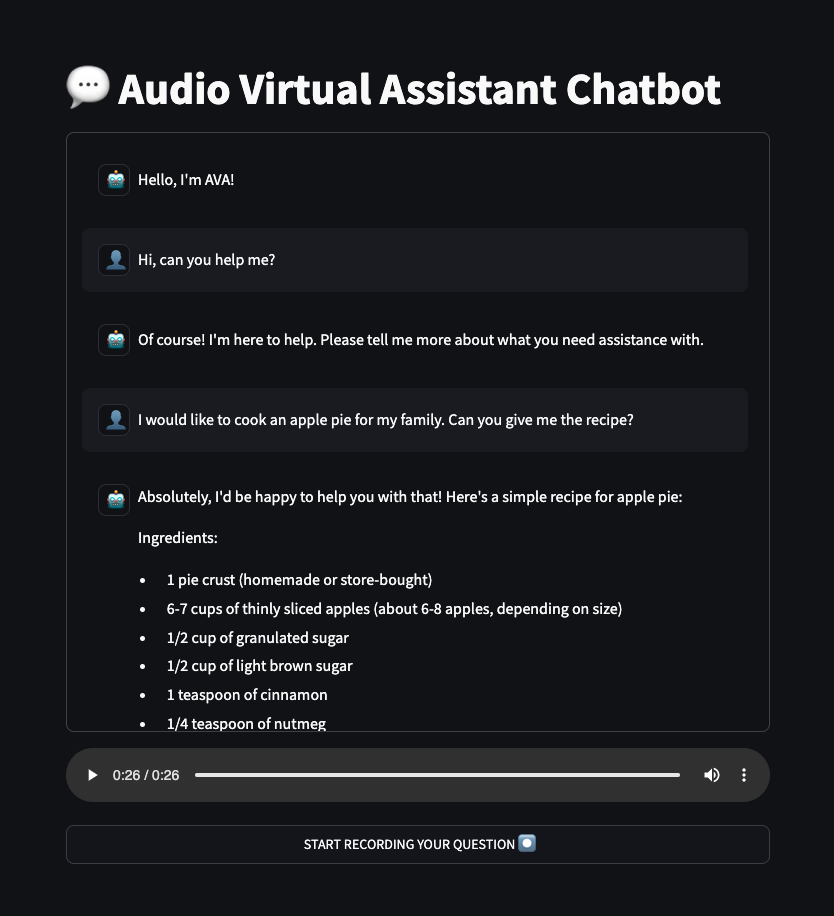
st.title("💬 Audio Virtual Assistant Chatbot")
with st.container(height=600):
messages = st.container()
if "messages" not in st.session_state:
st.session_state["messages"] = [{"role": "system", "content": "Hello, I'm AVA!", "avatar":"🤖"}]
for msg in st.session_state.messages:
messages.chat_message(msg["role"], avatar=msg["avatar"]).write(msg["content"])
with st.container():
placeholder = st.empty()
_, recording = placeholder.empty(), mic_recorder(
start_prompt="START RECORDING YOUR QUESTION ⏺️",
stop_prompt="STOP ⏹️",
format="wav",
use_container_width=True,
key='recorder'
)
if recording:
user_question = asr_transcription(recording['bytes'], asr_client)
if prompt := user_question:
st.session_state.messages.append({"role": "user", "content": prompt, "avatar":"👤"})
messages.chat_message("user", avatar="👤").write(prompt)
msg = llm_answer(st.session_state.messages, llm_client)
st.session_state.messages.append({"role": "assistant", "content": msg, "avatar": "🤖"})
messages.chat_message("system", avatar="🤖").write(msg)
if msg is not None:
audio_samples, sample_rate_hz = tts_synthesis(msg, tts_client)
placeholder.audio(audio_samples, sample_rate=sample_rate_hz, autoplay=True)Now, the Audio Virtual Assistant is ready to use!
🚀 That’s it! Now get the most out of your tool by launching it locally.
Launch Streamlit chatbot app locally
Finally, you can start this Streamlit app locally by launching the following command:
streamlit run audio-virtual-assistant.py Benefit from the full power of your tool as follow!
Improvements
By default, the nvr-tts-en-us model supports only a limited number of characters per request when generating audio. If you exceed this limit, you will encounter errors in your application.
To work around this limitation, you can replace the existing tts_synthesis function with the following implementation, which processes text in chunks:
def tts_synthesis(response, tts_client):
    # Split response into chunks of max 1000 characters
    max_chunk_length = 1000
    words = response.split()
    chunks = []
    current_chunk = ""

    for word in words:
        if len(current_chunk) + len(word) + 1 <= max_chunk_length:
            current_chunk += " " + word if current_chunk else word
        else:
            chunks.append(current_chunk)
            current_chunk = word
    if current_chunk:
        chunks.append(current_chunk)

    all_audio = np.array([], dtype=np.int16)
    sample_rate_hz = 16000

    # Process each chunk and concatenate the resulting audio
    for text in chunks:
        req = {
            "language_code": "en-US",
            "encoding": riva.client.AudioEncoding.LINEAR_PCM,
            "sample_rate_hz": sample_rate_hz,
            "voice_name": "English-US.Female-1",
            "text": text.strip(),
        }
        synthesized = tts_client.synthesize(**req)
        audio_segment = np.frombuffer(synthesized.audio, dtype=np.int16)
        all_audio = np.concatenate((all_audio, audio_segment))

    return all_audio, sample_rate_hz
☁️ Moreover, It’s also possible to make your interface accessible to everyone…
Go further
If you want to go further and deploy your web app in the cloud, refer to the following articles and tutorials.
- Deploy a custom Docker image for Data Science project – Streamlit app for EDA and interactive prediction (Part 2)
- AI Deploy – Tutorial – Build & use a custom Docker image
Conclusion of the Audio Virtual Assistant
Well done 🎉! You have learned how to build your own Audio Virtual Assistant in a few lines of code.
You’ve also seen how easy it is to use AI Endpoints to create innovative turnkey solutions.
➡️ Access the full code here.
🚀 What’s next? Implement RAG chatbot o specialize this Audio Virtual Assistant on your data!
References
- Enhance your applications with AI Endpoints
- RAG chatbot using AI Endpoints and LangChain
- How to use AI Endpoints, LangChain and Javascript to create a chatbot
- How to use AI Endpoints and LangChain to create a chatbot

Solution Architect @OVHcloud