

If you find yourself in need of shared persistent storage for applications running on OVHcloud Managed Kubernetes Service (MKS), then OVHcloud Enterprise File Storage (EFS) with Trident CSI offers you a practical way to provision and manage it.
This blog post explains how to create and connect OVHcloud EFS to your MKS cluster using Trident CSI, so you can dynamically provision persistent storage for Kubernetes workloads.
OVHcloud Enterprise File System (EFS)

EFS is a high-performance, fully managed file storage solution powered by NetApp ONTAP in an active-active architecture. It is designed for enterprise workloads requiring high availability, predictable performance, and seamless integration with cloud-native environments.
The service is available in multiple regions, including Roubaix, Gravelines, Strasbourg, Limbourg, and Beauharnois, with a strong SLA of 99.99% uptime. Storage capacity ranges from 50 GB up to 29 TB.
EFS delivers guaranteed performance with 4,000 IOPS and 64 MB/s throughput per TiB, scaling linearly with volume size thanks to NVMe SSD infrastructure.
Built for modern infrastructures, EFS integrates natively with Kubernetes via Trident CSI (compatible with MKS) and supports ReadWriteMany (RWX) access. It operates within a single availability zone (1AZ) and provides low-latency NFS storage over OVHcloud’s secure vRack network, ensuring strong security and compliance.
NetApp Trident CSI

Trident is an open-source, fully supported storage orchestration project maintained by NetApp. It is designed to help Kubernetes applications consume persistent storage using standard interfaces such as the Container Storage Interface (CSI).
Trident runs directly inside Kubernetes clusters as a set of Pods and enables dynamic provisioning and management of storage for containerized workloads. It allows applications to easily access persistent storage from NetApp’s ecosystem, including ONTAP systems (like the OVHcloud EFS).
Let’s do it!
EFS creation
We already have a MKS cluster, in GRA11 region, running inside a private network and a subnet, with a gateway.
We also already have a vRack and our Public Cloud Project attached to this vRack.
So in this blog post we will only create a new EFS in eu-west-rbx region, attached to a vRackServices, inside the same subnet that our existing MKS cluster.
Here you can see the architecture of all the services:
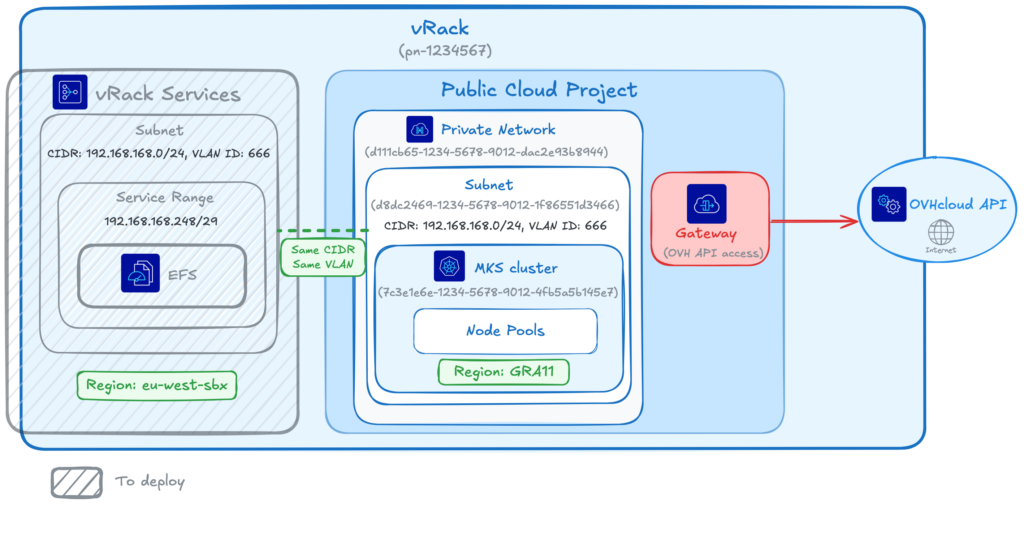
⚠️ EFS and MKS regions may differ; be aware that latency between different regions may impact your storage workloads performance. It’s highly recommended to keep your storage and compute as close as possible.
We will deploy the EFS in eu-west-rbx instead of in eu-west-gra region to show you that it is possible.
To deploy the EFS, we will use the Terraform OVHcloud EFS module.
The module we will use can deploy all the components necessary to use EFS with a MKS cluster (like you can see in the schema).
But in this blog post we will assume that we already deployed:
- a vRack
- a Private Network
- a Private Subnet
- a Gateway
- a MKS cluster
So using the Terraform module we will fill the existing resources information and ask Terraform to create:
- an OAuth2 credential
- an IAM policy
- an EFS
- a vRack Services
Let’s deploy our components with Terraform!
Create a provider.tf file and fill it with the information:
terraform {
  required_providers {
    ovh = {
      source  = "ovh/ovh"
      version = ">= 2.12.0"
    }
    null = {
      source  = "hashicorp/null"
      version = ">= 3.0.0"
    }
  }

  required_version = ">= 1.7.0"
}

provider "ovh" {
}
If you don’t define the provider information inside this file, as was shown in this example, you can instead set the environment variables with your credentials:
# OVHcloud provider needed keys
export OVH_ENDPOINT="ovh-eu"
export OVH_APPLICATION_KEY="xxx"
export OVH_APPLICATION_SECRET="xxx"
export OVH_CONSUMER_KEY="xxx"
export OVH_CLOUD_PROJECT_SERVICE="xxx"
Create a variable.tf.template file and fill it with these information:
# Existing services
variable "service_name" {
  default = "$OVH_CLOUD_PROJECT_SERVICE"
}

variable "vrack_id" {
  default = "pn-1234567" #ID of your existing vRack
}

variable "vlan_id" {
  default = "666" #ID of your VLAN
}

variable "private_network_id" {
  default = "d111cb65-1234-5678-9012-dac2e93b8944" #ID of your private network
}

variable "private_subnet_id" {
  default = "d8dc2469-1234-5678-9012-1f86551d3466" #ID of your subnet
}

variable "vrackservices_subnet_service_range_cidr" {
  default = "192.168.168.248/29" #CIDR of your private network
}

variable "private_subnet_cidr" {
  default = "192.168.168.0/24" #CIDR of your subnet
}

variable "mks_region" {
  default = "GRA11" #Region of your existing MKS cluster
}

variable "mks_cluster_id" {
  default = "7c3e1e6e-1234-5678-9012-4fb5a5b145e7" #ID of your existing MKS cluster
}

# Services to create

variable "oauth2_client_name" {
  default = "efs-trident-client-example"
}

variable "oauth2_client_description" {
  default = "OAuth2 client for EFS Trident integration"
}

variable "iam_policy_name" {
  default = "efs-trident-policy-example"
}

variable "iam_policy_description" {
  default = "IAM policy for EFS Trident access"
}

variable "vrackservices_attach_to_efs" {
  description = "Whether to attach the EFS service endpoint to vRack Services. Set to false before destroying."
  type        = bool
  default     = true
}

variable "efs_region" {
  default = "eu-west-rbx"
}

variable "efs_name" {
  default = "my-efs-storage"
}

variable "efs_plan" {
  default = "enterprise-file-storage-premium-1tb"
}
⚠️ In the file, replace the IDs, CIDR & MKS region with your existing resources information.
Replace the value of the OVH_CLOUD_PROJECT_SERVICE environment variable in the variables.tf file:
envsubst < variables.tf.template > variables.tfCreate a efs.tf file and fill it with the information:
module "ovh_efs_trident" {
  source = "ovh/efs/ovh//modules/efs-trident"

  # OVH region for EFS and vRack Services
  region = var.efs_region

  # Public Cloud region for MKS and private network
  public_cloud_region = var.mks_region

  # VLAN ID must be the same for vRack Services and Public Cloud private network
  vlan_id = var.vlan_id

  # Set to false before destroying to detach endpoint first
  vrackservices_attach_to_efs = var.vrackservices_attach_to_efs

  # EFS creation
  storage_efs_name      = var.efs_name
  storage_efs_plan_code = var.efs_plan

  # --- vRack ---
  create_vrack       = false
  vrack_service_name = var.vrack_id

  # --- Cloud Project ---
  create_cloud_project        = false
  cloud_project_id            = var.service_name
  bind_vrack_to_cloud_project = false # Set to false if already bound

  # --- Private Network ---
  create_private_network      = false
  private_network_id = var.private_network_id

  # --- Private Subnet ---
  create_private_subnet      = false
  private_subnet_id = var.private_subnet_id

  # --- Gateway ---
  create_gateway = false  # Set to false only if existing network has gateway

  # --- MKS Cluster ---
  create_mks_cluster = false
  mks_cluster_id     = var.mks_cluster_id # mks-priv-gra11
  create_node_pool   = false # Set to false if using existing node pool

  # OAuth2 and IAM
  oauth2_client_name        = var.oauth2_client_name
  oauth2_client_description = var.oauth2_client_description
  iam_policy_name           = var.iam_policy_name
  iam_policy_description    = var.iam_policy_description

  # Network (shared between vRack Services and Public Cloud)
  private_network_subnet_cidr             = var.private_subnet_cidr
  vrackservices_subnet_service_range_cidr = var.vrackservices_subnet_service_range_cidr # EFS gets IPs here
}
Create an output.tf file with the following content:
output "client_id" {
    value = module.ovh_efs_trident.client_id
}

output "client_secret" {
    value = module.ovh_efs_trident.client_secret
    sensitive = true
}

output "efs_id" {
  value       = module.ovh_efs_trident.efs_id
}
The Terraform configuration is ready. Let’s init it:
terraform initThe output should be like this:
$ terraform init

Initializing the backend...
Initializing modules...
Initializing provider plugins...
- Reusing previous version of hashicorp/null from the dependency lock file
- Reusing previous version of ovh/ovh from the dependency lock file
- Using previously-installed hashicorp/null v3.2.4
- Using previously-installed ovh/ovh v2.13.1

Terraform has been successfully initialized!

You may now begin working with Terraform. Try running "terraform plan" to see
any changes that are required for your infrastructure. All Terraform commands
should now work.

If you ever set or change modules or backend configuration for Terraform,
rerun this command to reinitialize your working directory. If you forget, other
commands will detect it and remind you to do so if necessary.
Apply it:
terraform applyThe output should be like this:
$ terraform apply

module.ovh_efs_trident.data.ovh_me.my_account: Reading...
module.ovh_efs_trident.data.ovh_cloud_project_kube.existing[0]: Reading...
module.ovh_efs_trident.data.ovh_cloud_project.existing[0]: Reading...
module.ovh_efs_trident.data.ovh_me.my_account: Read complete after 1s [id=xx12345-ovh]
module.ovh_efs_trident.data.ovh_cloud_project.existing[0]: Read complete after 0s
module.ovh_efs_trident.data.ovh_order_cart.cart: Reading...
module.ovh_efs_trident.data.ovh_order_cart.cart: Read complete after 0s [id=d582ab7c-1234-5678-9012-4a6e702ea4c5]
module.ovh_efs_trident.data.ovh_cloud_project_kube.existing[0]: Read complete after 5s [id=7c3e1e6e-1234-5678-9012-4fb5a5b145e7]

Terraform used the selected providers to generate the following execution plan. Resource actions are indicated with the following symbols:
  + create

Terraform will perform the following actions:

  # module.ovh_efs_trident.null_resource.config_validation will be created
  + resource "null_resource" "config_validation" {
      + id = (known after apply)
    }

  # module.ovh_efs_trident.ovh_iam_policy.iam_policy will be created
  + resource "ovh_iam_policy" "iam_policy" {
      + allow       = [
          + "storageNetApp:apiovh:get",
          + "storageNetApp:apiovh:serviceInfos/get",
          + "storageNetApp:apiovh:share/accessPath/get",
          + "storageNetApp:apiovh:share/acl/create",
          + "storageNetApp:apiovh:share/acl/delete",
          + "storageNetApp:apiovh:share/acl/get",
          + "storageNetApp:apiovh:share/create",
          + "storageNetApp:apiovh:share/delete",
          + "storageNetApp:apiovh:share/edit",
          + "storageNetApp:apiovh:share/extend",
          + "storageNetApp:apiovh:share/get",
          + "storageNetApp:apiovh:share/revertToSnapshot",
          + "storageNetApp:apiovh:share/snapshot/create",
          + "storageNetApp:apiovh:share/snapshot/delete",
          + "storageNetApp:apiovh:share/snapshot/edit",
          + "storageNetApp:apiovh:share/snapshot/get",
        ]
      + created_at  = (known after apply)
      + description = "IAM policy for EFS Trident access"
      + id          = (known after apply)
      + identities  = (known after apply)
      + name        = "efs-trident-policy-example"
      + owner       = (known after apply)
      + read_only   = (known after apply)
      + resources   = (known after apply)
      + updated_at  = (known after apply)
    }

  # module.ovh_efs_trident.ovh_me_api_oauth2_client.api_oauth2_client will be created
  + resource "ovh_me_api_oauth2_client" "api_oauth2_client" {
      + client_id     = (known after apply)
      + client_secret = (sensitive value)
      + description   = "OAuth2 client for EFS Trident integration"
      + flow          = "CLIENT_CREDENTIALS"
      + id            = (known after apply)
      + identity      = (known after apply)
      + name          = "efs-trident-client-example"
    }

  # module.ovh_efs_trident.ovh_storage_efs.efs[0] will be created
  + resource "ovh_storage_efs" "efs" {
      + created_at        = (known after apply)
      + iam               = (known after apply)
      + id                = (known after apply)
      + name              = "my-efs-storage"
      + order             = (known after apply)
      + ovh_subsidiary    = "FR"
      + performance_level = (known after apply)
      + plan              = [
          + {
              + configuration = [
                  + {
                      + label = "region"
                      + value = "eu-west-rbx"
                    },
                  + {
                      + label = "network"
                      + value = "vrack"
                    },
                ]
              + duration      = "P1M"
              + plan_code     = "enterprise-file-storage-premium-1tb"
              + pricing_mode  = "default"
            },
        ]
      + product           = (known after apply)
      + quota             = (known after apply)
      + region            = (known after apply)
      + service_name      = (known after apply)
      + status            = (known after apply)
    }

  # module.ovh_efs_trident.ovh_vrack_vrackservices.vrack-vrackservices-binding[0] will be created
  + resource "ovh_vrack_vrackservices" "vrack-vrackservices-binding" {
      + id             = (known after apply)
      + service_name   = "pn-1234567"
      + vrack_services = (known after apply)
    }

  # module.ovh_efs_trident.ovh_vrackservices.vrackservices[0] will be created
  + resource "ovh_vrackservices" "vrackservices" {
      + checksum        = (known after apply)
      + created_at      = (known after apply)
      + current_state   = (known after apply)
      + current_tasks   = (known after apply)
      + iam             = (known after apply)
      + id              = (known after apply)
      + order           = (known after apply)
      + ovh_subsidiary  = "FR"
      + plan            = [
          + {
              + configuration = [
                  + {
                      + label = "region_name"
                      + value = "eu-west-rbx"
                    },
                ]
              + duration      = "P1M"
              + plan_code     = "vrack-services"
              + pricing_mode  = "default"
            },
        ]
      + resource_status = (known after apply)
      + target_spec     = {
          + subnets = [
              + {
                  + cidr              = "192.168.168.0/24"
                  + service_endpoints = [
                      + {
                          + managed_service_urn = (known after apply)
                        },
                    ]
                  + service_range     = {
                      + cidr = "192.168.168.248/29"
                    }
                  + vlan              = 666
                    # (1 unchanged attribute hidden)
                },
            ]
        }
      + updated_at      = (known after apply)
    }

Plan: 6 to add, 0 to change, 0 to destroy.

Changes to Outputs:
  + client_id     = (known after apply)
  + client_secret = (sensitive value)
  + efs_id        = (known after apply)

Do you want to perform these actions?
  Terraform will perform the actions described above.
  Only 'yes' will be accepted to approve.

  Enter a value: yes

module.ovh_efs_trident.null_resource.config_validation: Creating...
module.ovh_efs_trident.null_resource.config_validation: Creation complete after 0s [id=8553589333890826101]
module.ovh_efs_trident.ovh_me_api_oauth2_client.api_oauth2_client: Creating...
module.ovh_efs_trident.ovh_storage_efs.efs[0]: Creating...
module.ovh_efs_trident.ovh_me_api_oauth2_client.api_oauth2_client: Creation complete after 0s [id=EU.xxxxxxxxxxxxx]
module.ovh_efs_trident.ovh_storage_efs.efs[0]: Still creating... [00m10s elapsed]
module.ovh_efs_trident.ovh_storage_efs.efs[0]: Still creating... [00m20s elapsed]
module.ovh_efs_trident.ovh_storage_efs.efs[0]: Still creating... [00m30s elapsed]
...
module.ovh_efs_trident.ovh_storage_efs.efs[0]: Still creating... [03m40s elapsed]
module.ovh_efs_trident.ovh_storage_efs.efs[0]: Still creating... [03m50s elapsed]
module.ovh_efs_trident.ovh_storage_efs.efs[0]: Creation complete after 3m52s [id=c2d759de-cd63-4e28-aaab-a7599aad2ca8]
module.ovh_efs_trident.ovh_vrackservices.vrackservices[0]: Creating...
module.ovh_efs_trident.ovh_iam_policy.iam_policy: Creating...
module.ovh_efs_trident.ovh_iam_policy.iam_policy: Creation complete after 0s [id=a434d1a4-1234-5678-9012-cf54251eee52]
module.ovh_efs_trident.ovh_vrackservices.vrackservices[0]: Still creating... [00m10s elapsed]
module.ovh_efs_trident.ovh_vrackservices.vrackservices[0]: Still creating... [00m20s elapsed]
...
module.ovh_efs_trident.ovh_vrackservices.vrackservices[0]: Still creating... [01m20s elapsed]
module.ovh_efs_trident.ovh_vrackservices.vrackservices[0]: Creation complete after 1m30s [id=vrs-a00-b11-c22-d33]
module.ovh_efs_trident.ovh_vrack_vrackservices.vrack-vrackservices-binding[0]: Creating...
module.ovh_efs_trident.ovh_vrack_vrackservices.vrack-vrackservices-binding[0]: Still creating... [00m10s elapsed]
module.ovh_efs_trident.ovh_vrack_vrackservices.vrack-vrackservices-binding[0]: Still creating... [00m20s elapsed]
...
module.ovh_efs_trident.ovh_vrack_vrackservices.vrack-vrackservices-binding[0]: Still creating... [01m40s elapsed]
module.ovh_efs_trident.ovh_vrack_vrackservices.vrack-vrackservices-binding[0]: Creation complete after 1m43s [id=vrack_pn-1234567-vrackServices_vrs-a00-b11-c22-d33]

Apply complete! Resources: 6 added, 0 changed, 0 destroyed.

Outputs:

client_id = "EU.xxxxxxxxxxxxx"
client_secret = <sensitive>
efs_id = "c2d759de-cd63-4e28-aaab-a7599aad2ca8"
Save the OAuth2 credentials in environment variables:
export EFS_CLIENT_ID=$(terraform output -raw client_id)
export EFS_CLIENT_SECRET=$(terraform output -raw client_secret)
Trident CSI Installation
Install the Trident operator in your MKS cluster:
helm repo add netapp-trident https://netapp.github.io/trident-helm-chart

helm install trident-operator netapp-trident/trident-operator \
  --version 100.2502.1 \
  --create-namespace \
  --namespace trident \
  --set tridentSilenceAutosupport=true \
  --set operatorImage="ovhcom/trident-operator:25.02.1-linux-amd64" \
  --set tridentImage="ovhcom/trident:25.02.1-linux-amd64"
You should have a result like this:
$ helm install trident-operator netapp-trident/trident-operator \
  --version 100.2502.1 \
  --create-namespace \
  --namespace trident \
  --set tridentSilenceAutosupport=true \
  --set operatorImage="ovhcom/trident-operator:25.02.1-linux-amd64" \
  --set tridentImage="ovhcom/trident:25.02.1-linux-amd64"

NAME: trident-operator
LAST DEPLOYED: Tue Apr 28 14:01:19 2026
NAMESPACE: trident
STATUS: deployed
REVISION: 1
TEST SUITE: None
NOTES:
Thank you for installing trident-operator, which will deploy and manage NetApp's Trident CSI
storage provisioner for Kubernetes.

Your release is named 'trident-operator' and is installed into the 'trident' namespace.
Please note that there must be only one instance of Trident (and trident-operator) in a Kubernetes cluster.

To configure Trident to manage storage resources, you will need a copy of tridentctl, which is
available in pre-packaged Trident releases.  You may find all Trident releases and source code
online at https://github.com/NetApp/trident.

To learn more about the release, try:

  $ helm status trident-operator
  $ helm get all trident-operator
Once the installation is complete, verify that all Trident pods are in Running state in the trident namespace before proceeding:
$ kubectl get pods -n trident

NAME                                  READY   STATUS    RESTARTS      AGE
trident-controller-5bf6c8d6f6-g95jq   6/6     Running   0             119s
trident-node-linux-4xtjr              2/2     Running   1 (82s ago)   119s
trident-node-linux-6w5ff              2/2     Running   1 (82s ago)   119s
trident-node-linux-r7hxp              2/2     Running   0             119s
trident-operator-859f59c58b-2z2ts     1/1     Running   0             2m31s
Trident Backend Creation
The Trident backend connects NetApp Trident to the OVHcloud EFS service using the IAM credentials previously created.
1. Secret Creation
Create a Kubernetes Secret containing the connection information that allows Trident to access the OVHcloud API. Create a trident-secret.yaml.template file with the following content:
apiVersion: v1
kind: Secret
metadata:
  name: ovh-efs-secret
type: Opaque
stringData:
  clientID: "$EFS_CLIENT_ID"         # your clientId
  clientSecret: "$EFS_CLIENT_SECRET" # your clientSecret
Replace the clientID and clientSecret values by the OAuth2 client we created with Terraform:
envsubst < trident-secret.yaml.template > trident-secret.yamlApply the secret in your cluster:
kubectl apply -f trident-secret.yaml -n tridentCheck that the secret has been correctly created:
$ kubectl get secret ovh-efs-secret -n trident

NAME             TYPE     DATA   AGE
ovh-efs-secret   Opaque   2      3s
2. Trident Backend Creation
Create your backend with the command below:
cat <<EOF | kubectl create -n trident -f -
apiVersion: trident.netapp.io/v1
kind: TridentBackendConfig
metadata:
  name: ovh-efs-rbx
spec:
  version: 1
  backendName: backend-ovh-efs
  defaults:
    exportRule: "192.168.168.0/24"    # CIDR of your network for NFS ACLs
  storageDriverName: ovh-efs
  clientLocation: ovh-eu
  location: eu-west-rbx         # Location of your EFS service
  serviceLevel: premium
  nfsMountOptions: rw,hard,rsize=65536,wsize=65536,nfsvers=3,tcp
  credentials:
    name: ovh-efs-secret
  volumeCreateTimeout: "60"
EOF
⚠️ The ovh-efs storage driver must be used. Replace exportRule, location, and other parameters with values matching your environment.
Verify that the backend has been created correctly with the command below:
$ kubectl get TridentBackendConfig -n trident

NAME          BACKEND NAME      BACKEND UUID                           PHASE   STATUS
ovh-efs-rbx   backend-ovh-efs   ace12d67-70ea-44e1-abd8-20d016f7f030   Bound   Success
Use EFS in your MKS cluster
This section describes how to expose Enterprise File Storage to Kubernetes workloads using Trident.
1. StorageClass
In a sc_efs.yaml file, define a StorageClass to enable dynamic provisioning via the Trident CSI driver:
apiVersion: storage.k8s.io/v1
kind: StorageClass
metadata:
  name: ovh-efs-premium
provisioner: csi.trident.netapp.io
parameters:
  backendType: "ovh-efs"
  fsType: "nfs"
allowVolumeExpansion: true
Apply the StorageClass:
kubectl apply -f sc_efs.yamlCheck that the StorageClass has been created:
$ kubectl get sc ovh-efs-premium

NAME              PROVISIONER             RECLAIMPOLICY   VOLUMEBINDINGMODE   ALLOWVOLUMEEXPANSION   AGE
ovh-efs-premium   csi.trident.netapp.io   Delete          Immediate           true                   3h13m
This StorageClass allows volumes to be provisioned on demand and expanded dynamically.
2. Volume Creation (PVC)
Create a PersistentVolumeClaim with ReadWriteMany (RWX) access mode. Create a pvc_efs.yaml file with this content:
apiVersion: v1
kind: PersistentVolumeClaim
metadata:
  name: premium-pvc-efs
spec:
  accessModes:
    - ReadWriteMany
  resources:
    requests:
      storage: 100Gi
  storageClassName: ovh-efs-premium
Apply it:
kubectl apply -f pvc_efs.yamlVerify that the PVC has been created with the command below:
kubectl get pvc premium-pvc-efsAt this point, the EFS is creating a volume, attach the correct ACL to it and mount it in the PVC
After a little time, the output should show the PVC in Bound state:
$ kubectl get pvc

NAME              STATUS   VOLUME                                     CAPACITY   ACCESS MODES   STORAGECLASS      VOLUMEATTRIBUTESCLASS   AGE
premium-pvc-efs   Bound    pvc-faca364d-ad76-44ec-9bc9-959c0d33c515   100Gi      RWX            ovh-efs-premium   <unset>                 3m43s
The volume has been created through the PVC and you can now mount it in a Pod 🎉.
Conclusion
In this blog, we’ve explained how to create an EFS and use it in a MKS cluster through Trident CSI. This will give you a flexible, production-ready approach to persistent shared storage in Kubernetes.
We recommend you also take a look at our Cloud Roadmap & Changelog for an overview of all the coming features for OVHcloud Public Cloud products.
Developer Advocate at OVHcloud, specializing in Cloud Native, Infrastructure as Code, and Developer Experience.
Docker Captain, CNCF Ambassador, Google Developer Expert, and Women Techmakers Ambassador, she has spent more than 20 years helping developers and operators build reliable cloud-native platforms. Passionate about DevOps, Kubernetes, and Go, she shares best practices through technical writing, international conferences, and visual learning resources.
Author of the Understanding Kubernetes, Understanding Docker, and Understanding Istio series, she pioneered a visual approach to learning cloud technologies through sketchnotes, books, and videos.