Your service is now ready to test, but the API it depends on won't ship for three more weeks. Sound familiar? When you build or test an application, some of the APIs it relies on are often not available yet, and this can be a frustration.
API mocking closes that gap: it lets you test your integrations without waiting for the actual backend. Microcks addresses this need, and it does it directly from your Kubernetes cluster.
In this blog post, you will deploy Microcks on an OVHcloud Managed Kubernetes Service (MKS) cluster and expose it using the Kubernetes Gateway API, Envoy Gateway, and an OVHcloud Public Cloud Load Balancer.
As a CNCF project, Microcks fits naturally into a cloud-native environment. And with OVHcloud being a CNCF Platinum Member, running Microcks on MKS is a natural way to bring API mocking and testing into your Kubernetes platform.
What is Microcks?

Microcks is an open-source tool for API mocking and testing.
It creates API mocks from API specifications, so you can test applications and integrations without requiring the actual backend to be available.
This is particularly useful in distributed environments, where teams and services evolve independently. And since Microcks runs on Kubernetes, it fits naturally into a cloud-native environment.
Prerequisites
Before getting started, you will need:
- An OVHcloud account
- An OVHcloud Public Cloud project
- An API credential with the permissions required to manage an MKS cluster
- The OVHcloud CLI
- kubectl
- Helm
- A domain name (pointing to the Load Balancer, if you want a custom domain name)
Let's go.
Step 1: Create the MKS cluster
You will first create an OVHcloud Managed Kubernetes Service cluster and a node pool.
For this example, you will use a three-node pool based on the b3-8 flavor.
Note that for production usage, you should consider using a standard plan instead of the free plan.
Create the cluster
Define your cluster parameters:
export CLUSTER_NAME="microcks"
export REGION="GRA9"
export PLAN="free"
Create the Kubernetes cluster:
CLUSTER_ID=$(ovhcloud cloud mks create --name $CLUSTER_NAME --region $REGION --plan $PLAN | grep -oE '[0-9a-f-]{36}')Wait for 2–3 minutes for the cluster to be provisioned.
Check the status of the Kubernetes cluster:
ovhcloud cloud mks get $CLUSTER_IDCreate the node pool and connect to the cluster
Microcks is composed of several Kubernetes workloads, including the Microcks application, Keycloak and its PostgreSQL instance, MongoDB, and the Postman runtime.
For a small installation, a node pool with three general-purpose nodes is a reasonable starting point.
Once the cluster has been created, you can create the node pool. Define the node pool configuration:
export NODEPOOL_NAME="microcks-np"
export NODE_FLAVOR="b3-8"
Create the node pool:
NP_ID=$(ovhcloud cloud mks nodepool create $CLUSTER_ID --flavor-name $NODE_FLAVOR --name $NODEPOOL_NAME --desired-nodes 3 --min-nodes 2 --max-nodes 3 | grep -oE '[0-9a-f-]{36}')Wait for 3–4 minutes for the node pool to be provisioned.
Check the status of the node pool:
ovhcloud cloud mks nodepool get $CLUSTER_ID $NP_IDOnce the cluster and node pool are ready, generate the Kubernetes configuration:
ovhcloud cloud mks kubeconfig generate $CLUSTER_ID > microcks.yamlConfigure the kubectl CLI with the generated kubeconfig:
export KUBECONFIG=$(pwd)/microcks.yamlCheck that the nodes are ready:
kubectl get np
kubectl get nodes
Your Kubernetes cluster is now ready. You can move on to exposing Microcks.
Step 2: Expose the cluster with Gateway API
Gateway API is the Kubernetes standard for routing traffic into a cluster, designed as the successor to Ingress. It describes what you want to expose; a controller then turns that description into a running proxy and, on MKS, into an OVHcloud Public Cloud Load Balancer.
You will use three components: Envoy Gateway, an implementation of Gateway API built on the Envoy proxy; cert-manager, which automates TLS certificates; and a Gateway resource that ties them together.
Install Envoy Gateway
Install the Envoy Gateway Helm chart:
helm install envoy-gateway oci://docker.io/envoyproxy/gateway-helm -n envoy-gateway-system --create-namespaceThen create a GatewayClass that tells Kubernetes that Envoy Gateway is responsible for your Gateway resources:
cat <<EOF | kubectl apply -f -
apiVersion: gateway.networking.k8s.io/v1
kind: GatewayClass
metadata:
  name: envoy
spec:
  controllerName: gateway.envoyproxy.io/gatewayclass-controller
EOF
Manage TLS certificates with cert-manager
To automatically manage your TLS certificates, you will use cert-manager together with Let's Encrypt.
Install cert-manager:
helm repo add jetstack https://charts.jetstack.io
helm repo update
helm install cert-manager jetstack/cert-manager --namespace cert-manager --create-namespace --set crds.enabled=true --set config.gatewayAPI.enabled=true
Then create a ClusterIssuer for Let's Encrypt:
cat <<EOF | kubectl apply -f -
apiVersion: cert-manager.io/v1
kind: ClusterIssuer
metadata:
  name: letsencrypt-prod-microcks
spec:
  acme:
    server: https://acme-v02.api.letsencrypt.org/directory
    email: <your-email@example.com>   # Update with your email address
    privateKeySecretRef:
      name: letsencrypt-prod-microcks
    solvers:
      - http01:
          gatewayHTTPRoute:
            parentRefs:
              - name: microcks-gateway
                namespace: microcks
                group: gateway.networking.k8s.io
                kind: Gateway
EOF
This issuer allows cert-manager to request certificates from Let's Encrypt using the Gateway API HTTP-01 solver.
Create the Gateway
You can now create the Gateway that will expose Microcks.
Create the namespace:
kubectl create namespace microcksThen create the Gateway with its five listeners: HTTP and HTTPS for Microcks, TLS passthrough for gRPC, and HTTP and HTTPS for Keycloak.
cat <<EOF | kubectl apply -f -
apiVersion: gateway.networking.k8s.io/v1
kind: Gateway
metadata:
  name: microcks-gateway
  namespace: microcks
  annotations:
    cert-manager.io/cluster-issuer: letsencrypt-prod-microcks
spec:
  gatewayClassName: envoy
  listeners:
    - name: microcks-http
      hostname: microcks.<YOUR_DOMAIN>.com
      protocol: HTTP
      port: 80
      allowedRoutes:
        namespaces:
          from: Same
    - name: microcks-https
      hostname: microcks.<YOUR_DOMAIN>.com
      protocol: HTTPS
      port: 443
      tls:
        mode: Terminate
        certificateRefs:
          - name: microcks-tls
      allowedRoutes:
        namespaces:
          from: Same
    - name: microcks-grpc
      hostname: microcks-grpc.<YOUR_DOMAIN>.com
      protocol: TLS
      port: 443
      tls:
        mode: Passthrough
      allowedRoutes:
        namespaces:
          from: Same
    - name: keycloak-http
      hostname: keycloak.<YOUR_DOMAIN>.com
      protocol: HTTP
      port: 80
      allowedRoutes:
        namespaces:
          from: Same
    - name: keycloak-https
      hostname: keycloak.<YOUR_DOMAIN>.com
      protocol: HTTPS
      port: 443
      tls:
        mode: Terminate
        certificateRefs:
          - name: keycloak-tls
      allowedRoutes:
        namespaces:
          from: Same
EOF
Check the status of the Gateway:
kubectl get gateway -n microcks
--- OUTPUT ---
NAME               CLASS   ADDRESS        PROGRAMMED   AGE
microcks-gateway   envoy   xx.xx.xx.xx    True         3m49s
At this stage, the Gateway should be Accepted=True and Programmed=True. If it isn't yet, wait a few minutes for the Gateway to be programmed and for the OVHcloud Public Cloud Load Balancer to be provisioned.
Configure DNS
Get the external address assigned to the Gateway:
export GATEWAY_IP=$(kubectl get gateway microcks-gateway \
  -n microcks \
  -o jsonpath='{.status.addresses[0].value}')

echo $GATEWAY_IP
--- OUTPUT ---
xx.xx.xx.xx
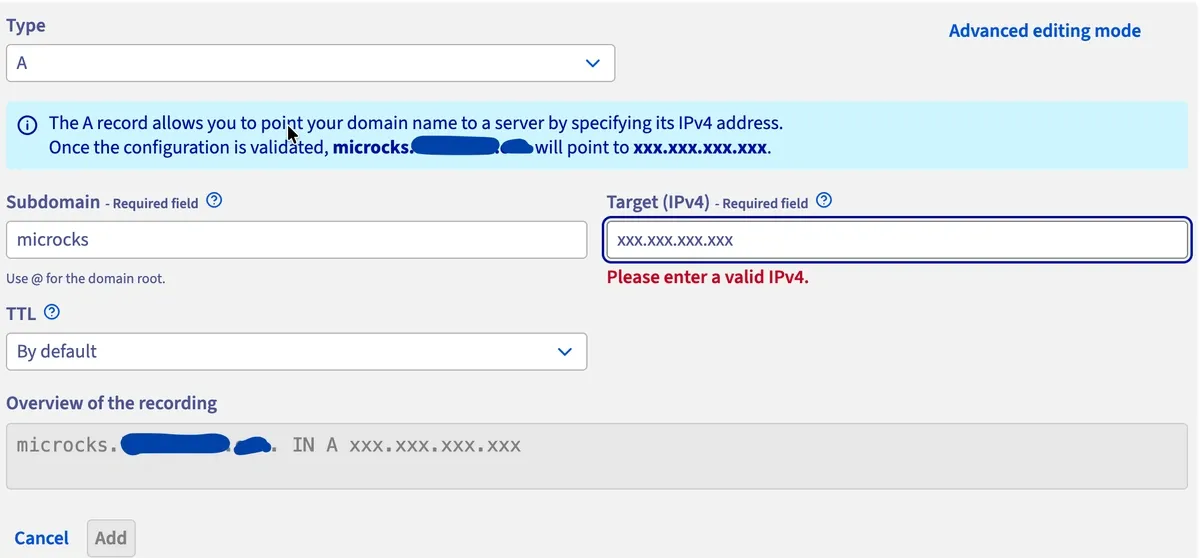
If you are using a custom domain, create the following DNS records:
microcks.<YOUR_DOMAIN>.com       A    <GATEWAY_IP>
microcks-grpc.<YOUR_DOMAIN>.com  A    <GATEWAY_IP>
keycloak.<YOUR_DOMAIN>.com       A    <GATEWAY_IP>
You can configure these records through the OVHcloud DNS management interface:
Once DNS is configured, verify the records:
dig keycloak.<YOUR_DOMAIN>.com +noall +answer
dig microcks.<YOUR_DOMAIN>.com +noall +answer
dig microcks-grpc.<YOUR_DOMAIN>.com +noall +answer
Step 3: Deploy and verify Microcks
The infrastructure is now ready. Let's deploy Microcks.
Deploy Microcks with Helm
You will use the official Microcks Helm chart and configure it to create Gateway API HTTPRoute resources instead of Kubernetes Ingress resources.
Add the Microcks Helm repository:
helm repo add microcks https://microcks.io/helm/
helm repo update
Create a microcks_values.yaml file:
cat > microcks_values.yaml <<EOF
appName: microcks

ingresses: false
gatewayRoutes: true

gatewayRefName: microcks-gateway
gatewayRefNamespace: microcks
gatewayRefSectionName: microcks-https
grpcGatewayRefSectionName: microcks-grpc

microcks:
  url: microcks.<YOUR_DOMAIN>.com
  ingressSecretRef: microcks-tls
  generateCert: false
  grpcEnableTLS: true

keycloak:
  url: keycloak.<YOUR_DOMAIN>.com
  privateUrl: http://microcks-keycloak.microcks.svc.cluster.local:8080
  ingressSecretRef: keycloak-tls
  generateCert: false
  gatewayRefName: microcks-gateway
  gatewayRefNamespace: microcks
  gatewayRefSectionName: keycloak-https
EOF
Install Microcks:
helm install microcks microcks/microcks -n microcks -f microcks_values.yamlVerify the deployment
Check the pods:
kubectl get pods -n microcks
--- OUTPUT ---
NAME                                           READY   STATUS    RESTARTS       AGE
microcks-7f9f994fbc-jd7pb                      1/1     Running   0              19m
microcks-keycloak-5cf68c6b65-xjr6n             1/1     Running   3 (3m1s ago)   19m
microcks-keycloak-postgresql-6665b755f-zjdrl   1/1     Running   0              19m
microcks-mongodb-7ddff9f544-8rdcx              1/1     Running   0              19m
microcks-postman-runtime-5699859b86-58mr7      1/1     Running   0              19m
Wait until all pods are in the Running state and containers are ready.
You can also check the Gateway API routes:
kubectl get httproute -n microcks
--- OUTPUT ---
NAME                HOSTNAMES                          AGE
microcks            ["microcks.<YOUR_DOMAIN>.com"]     3m34s
microcks-keycloak   ["keycloak.<YOUR_DOMAIN>.com"]     3m34s
The routes should reference the Microcks and Keycloak hostnames configured earlier.
At this point, Microcks should be accessible through:
https://microcks.<YOUR_DOMAIN>.com
https://microcks-grpc.<YOUR_DOMAIN>.com
https://keycloak.<YOUR_DOMAIN>.com
You now have Microcks running on an OVHcloud Managed Kubernetes Service cluster, exposed through Gateway API and secured with TLS certificates managed by cert-manager.
Conclusion and what's next
In this blog post, you deployed Microcks on an OVHcloud Managed Kubernetes Service cluster and exposed it using Envoy Gateway's Kubernetes Gateway API implementation and an OVHcloud Public Cloud Load Balancer. TLS certificates are managed with cert-manager and Let's Encrypt.
You can now mock and test APIs directly from an MKS cluster.
For a production environment, another option would be to use OVHcloud Managed Databases for PostgreSQL and MongoDB instead of running these database components directly in the Kubernetes cluster. This approach separates the application platform from the database infrastructure and lets you take advantage of managed database services.
Ready to try it? Create your first Managed Kubernetes cluster and deploy Microcks in under 30 minutes. To follow the latest features coming to OVHcloud Public Cloud products, take a look at the Cloud Roadmap & Changelog.