

Several months ago, we released the Beta version of the OVHcloud Secret Manager and we guided you how to manage your secrets thanks to the existing External Secret Operator (ESO) Hashicorp Vault provider.
As our Secret Manager is now in General Availability, our teams worked on the development of an OVHcloud ESO Provider now available in the ESO v2.3.0 new release 🎉.
In this blog post, you will learn how to create a new secret in the OVHcloud Secret Manager and how to manage it within your Kubernetes clusters through the OVHcloud ESO provider.
External Secrets Operator (ESO)
The External Secrets Operator (ESO), a CNCF sanbox project since 2022, is a Kubernetes operator that integrates external secret management systems.
The operator reads the information from an external APIs and automatically injects the values into a Kubernetes Secret. If the secret changes in the external API, the operator updates the secret in the Kubernetes cluster.
The ESO connects to an external Secret Manager, such as OVHcloud, Vault, AWS, or GCP, via a provider configured in a (Cluster)SecretStore. An ExternalSecret resource then specifies which secrets to retrieve. ESO fetches those values and creates a corresponding Kubernetes Secret within the cluster.

For more details, read the ESO official documentation.
Prerequisites
To be able to use the ESO OVHcloud provider, you need to follow some prerequisites:
- Have an OVHcloud account
- Created an OKMS domain (“305db938-331f-454d-83a7-3a0a29291661” for example in this blog post)
- Created an IAM local user (“secretmanager-305db938-331f-454d-83a7-3a0a29291661” for example in this blog post)
- Installed the OVHcloud CLI
- Have a Kubernetes cluster
The ESO OVH provider supports both token and mTLS authentication. In this blog post, we will use the token authentication mode. Please follow the OVHcloud ESO provider guide if you wish to use mTLS authentication mode.
Generate a PAT token (For token authentication only)
The ESO (Cluster)SecretStore needs the permission to fetch secrets from Secret Manager.
If you want to use token autentication, you’ll need a token (PAT). You can use the ovhcloud CLI to do that:
PAT_TOKEN=$(ovhcloud iam user token create <iam-local-user-name> --name pat-<iam-local-user-name> --description "PAT secret manager for domain <okms-id>" -o json  | jq .details.token |  tr -d '"')

echo $PAT_TOKEN
<your-token>
You should have a result like this:
$ PAT_TOKEN=$(ovhcloud iam user token create secretmanager-305db938-331f-454d-83a7-3a0a29291661 --name pat-secretmanager-305db938-331f-454d-83a7-3a0a29291661 --description "PAT secret manager for domain 305db938-331f-454d-83a7-3a0a29291661" -o json  | jq .details.token |  tr -d '"')
2026/04/07 14:07:45 Final parameters:
{
 "description": "PAT secret manager for domain 305db938-331f-454d-83a7-3a0a29291661",
 "name": "pat-secretmanager-305db938-331f-454d-83a7-3a0a29291661"
}

$ echo $PAT_TOKEN
eyJhbGciOiJFZERTQSIsImtpZCI6IjgzMkFGNUE5ODg3MzFCMDNGM0EzMTRFMDJFRUJFRjBGNDE5MUY0Q0YiLCJraW5kIjoicGF0IiwidHlwIjoiSldUIn0.eyJ0b2tlbiI6InBBSFh1WE5JdVNHYVpmV3F2OUFzVmJrU3UwR2UySTJrdFU0OGdTZkwyZ1k9In0.-VDbiUf4vNm1KB9qSv7i4sGMCvxs_EuZFAETB-eaOFf3IX8-9m7akN800--ASgXy55_DDFHdy4Z5uSq8lww-Bw
Encode the PAT token in base 64 and save it in an environment variable:
export PAT_TOKEN_B64=$(echo -n $PAT_TOKEN | base64)
echo $PAT_TOKEN_B64
Retrieve and save the KMS information
List the OKMS domains:
$ ovhcloud okms list
┌──────────────────────────────────────┬─────────────┐
│                  id                  │   region    │
├──────────────────────────────────────┼─────────────┤
│ 305db938-331f-454d-83a7-3a0a29291661 │ eu-west-par │
│ xxxxxxxx-xxxx-xxxx-xxxx-xxxxxxxxxxxx │ eu-west-par │
└──────────────────────────────────────┴─────────────┘
Save the KMS endpoint and the OKMS ID in two environment variables. For example:
export OKMS_ID="305db938-331f-454d-83a7-3a0a29291661"
export KMS_ENDPOINT=$(ovhcloud okms get 305db938-331f-454d-83a7-3a0a29291661 -o json | jq .restEndpoint | xargs)
Create a secret in the Secret Manager
In the OVHcloud Control Panel (UI), go to ‘Secret Manager’ section and click on the Create a secret button.
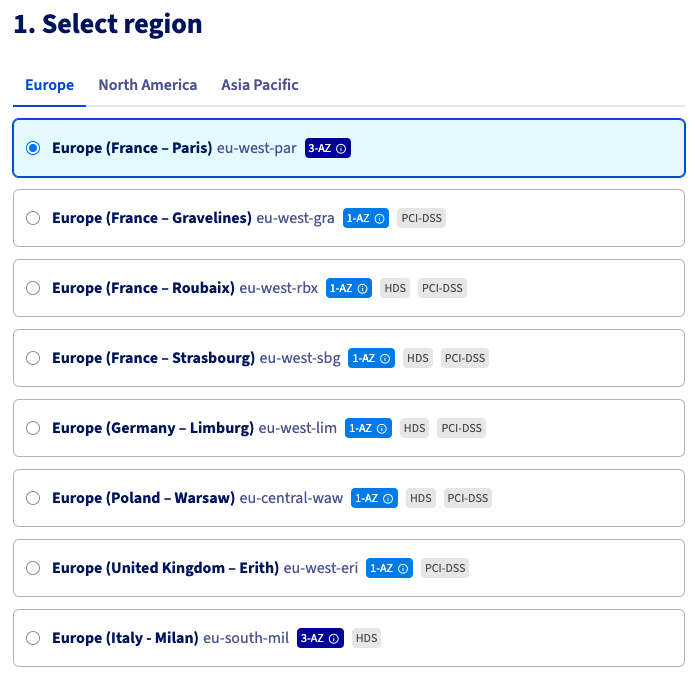
Then in order to create a secret ‘prod/eu-west-par/dockerconfigjson’, in the Europe region (France – Paris) eu-west-par, choose this region:
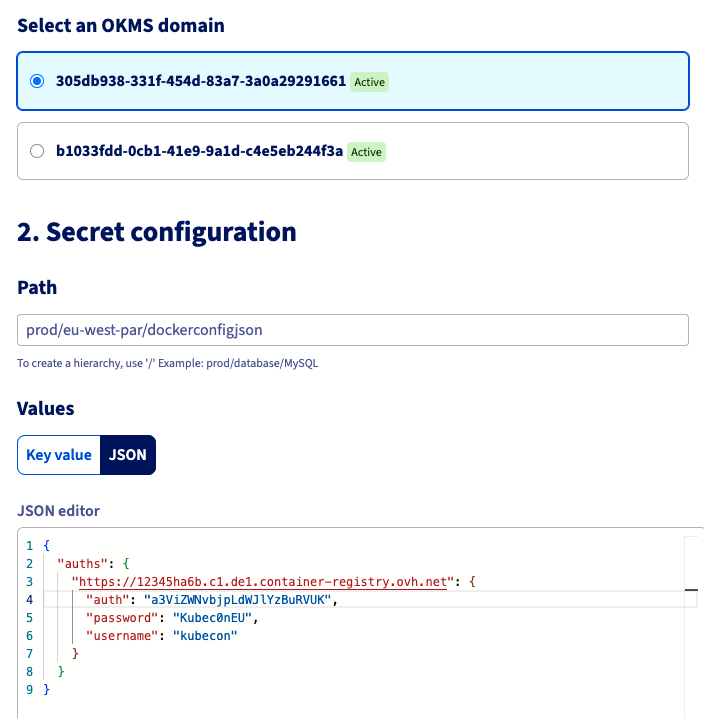
Then, choose the OKMS domain and create”prod/eu-west-par/dockerconfigjson” in the path and fill the content:
Finally, click on the Create button to finalise the creation of the new secret.
Install or update the ESO
If you’d never installed ESO in your Kubernetes cluster, you can install it via Helm:
helm repo add external-secrets https://charts.external-secrets.io
helm repo update

helm install external-secrets \
   external-secrets/external-secrets \
    -n external-secrets \
    --create-namespace \
    --set installCRDs=true
If you already installed it, now you should update it in order to use this new provider:
helm upgrade external-secrets external-secrets/external-secrets -n external-secrets⚠️ In order to use the OVHcloud provider, you need to have a running instance of ESO equals to version 2.3.0 or more.
$ helm list -n external-secrets

NAME            	NAMESPACE       	REVISION	UPDATED                              	STATUS  	CHART                 	APP VERSION
external-secrets	external-secrets	1       	2026-04-13 13:56:29.071329 +0200 CEST	deployed	external-secrets-2.3.0	v2.3.0
Let’s deploy a Secret in Kubernetes using the ESO provider!
Deploy a ClusterSecretStore to connect ESO to Secret Manager
Set up a ClusterSecretStore to manage synchronization with Secret Manager.
It will use the OVHcloud provider with token authorization mode, and the OKMS endpoint as the backend.
Create a clustersecretstore.yaml.template file with the content below:
apiVersion: external-secrets.io/v1
kind: ClusterSecretStore
metadata:
  name: secret-store-ovh
spec:
  provider:
    ovh:
      server: "$KMS_ENDPOINT" # for example: "https://eu-west-rbx.okms.ovh.net"
      okmsid: "$OKMS_ID" # for example: "734b9b45-8b1a-469c-b140-b10bd6540017"
      auth:
        token:
          tokenSecretRef:
            name: ovh-token
            namespace: external-secrets
            key: token
---
apiVersion: v1
kind: Secret
metadata:
  name: ovh-token
  namespace: external-secrets
data:
  token: $PAT_TOKEN_B64
Generate the clustersecretstore.yaml file from the environment variables you defined:
envsubst < clustersecretstore.yaml.template > clustersecretstore.yamlYou should obtain a file filled with the OVHcloud KMS information:
apiVersion: external-secrets.io/v1
kind: ClusterSecretStore
metadata:
  name: secret-store-ovh
spec:
  provider:
    ovh:
      server: "https://eu-west-par.okms.ovh.net" # for example: "https://eu-west-rbx.okms.ovh.net"
      okmsid: "xxxxxxxx-xxxx-xxxx-xxxx-xxxxxxxxxxxx" # for example: "734b9b45-8b1a-469c-b140-b10bd6540017"
      auth:
        token:
          tokenSecretRef:
            name: ovh-token
            namespace: external-secrets
            key: token
---
apiVersion: v1
kind: Secret
metadata:
  name: ovh-token
  namespace: external-secrets
data:
  token: ZXlK...UJ3
Apply it in your Kubernetes cluster:
kubectl apply -f clustersecretstore.yamlCheck:
$ kubectl get clustersecretstore.external-secrets.io/secret-store-ovh

NAME               AGE   STATUS   CAPABILITIES   READY
secret-store-ovh   7s    Valid    ReadWrite      True
Create an ExternalSecret
Create an externalsecret.yaml file with the content below:
apiVersion: external-secrets.io/v1
kind: ExternalSecret
metadata:
  name: docker-config-secret
  namespace: external-secrets
spec:
  refreshInterval: 30m
  secretStoreRef:
    name: secret-store-ovh
    kind: ClusterSecretStore
  target:
    template:
      type: kubernetes.io/dockerconfigjson
      data:
        .dockerconfigjson: "{{ .mysecret | toString }}"
    name: ovhregistrycred
    creationPolicy: Owner
  data:
  - secretKey: ovhregistrycred
    remoteRef:
      key: prod/eu-west-par/dockerconfigjson
Apply it:
$ kubectl apply -f externalsecret.yaml

externalsecret.external-secrets.io/docker-config-secret created
Check:
$ kubectl get externalsecret.external-secrets.io/docker-config-secret -n external-secrets

NAME                   STORETYPE            STORE              REFRESH INTERVAL   STATUS         READY   LAST SYNC
docker-config-secret   ClusterSecretStore   secret-store-ovh   30m                SecretSynced   True    4s
After applying this command, it will create a Kubernetes Secret object.
$ kubectl get secret ovhregistrycred -n external-secrets

NAME              TYPE                             DATA   AGE
ovhregistrycred   kubernetes.io/dockerconfigjson   1      49s
The Kubernetes Secret have been created 🎉
We created a Secret directly from the key, but the OVHcloud ESO provider allows you to fetch the original secret from different parameters (fetch the whole secret, fetch nested values, fetch multiple secrets…), according to your needs.
Conclusion
In this blog, we’ve explained how to create secrets in the OVHcloud Secret Manager and then integrate them directly in your Kubernetes clusters using the new ESO OVHcloud provider.
With this brand new OVHcloud provider, you will have a smoother integration between the Secret Manager and your Kubernetes clusters with ESO.
Our team are working on several other integrations, so stay tuned, and please share your thoughts with us!
Developer Advocate at OVHcloud, specialized in Cloud Native, Infrastructure as Code (IaC) & Developer eXperience (DX).
She is recognized as a Docker Captain, CNCF ambassador, GDE & Women techmakers Ambassador.
She has been working as a Developer and Ops for over 20 years. Cloud enthusiast and advocates DevOps/Cloud/Golang best practices.
Technical writer, a sketchnoter and a speaker at international conferences.
Book author, she created a new visual way for people to learn and understand Cloud technologies: "Understanding Kubernetes / Docker / Istio in a visual way" in sketchnotes, books and videos.