
What if an n8n workflow, deployed in a sovereign environment, saved you time while giving you peace of mind? From document ingestion to targeted response generation, n8n acts as the conductor of your RAG pipeline without compromising data protection.
In the current landscape of AI agents and knowledge assistants, connecting your internal documentation with Large Language Models (LLMs) is becoming a strategic differentiator.
How? By building Agentic RAG systems capable of retrieving, reasoning, and acting autonomously based on external knowledge.
To make this possible, engineers need a way to connect retrieval pipelines (RAG) with tool-based orchestration.
This article outlines a reference architecture for building a fully automated RAG pipeline orchestrated by n8n, leveraging OVHcloud AI Endpoints and PostgreSQL with pgvector as core components.
The final result will be a system that automatically ingests Markdown documentation from Object Storage, creates embeddings with OVHcloud’s BGE-M3 model available on AI Endpoints, and stores them in a Managed Database PostgreSQL with pgvector extension.
Lastly, you’ll be able to build an AI Agent that lets you chat with an LLM (GPT-OSS-120B on AI Endpoints). This agent, utilising the RAG implementation carried out upstream, will be an expert on OVHcloud products.
You can further improve the process by using an LLM guard to protect the questions sent to the LLM, and set up a chat memory to use conversation history for higher response quality.
But what about n8n?
n8n, the open-source workflow automation tool, offers many benefits and connects seamlessly with over 300 APIs, apps, and services:
- Open-source: n8n is a 100% self-hostable solution, which means you retain full data control;
- Flexible: combines low-code nodes and custom JavaScript/Python logic;
- AI-ready: includes useful integrations for LangChain, OpenAI, and embedding support capabilities;
- Composable: enables simple connections between data, APIs, and models in minutes;
- Sovereign by design: compliant with privacy-sensitive or regulated sectors.
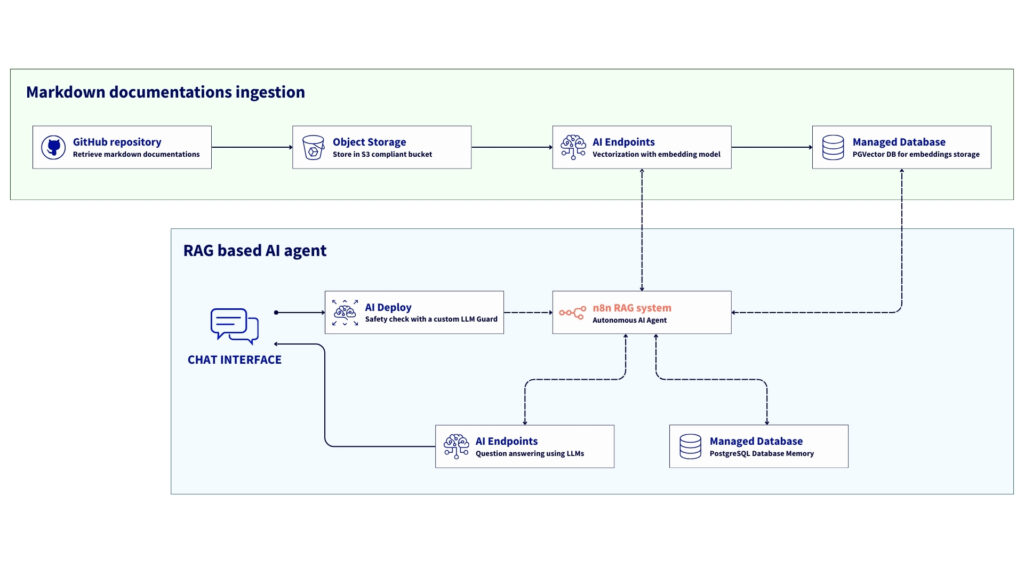
This reference architecture serves as a blueprint for building a sovereign, scalable Retrieval Augmented Generation (RAG) platform using n8n and OVHcloud Public Cloud solutions.
This setup shows how to orchestrate data ingestion, generate embedding, and enable conversational AI by combining OVHcloud Object Storage, Managed Databases with PostgreSQL, AI Endpoints and AI Deploy.The result? An AI environment that is fully integrated, protects privacy, and is exclusively hosted on OVHcloud’s European infrastructure.
Overview of the n8n workflow architecture for RAG
The workflow involves the following steps:
- Ingestion: documentation in markdown format is fetched from OVHcloud Object Storage (S3);
- Preprocessing: n8n cleans and normalises the text, removing YAML front-matter and encoding noise;
- Vectorisation: Each document is embedded using the BGE-M3 model, which is available via OVHcloud AI Endpoints;
- Persistence: vectors and metadata are stored in OVHcloud PostgreSQL Managed Database using pgvector;
- Retrieval: when a user sends a query, n8n triggers a LangChain Agent that retrieves relevant chunks from the database;
- Reasoning and actions: The AI Agent node combines LLM reasoning, memory, and tool usage to generate a contextual response or trigger downstream actions (Slack reply, Notion update, API call, etc.).
In this tutorial, all services are deployed within the OVHcloud Public Cloud.
Prerequisites
Before you start, double-check that you have:
- an OVHcloud Public Cloud account
- an OpenStack user with the following roles:
- Administrator
- AI Operator
- Object Storage Operator
- An API key for AI Endpoints
- ovhai CLI available – install the ovhai CLI
- Hugging Face access – create a Hugging Face account and generate an access token
🚀 Now that you have everything you need, you can start building your n8n workflow!
Architecture guide: n8n agentic RAG workflow
You’re all set to configure and deploy your n8n workflow
⚙️ Keep in mind that the following steps can be completed using OVHcloud APIs!
Step 1 – Build the RAG data ingestion pipeline
This first step involves building the foundation of the entire RAG workflow by preparing the elements you need:
- n8n deployment
- Object Storage bucket creation
- PostgreSQL database creation
- and more
Remember to set up the proper credentials in n8n so the different elements can connect and function.
1. Deploy n8n on OVHcloud VPS
OVHcloud provides VPS solutions compatible with n8n. Get a ready-to-use virtual server with pre-installed n8n and start building automation workflows without manual setup. With plans ranging from 6 vCores / 12 GB RAM to 24 vCores / 96 GB RAM, you can choose the capacity that suits your workload.
How to set up n8n on a VPS?
Setting up n8n on an OVHcloud VPS generally involves:
- Choosing and provisioning your OVHcloud VPS plan;
- Connecting to your server via SSH and carrying out the initial server configuration, which includes updating the OS;
- Installing n8n, typically with Docker (recommended for ease of management and updates), or npm by following this guide;
- Configuring n8n with a domain name, SSL certificate for HTTPS, and any necessary environment variables for databases or settings.
While OVHcloud provides a robust VPS platform, you can find detailed n8n installation guides in the official n8n documentation.
Once the configuration is complete, you can configure the database and bucket in Object Storage.
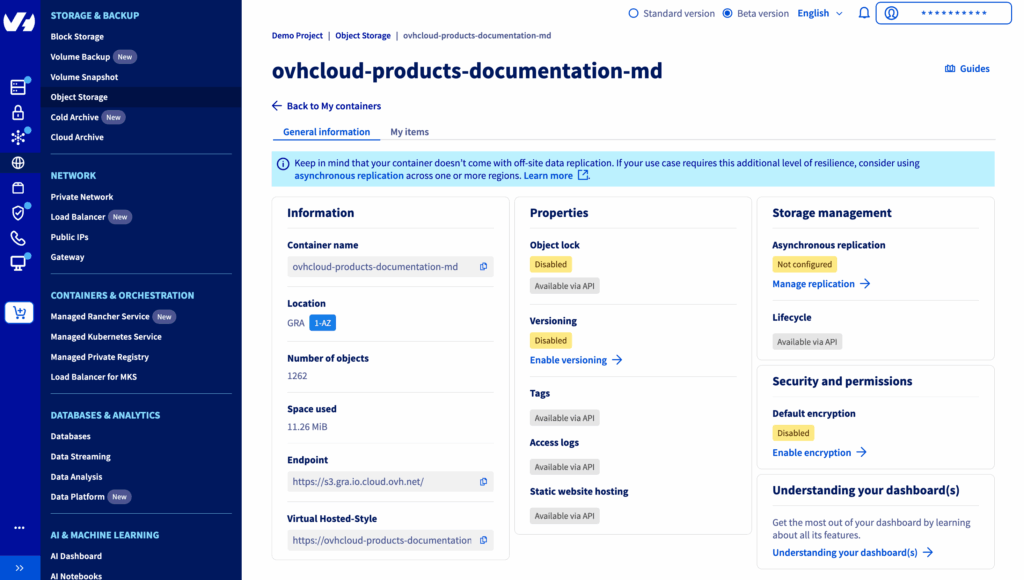
2. Create Object Storage bucket
First, you have to set up your data source. Here you can store all your documentation in an S3-compatible Object Storage bucket.
Here, assume that all the documentation files are in Markdown format.
From OVHcloud Control Panel, create a new Object Storage container with S3-compatible API solution; follow this guide.
When the bucket is ready, add your Markdown documentation to it.
Note: For this tutorial, we’re using the various OVHcloud product documentation available in Open-Source on the GitHub repository maintained by OVHcloud members.
Click this link to access the repository.
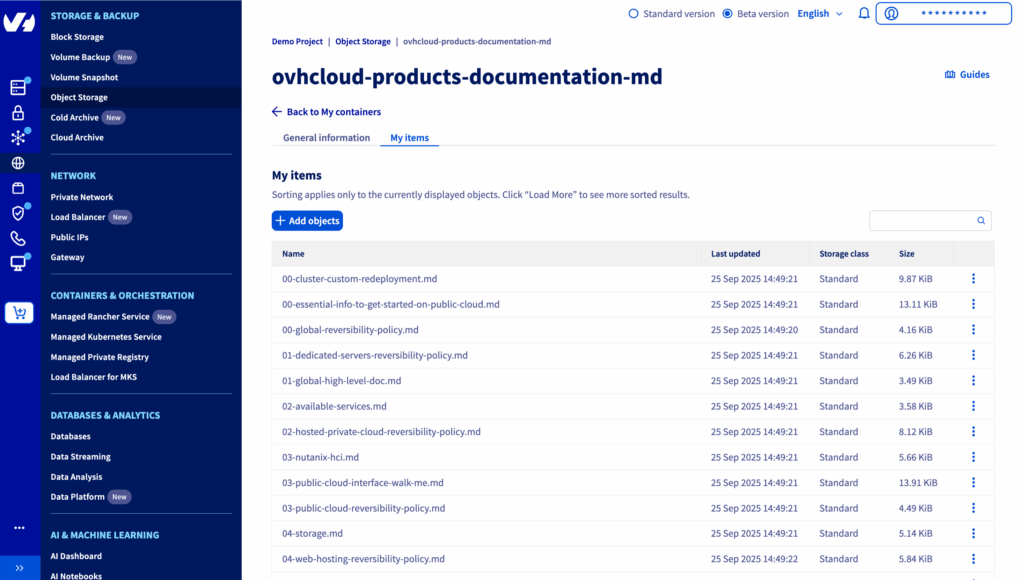
How do you do that? Extract all the guide.en-gb.md files from the GitHub repository and rename each one to match its parent folder.
Example: the documentation about ovhai cli installation docs/pages/public_cloud/ai_machine_learning/cli_10_howto_install_cli/guide.en-gb.md is stored in ovhcloud-products-documentation-md bucket as cli_10_howto_install_cli.md
You should get an overview that looks like this:
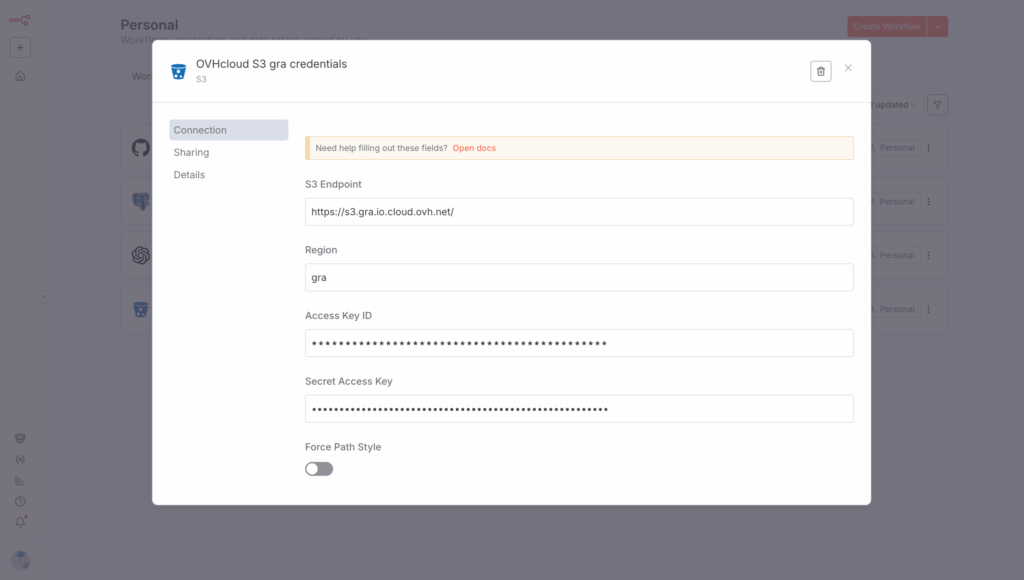
Keep the following elements and create a new credential in n8n named OVHcloud S3 gra credentials:
- S3 Endpoint:
https://s3.gra.io.cloud.ovh.net/ - Region:
gra - Access Key ID:
<your_object_storage_user_access_key> - Secret Access Key:
<your_pbject_storage_user_secret_key>
Then, create a new n8n node by selecting S3, then Get Multiple Files.
Configure this node as follows:
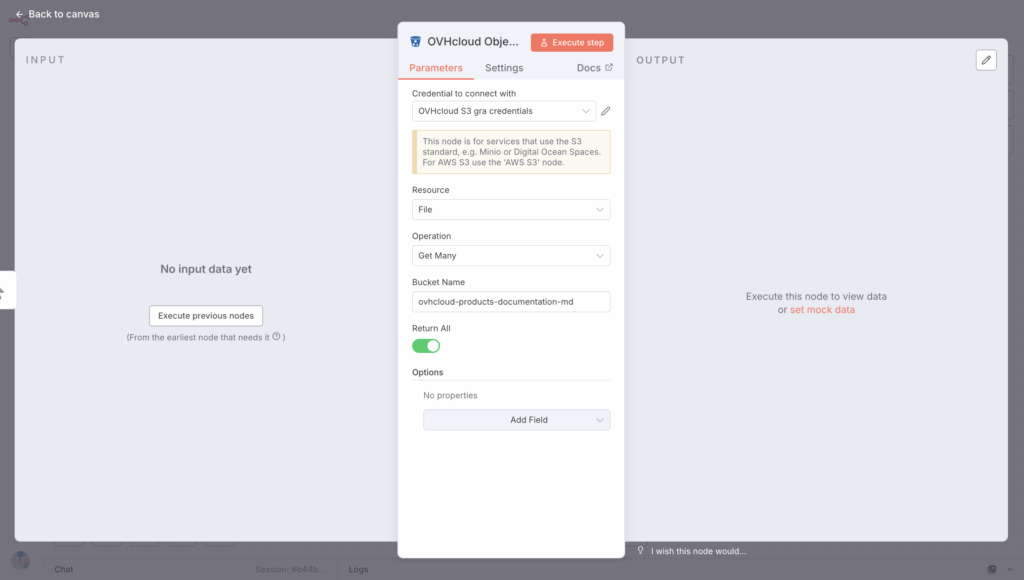
Connect the node to the previous one before moving on to the next step.

With the first phase done, you can now configure the vector DB.
3. Configure PostgreSQL Managed DB (pgvector)
In this step, you can set up the vector database that lets you store the embeddings generated from your documents.
How? By using OVHcloud’s managed databases, a pgvector extension of PostgreSQL. Go to your OVHcloud Control Panel and follow the steps.
1. Navigate to Databases & Analytics > Databases
2. Create a new database and select PostgreSQL and a datacenter location
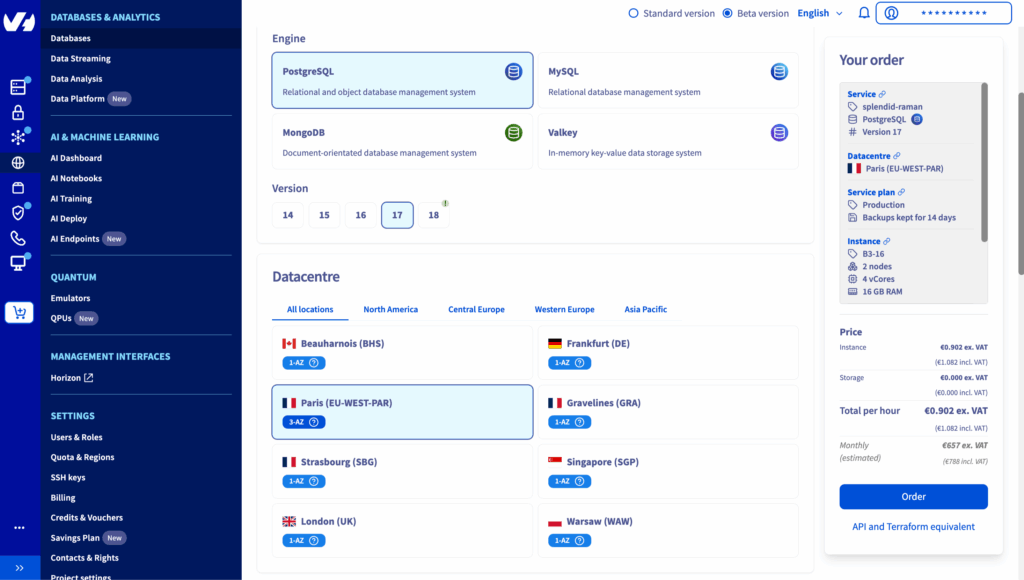
3. Select Production plan and Instance type
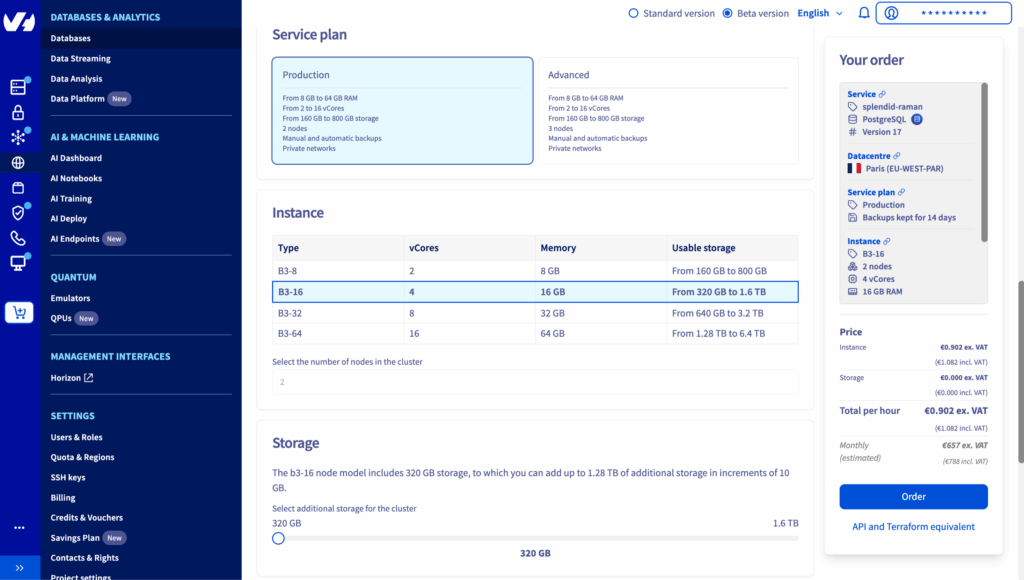
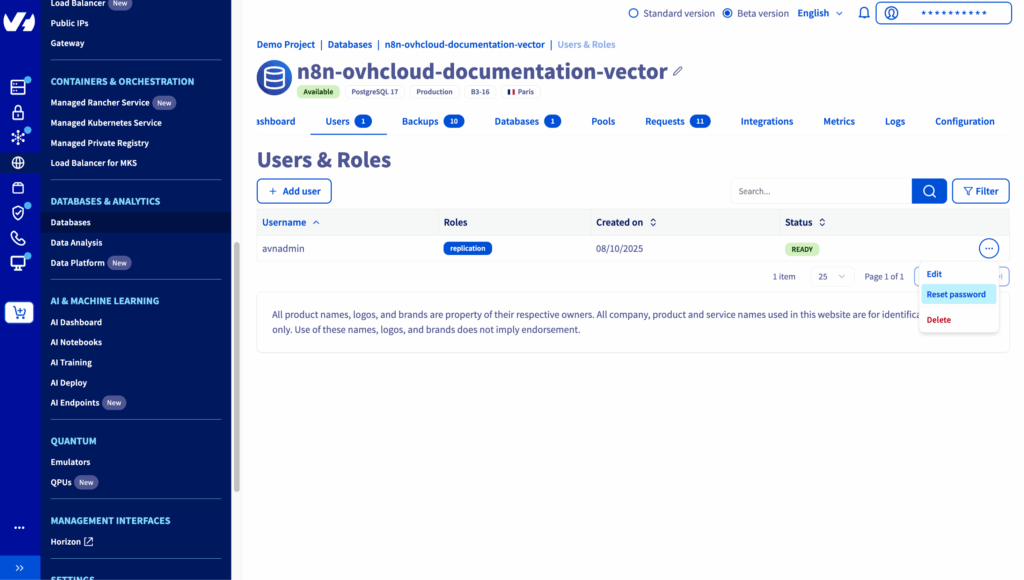
4. Reset the user password and save it
5. Whitelist the IP of your n8n instance as follows
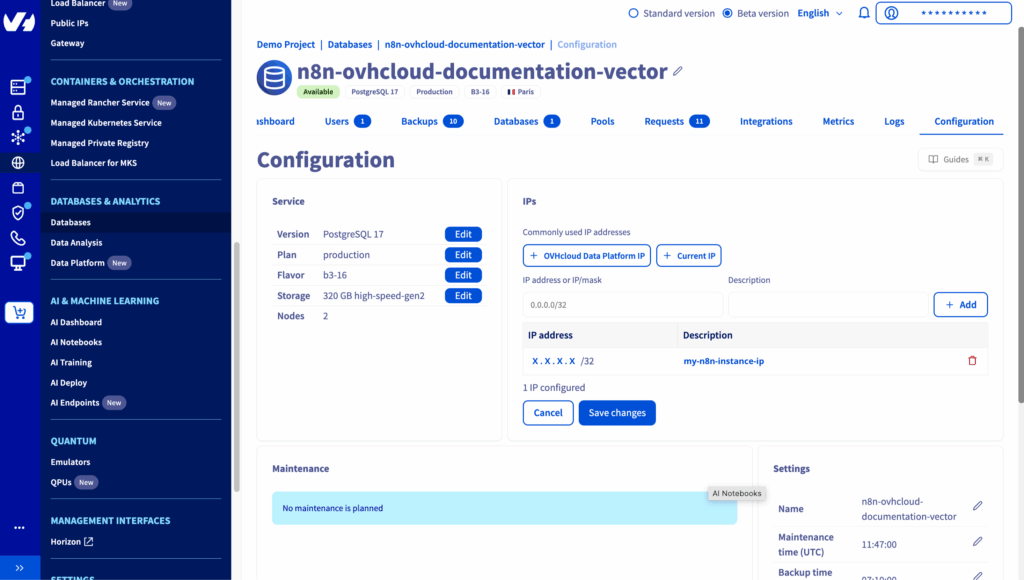
6. Take note of te following parameters
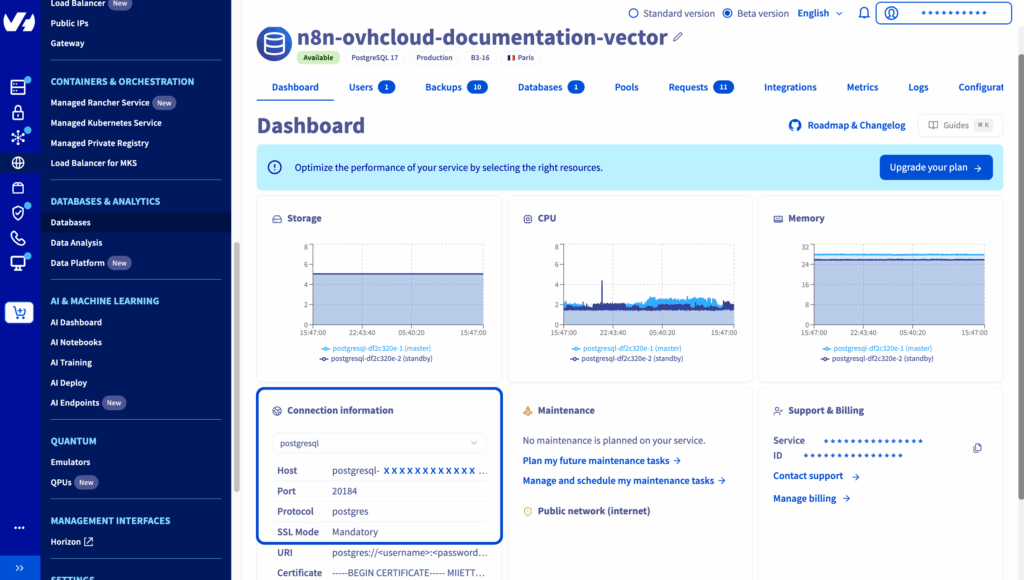
Make a note of this information and create a new credential in n8n named OVHcloud PGvector credentials:
- Host:
<db_hostname> - Database: defaultdb
- User:
avnadmin - Password:
<db_password> - Port: 20184
Consider enabling the Ignore SSL Issues (Insecure) button as needed and setting the Maximum Number of Connections value to 1000.
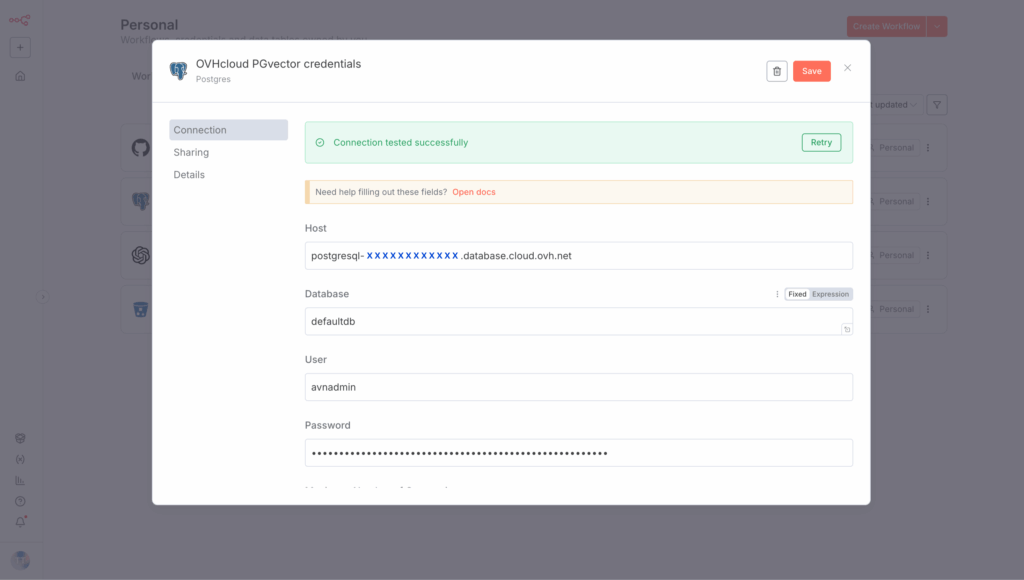
✅ You’re now connected to the database! But what about the PGvector extension?
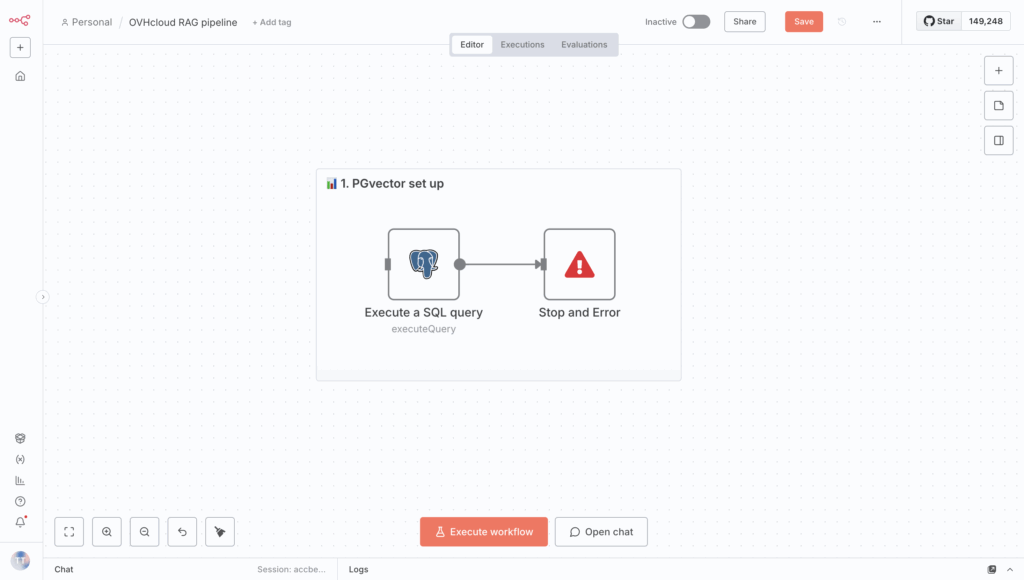
Add a PosgreSQL node in your n8n workflow Execute a SQL query, and create the extension through an SQL query, which should look like this:
-- drop table as needed
DROP TABLE IF EXISTS md_embeddings;

-- activate pgvector
CREATE EXTENSION IF NOT EXISTS vector;

-- create table
CREATE TABLE md_embeddings (
    id SERIAL PRIMARY KEY,
    text TEXT,
    embedding vector(1024),
    metadata JSONB
);
You should get this n8n node:
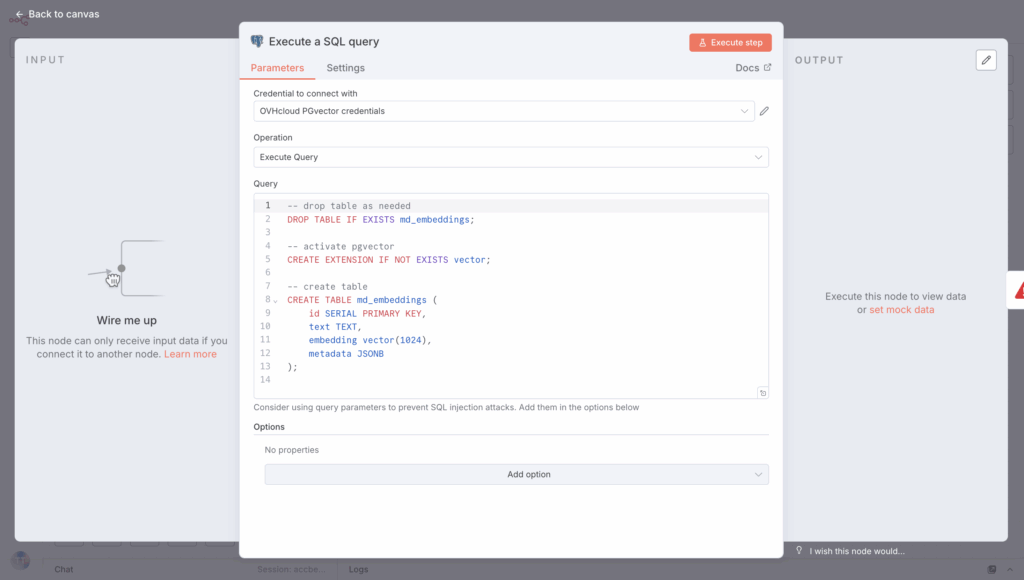
Finally, you can create a new table and name it md_embeddings using this node. Create a Stop and Error node if you run into errors setting up the table.
All set! Your vector DB is prepped and ready for data! Keep in mind, you still need an embeddings model for the RAG data ingestion pipeline.
4. Access to OVHcloud AI Endpoints
OVHcloud AI Endpoints is a managed service that provides ready-to-use APIs for AI models, including LLM, CodeLLM, embeddings, Speech-to-Text, and image models hosted within OVHcloud’s European infrastructure.
To vectorise the various documents in Markdown format, you have to select an embedding model: BGE-M3.
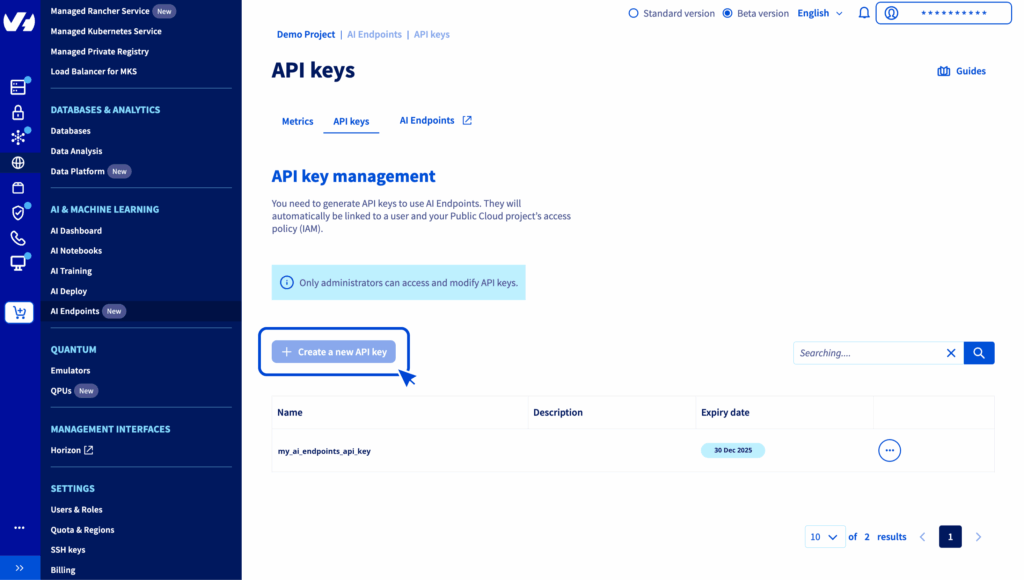
Usually, your AI Endpoints API key should already be created. If not, head to the AI Endpoints menu in your OVHcloud Control Panel to generate a new API key.
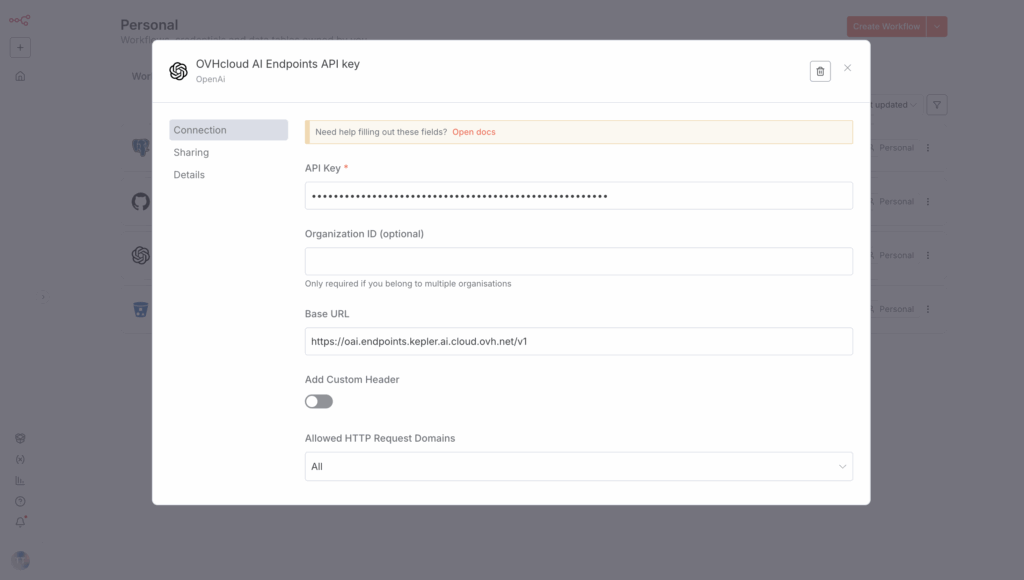
Once this is done, you can create new OpenAI credentials in your n8n.
Why do I need OpenAI credentials? Because AI Endpoints API is fully compatible with OpenAI’s, integrating it is simple and ensures the sovereignty of your data.
How? Thanks to a single endpoint https://oai.endpoints.kepler.ai.cloud.ovh.net/v1, you can request the different AI Endpoints models.
This means you can create a new n8n node by selecting Postgres PGVector Store and Add documents to Vector Store.
Set up this node as shown below:
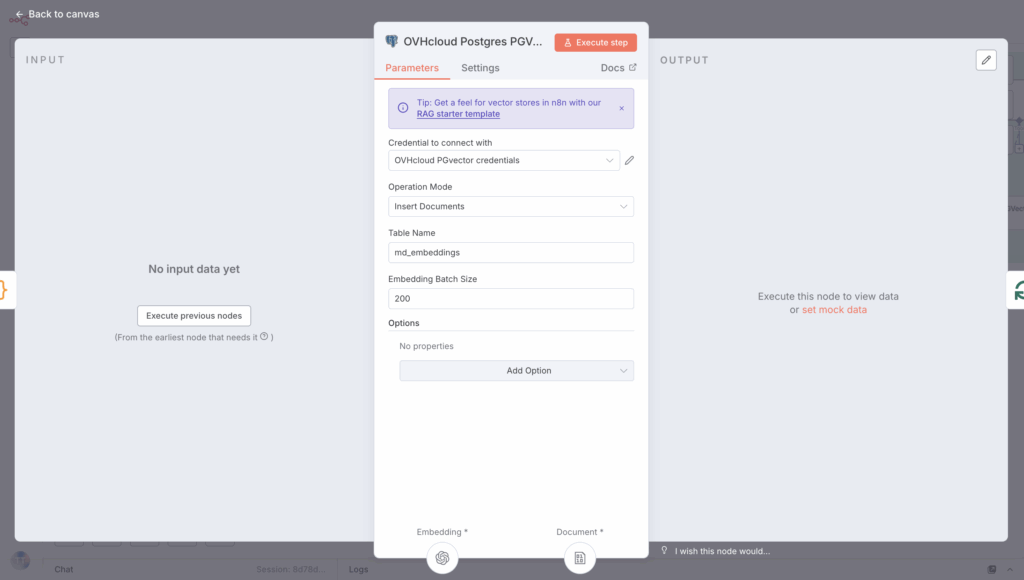
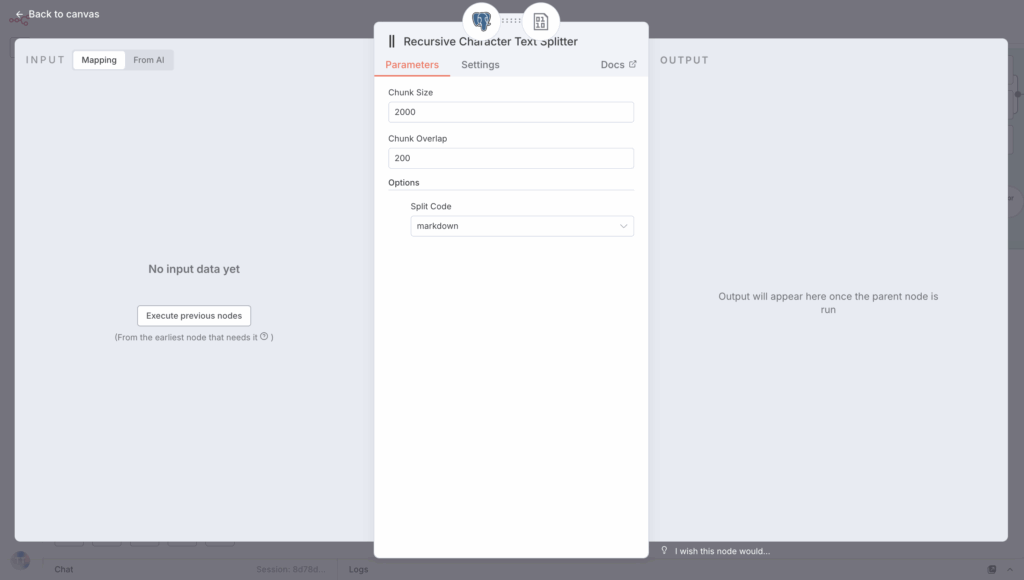
Then configure the Data Loader with a custom text splitting and a JSON type.

For the text splitter, here are some options:
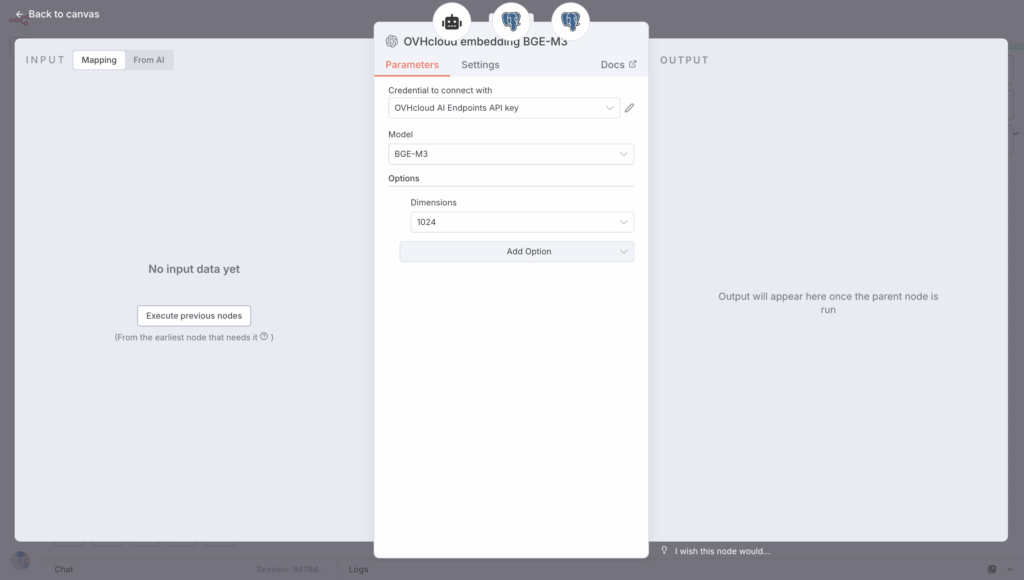
To finish, select the BGE-M3 embedding model from the model list and set the Dimensions to 1024.
You now have everything you need to build the ingestion pipeline.
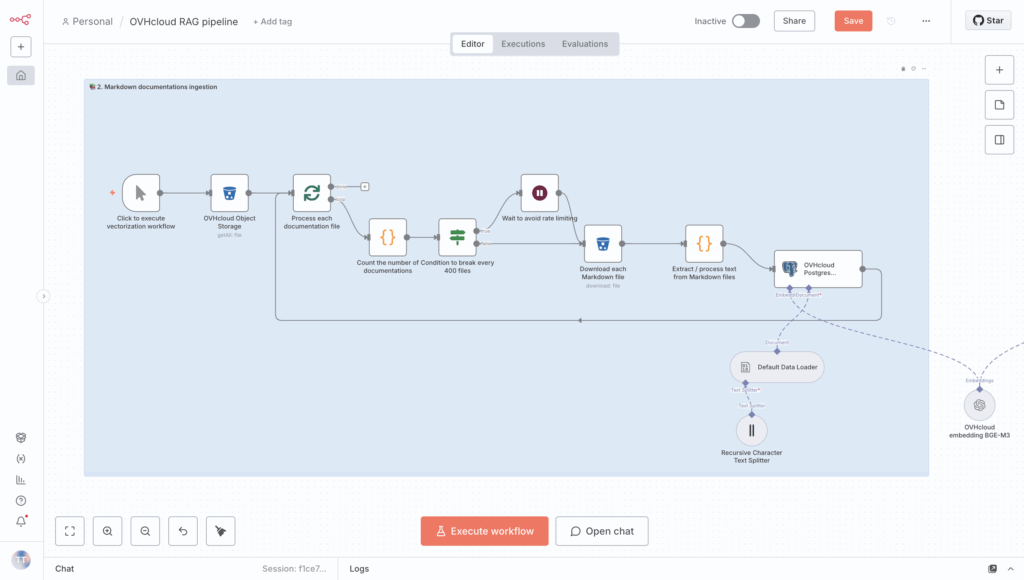
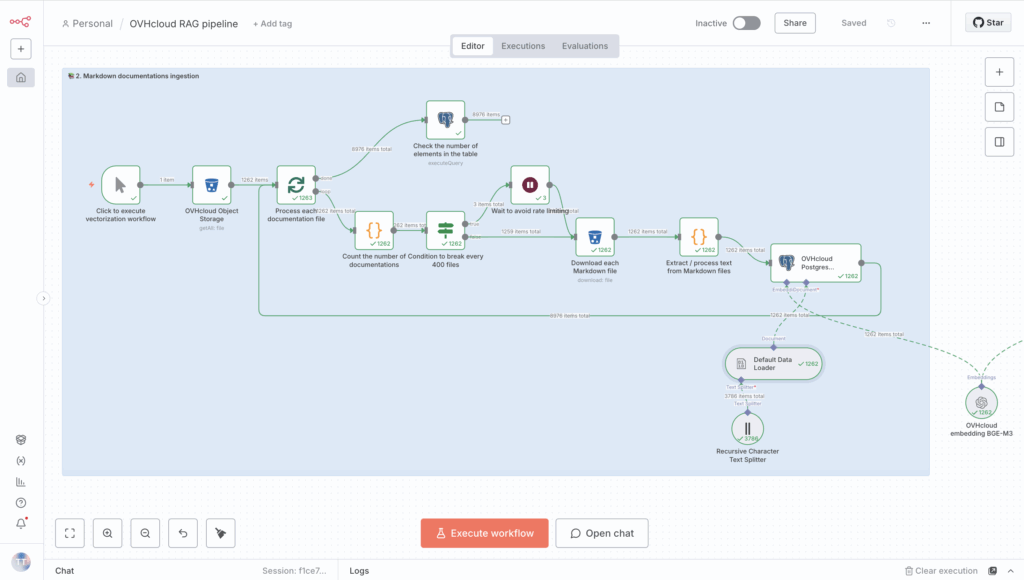
5. Set up the ingestion pipeline loop
To make use of a fully automated document ingestion and vectorisation pipeline, you have to integrate some specific nodes, mainly:
- a
Loop Over Itemsthat downloads each markdown file one by one so that it can be vectorised; - a
Code in JavaScriptthat counts the number of files processed, which subsequently determines the number of requests sent to the embedding model; - an
Ifcondition that allows you to check when the 400 requests have been reached; - a
Waitnode that pauses after every 400 requests to avoid getting rate-limited; - an S3 block
Download a fileto download each markdown; - another
Code in JavaScriptto extract and process text from Markdown files by cleaning and removing special characters before sending it to the embeddings model; - a PostgreSQL node to
Execute a SQLquery to check that the table contains vectors after the process (loop) is complete.
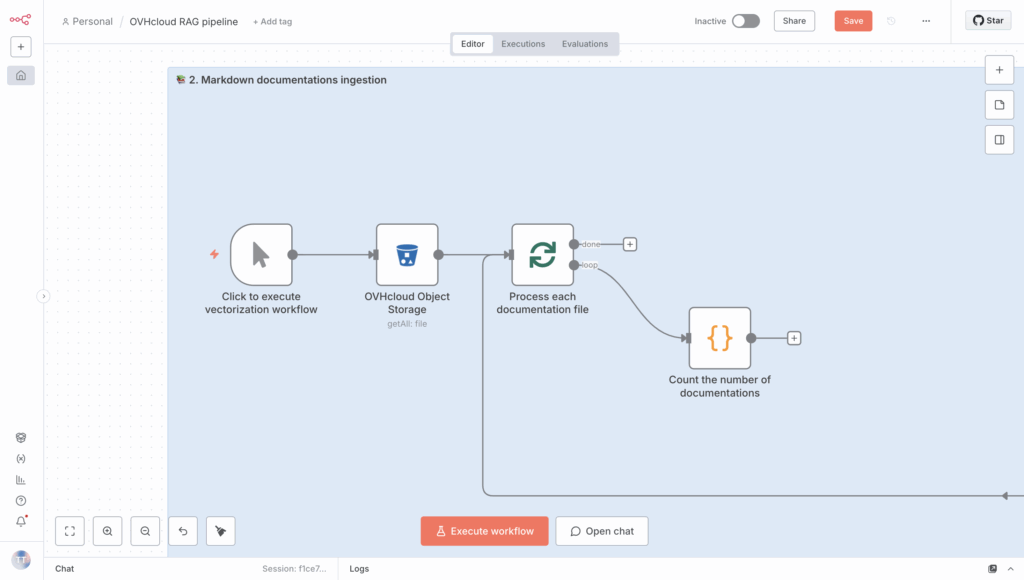
5.1. Create a loop to process each documentation file
Begin by creating a Loop Over Items to process all the Markdown files one at a time. Set the batch size to 1 in this loop.
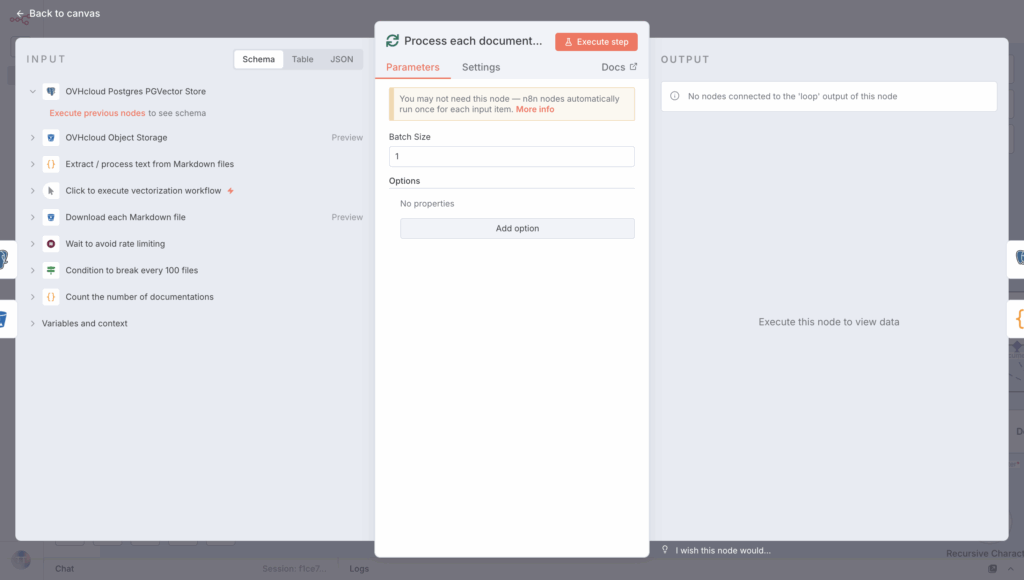
Add the Loop statement right after the S3 Get Many Files node as shown below:
Time to put the loop’s content into action!
5.2. Count the number of files using a code snippet
Next, choose the Code in JavaScript node from the list to see how many files have been processed. Set “Run Once for Each Item” Mode and “JavaScript” code Language, then add the following code snippet to the designated block.
// simple counter per item
const counter = $runIndex + 1;

return {
  counter
};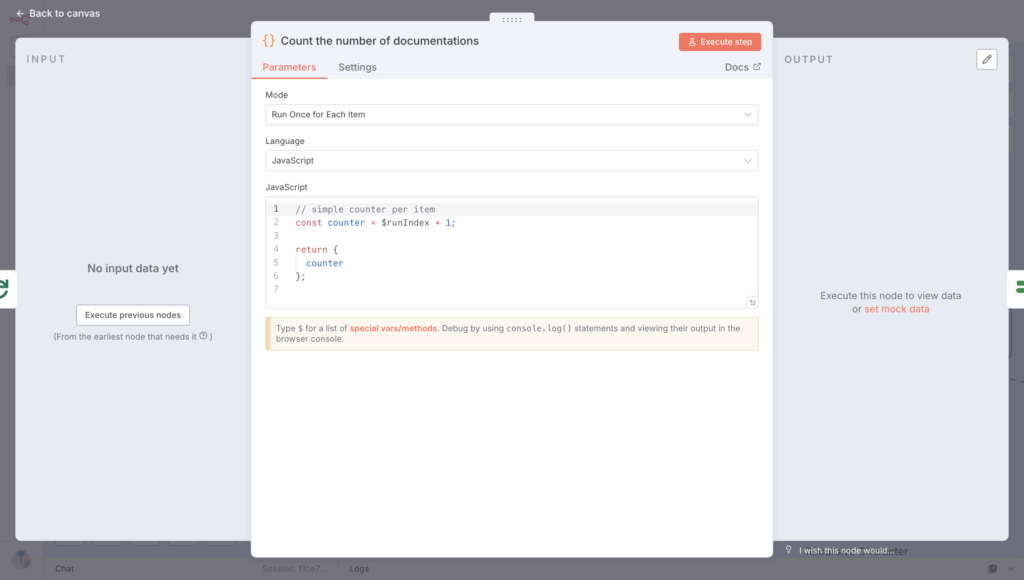
Make sure this code snippet is included in the loop.
You can start adding the if part to the loop now.
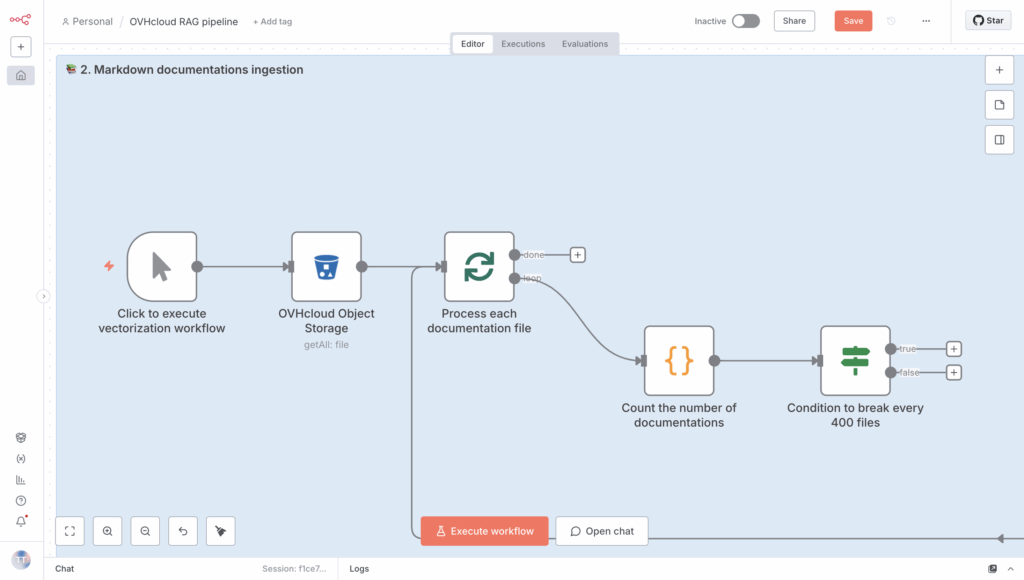
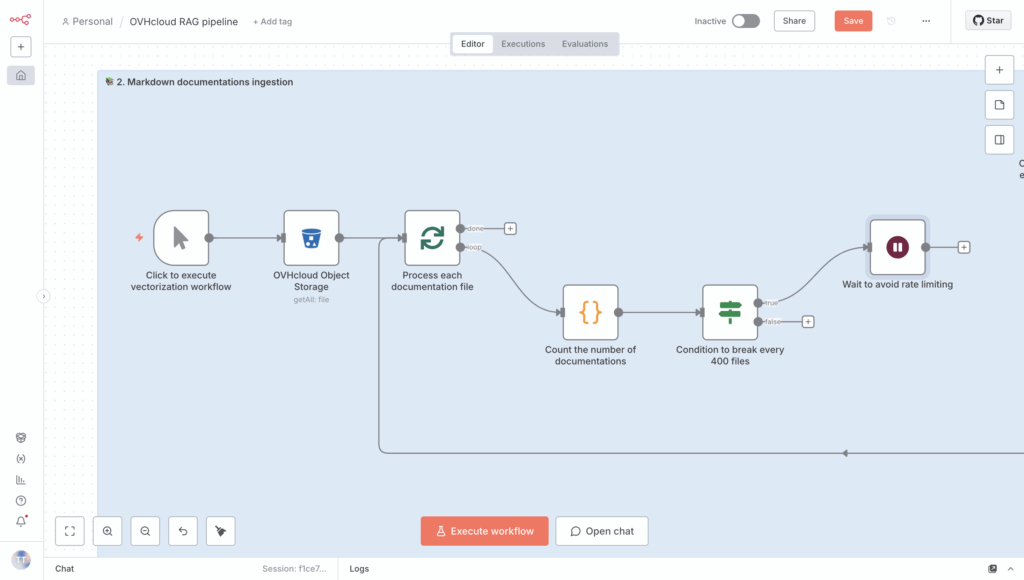
5.3. Add a condition that applies a rule every 400 requests
Here, you need to create an If node and add the following condition, which you have set as an expression.
{{ (Number($json["counter"]) % 400) === 0 }}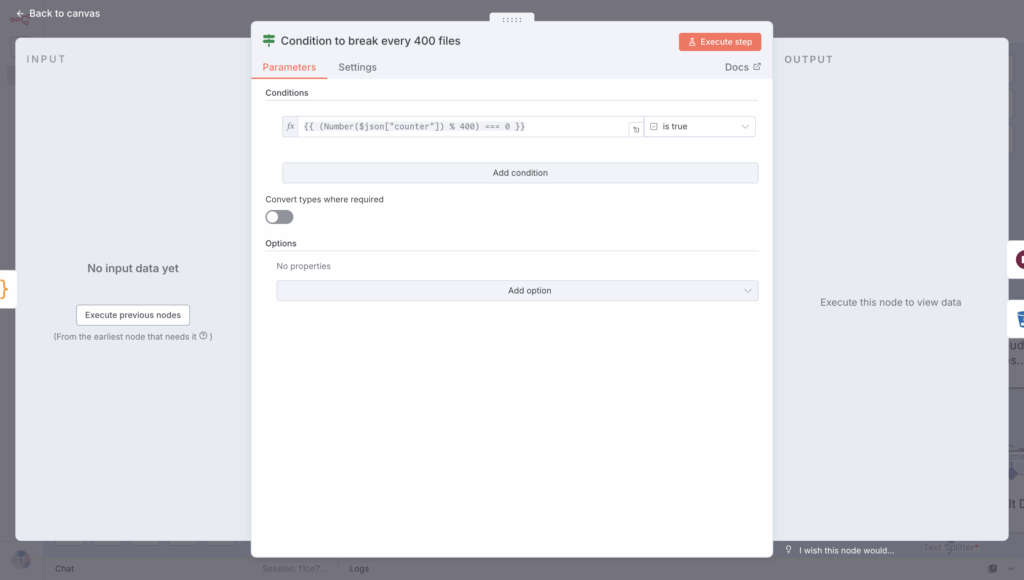
Add it immediately after counting the files:
If this condition is true, trigger the Wait node.
5.4. Insert a pause after each set of 400 requests
Then insert a Wait node to pause for a few seconds before resuming. You can insert Resume “After Time Interval” and set the Wait Amount to “60:00” seconds.
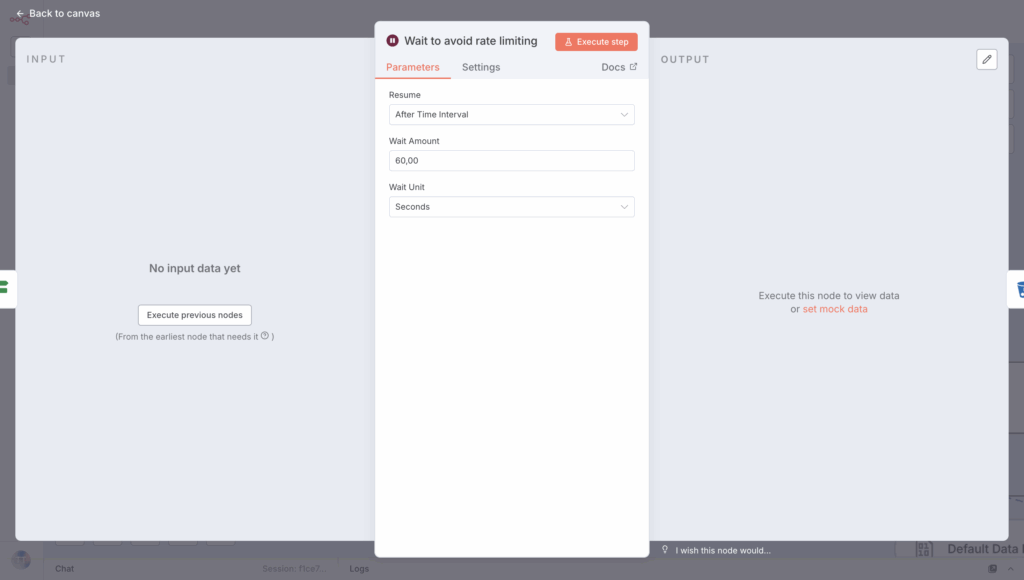
Link it to the If condition when this is True.
Next, you can go ahead and download the Markdown file, and then process it.
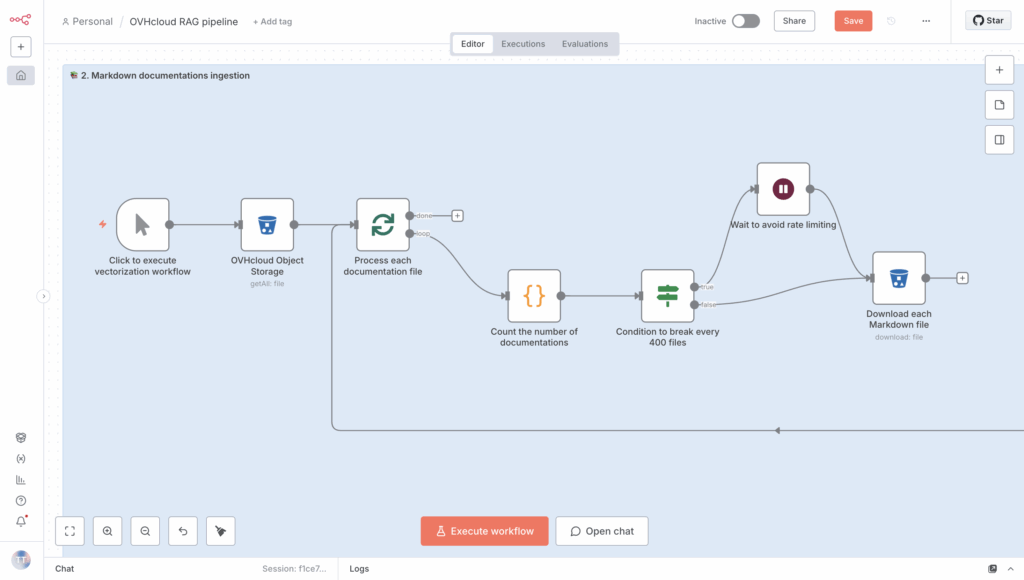
5.5. Launch documentation download
To do this, create a new Download a file S3 node and configure it with this File Key expression:
{{ $('Process each documentation file').item.json.Key }}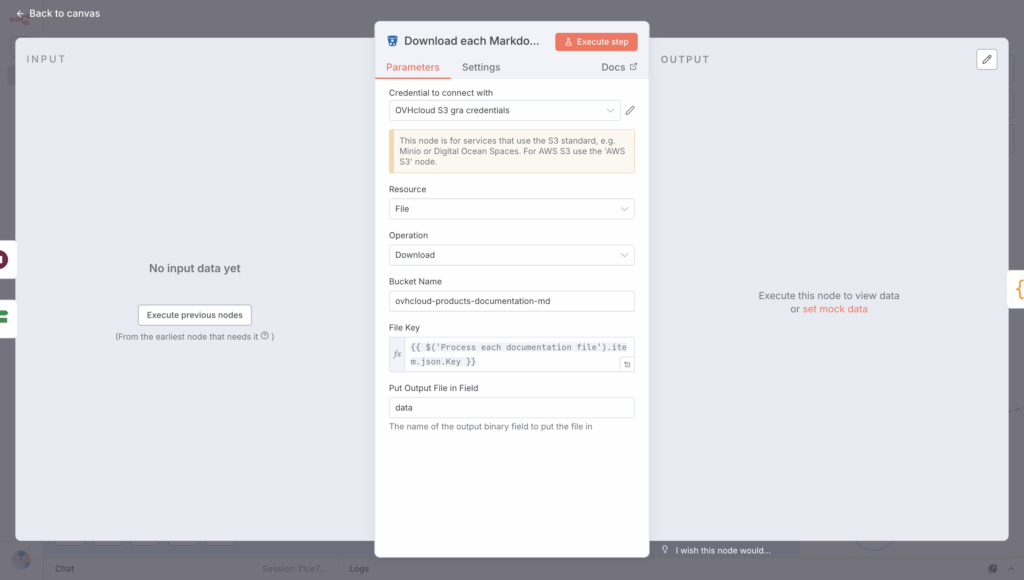
Want to connect it? That’s easy, link it to the output of the Wait and If statements when the ‘if’ statement returns False; this will allow the file to be processed only if the rate limit is not exceeded.
You’re almost done! Now you need to extract and process the text from the Markdown files – clean and remove any special characters before sending it to the embedding model.
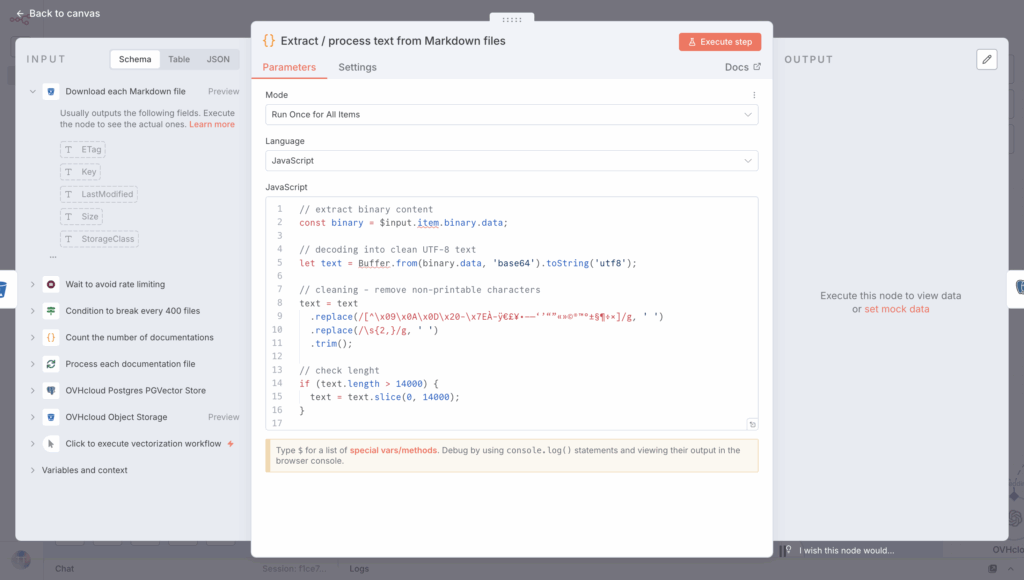
5.6 Clean Markdown text content
Next, create another Code in JavaScript to process text from Markdown files:
// extract binary content
const binary = $input.item.binary.data;

// decoding into clean UTF-8 text
let text = Buffer.from(binary.data, 'base64').toString('utf8');

// cleaning - remove non-printable characters
text = text
  .replace(/[^\x09\x0A\x0D\x20-\x7EÀ-ÿ€£¥•–—‘’“”«»©®™°±§¶÷×]/g, ' ')
  .replace(/\s{2,}/g, ' ')
  .trim();

// check lenght
if (text.length > 14000) {
  text = text.slice(0, 14000);
}

return [{
  text,
  fileName: binary.fileName,
  mimeType: binary.mimeType
}];
Select the “Run Once for Each Item” Mode and place the previous code in the dedicated JavaScript block.
To finish, check that the output text has been sent to the document vectorisation system, which was set up in Step 3 – Configure PostgreSQL Managed DB (pgvector).
How do I confirm that the table contains all elements after vectorisation?
5.7 Double-check that the documents are in the table
To confirm that your RAG system is working, make sure your vector database has different vectors; use a PostgreSQL node with Execute a SQL query in your n8n workflow.
Then, run the following query:
-- count the number of elements
SELECT COUNT(*) FROM md_embeddings;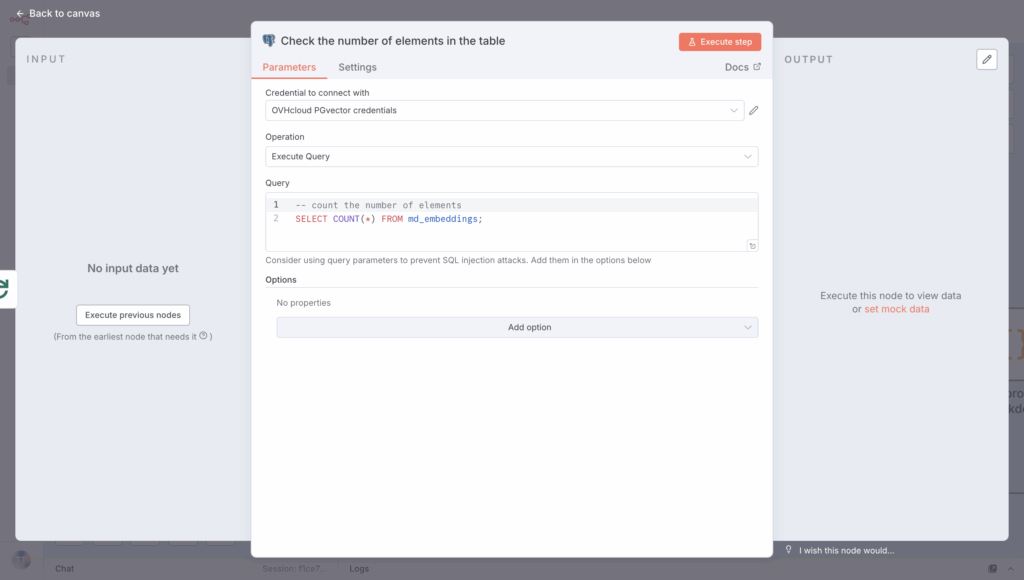
Next, link this element to the Done section of your Loop, so the elements are counted when the process is complete.
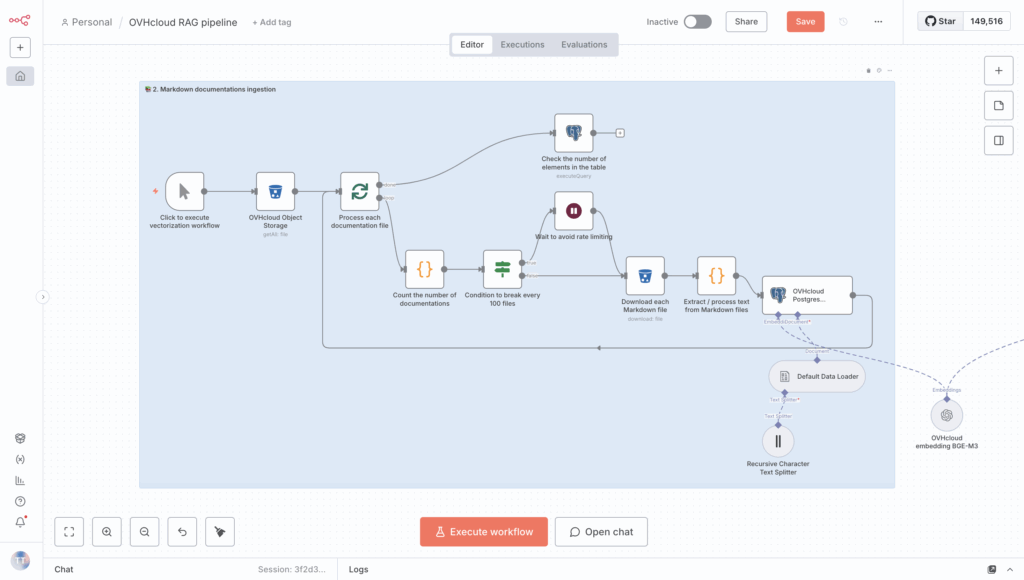
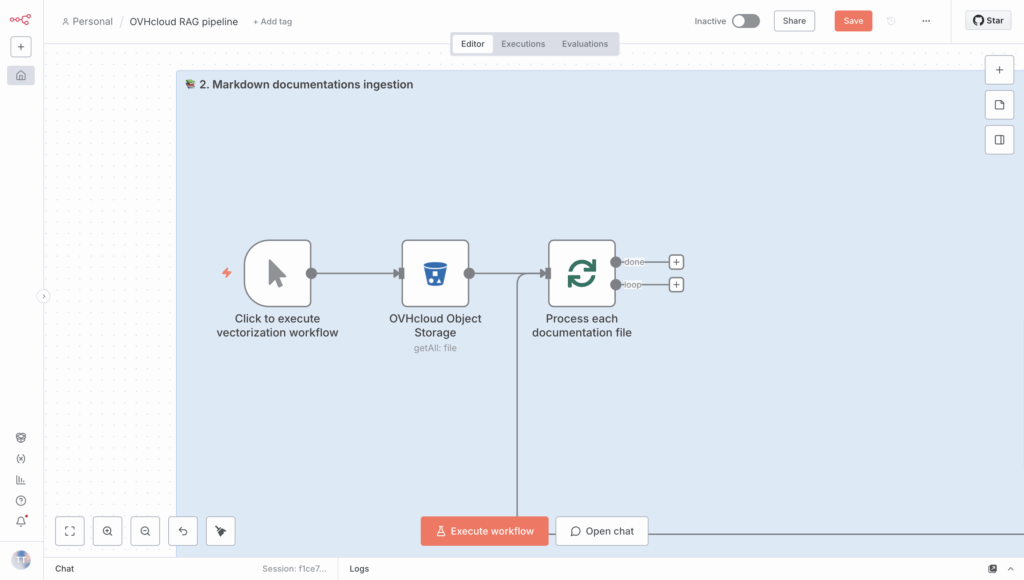
Congrats! You can now run the workflow to begin ingesting documents.
Click the Execute workflow button and wait until the vectorization process is complete.
Remember, everything should be green when it’s finished ✅.
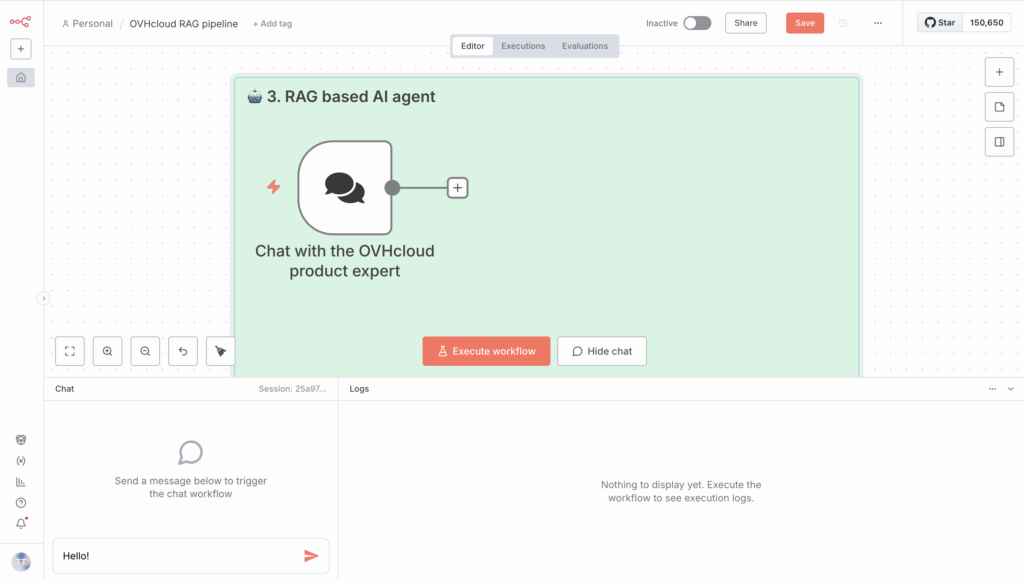
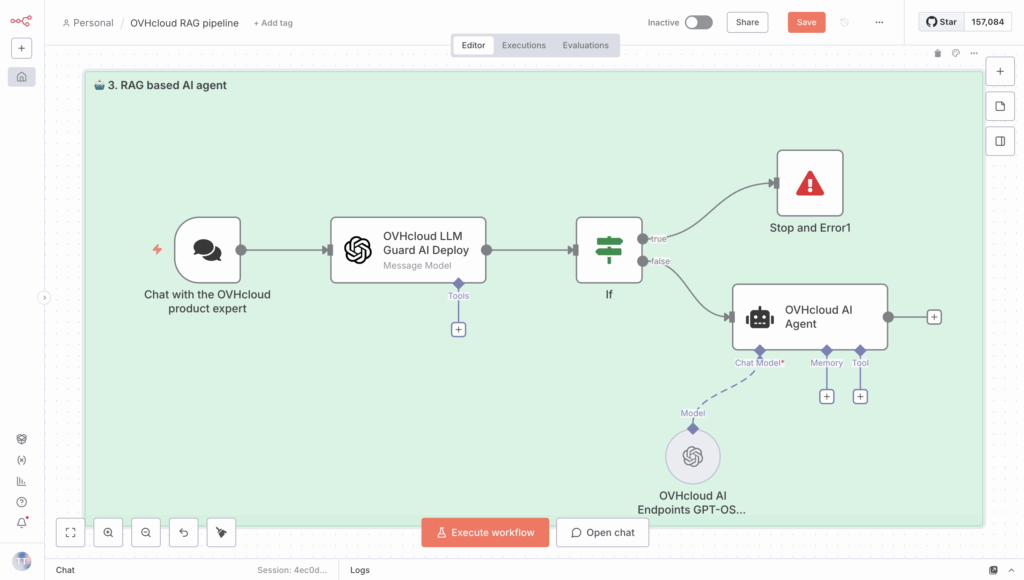
Step 2 – RAG chatbot
With the data ingestion and vectorisation steps completed, you can now begin implementing your AI agent.
This involves building a RAG-based AI Agent by simply starting a chat with an LLM.
1. Set up the chat box to start a conversation
First, configure your AI Agent based on the RAG system, and add a new node in the same n8n workflow: Chat Trigger.
This node will allow you to interact directly with your AI agent! But before that, you need to check that your message is safe.
This node will allow you to interact directly with your AI agent! But before that, you need to check that your message is secure.
2. Set up your LLM Guard with AI Deploy
To check whether a message is secure or not, use an LLM Guard.
What’s an LLM Guard? This is a safety and control layer that sits between users and an LLM, or between the LLM and an external connection. Its main goal is to filter, monitor, and enforce rules on what goes into or comes out of the model 🔐.
You can use AI Deploy from OVHcloud to deploy your desired LLM guard. With a single command line, this AI solution lets you deploy a Hugging Face model using vLLM Docker containers.
For more details, please refer to this blog.
For the use case covered in this article, you can use the open-source model meta-llama/Llama-Guard-3-8B available on Hugging Face.
2.1 Create a Bearer token to request your custom AI Deploy endpoint
Create a token to access your AI Deploy app once it’s deployed.
ovhai token create --role operator ai_deploy_token=my_operator_tokenThe following output is returned:
Id: 47292486-fb98-4a5b-8451-600895597a2b
Created At: 20-10-25 8:53:05
Updated At: 20-10-25 8:53:05
Spec:
Name: ai_deploy_token=my_operator_token
Role: AiTrainingOperator
Label Selector:
Status:
Value: XXXXXXXXXXXXXXXXXXXXXXXXXXXXXX
Version: 1
You can now store and export your access token to add it as a new credential in n8n.
export MY_OVHAI_ACCESS_TOKEN=XXXXXXXXXXXXXXXXXXXXXXXXXXXXXX2.1 Start Llama Guard 3 model with AI Deploy
Using ovhai CLI, launch the following command and vLLM start inference server.
ovhai app run \
	--name vllm-llama-guard3 \
        --default-http-port 8000 \
        --gpu 1 \
	--flavor l40s-1-gpu \
        --label ai_deploy_token=my_operator_token \
	--env OUTLINES_CACHE_DIR=/tmp/.outlines \
	--env HF_TOKEN=$MY_HF_TOKEN \
	--env HF_HOME=/hub \
	--env HF_DATASETS_TRUST_REMOTE_CODE=1 \
	--env HF_HUB_ENABLE_HF_TRANSFER=0 \
	--volume standalone:/workspace:RW \
	--volume standalone:/hub:RW \
	vllm/vllm-openai:v0.10.1.1 \
	-- bash -c python3 -m vllm.entrypoints.openai.api_server
                           --model meta-llama/Llama-Guard-3-8B \
                           --tensor-parallel-size 1 \
                           --dtype bfloat16
Full command explained:
ovhai app run
This is the core command to run an app using the OVHcloud AI Deploy platform.
--name vllm-llama-guard3
Sets a custom name for the job. For example, vllm-llama-guard3.
--default-http-port 8000
Exposes port 8000 as the default HTTP endpoint. vLLM server typically runs on port 8000.
--gpu1--flavor l40s-1-gpu
Allocates 1 GPU L40S for the app. You can adjust the GPU type and number depending on the model you have to deploy.
--volume standalone:/workspace:RW--volume standalone:/hub:RW
Mounts two persistent storage volumes: /workspace which is the main working directory and /hub to store Hugging Face model files.
--env OUTLINES_CACHE_DIR=/tmp/.outlines--env HF_TOKEN=$MY_HF_TOKEN--env HF_HOME=/hub--env HF_DATASETS_TRUST_REMOTE_CODE=1--env HF_HUB_ENABLE_HF_TRANSFER=0
These are Hugging Face environment variables you have to set. Please export your Hugging Face access token as environment variable before starting the app: export MY_HF_TOKEN=***********
vllm/vllm-openai:v0.10.1.1
Use the v Docker image (a pre-configured vLLM OpenAI API server).llm/vllm-openai
-- bash -c python3 -m vllm.entrypoints.openai.api_server
                    --model meta-llama/Llama-Guard-3-8B \
                    --tensor-parallel-size 1 \
                    --dtype bfloat16
Finally, run a bash shell inside the container and executes a Python command to launch the vLLM API server.
2.2 Check to confirm your AI Deploy app is RUNNING
Replace the <app_id> by yours.
ovhai app get <app_id>You should get:
History:
DATE STATE
20-1O-25 09:58:00 QUEUED
20-10-25 09:58:01 INITIALIZING
04-04-25 09:58:07 PENDING
04-04-25 10:03:10 RUNNING
Info:
Message: App is running
2.3 Create a new n8n credential with AI Deploy app URL and Bearer access token
First, using your <app_id>, retrieve your AI Deploy app URL.
ovhai app get <app_id> -o json | jq '.status.url' -rThen, create a new OpenAI credential from your n8n workflow, using your AI Deploy URL and the Bearer token as an API key.
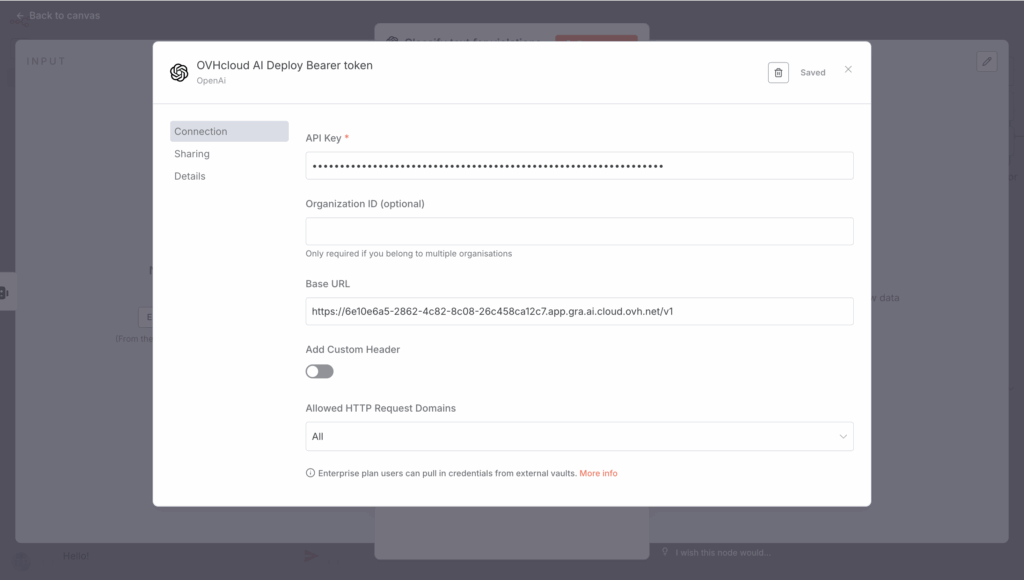
Don’t forget to replace 6e10e6a5-2862-4c82-8c08-26c458ca12c7 with your <app_id>.
2.4 Create the LLM Guard node in n8n workflow
Create a new OpenAI node to Message a model and select the new AI Deploy credential for LLM Guard usage.
Next, create the prompt as follows:
{{ $('Chat with the OVHcloud product expert').item.json.chatInput }}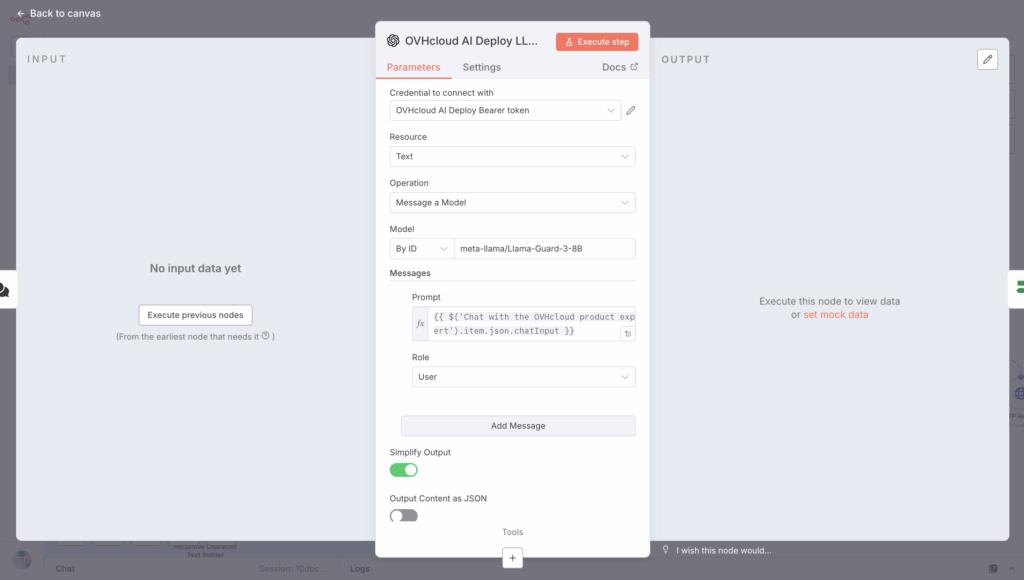
Then, use an If node to determine if the scenario is safe or unsafe:
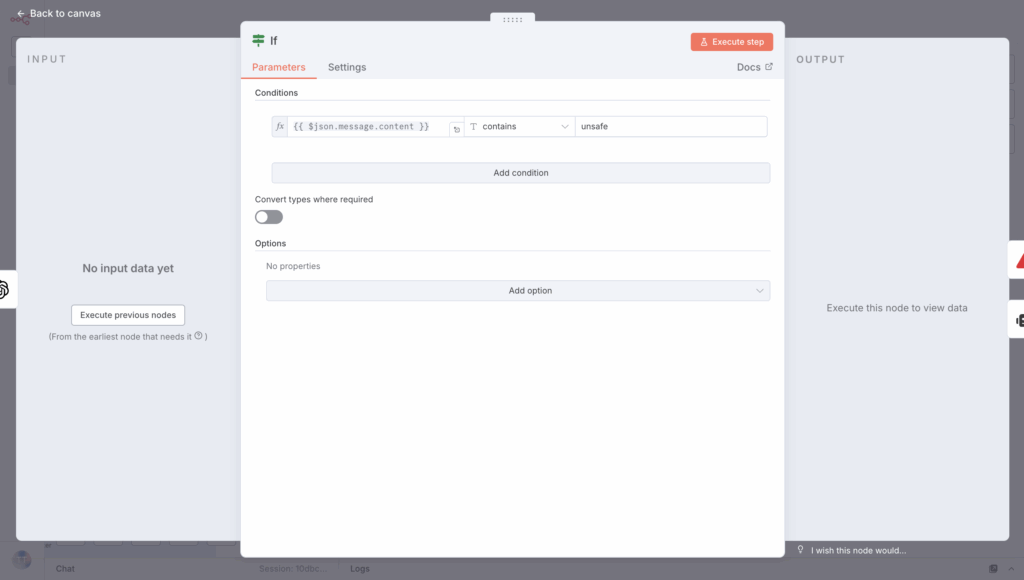
If the message is unsafe, send an error message right away to stop the workflow.
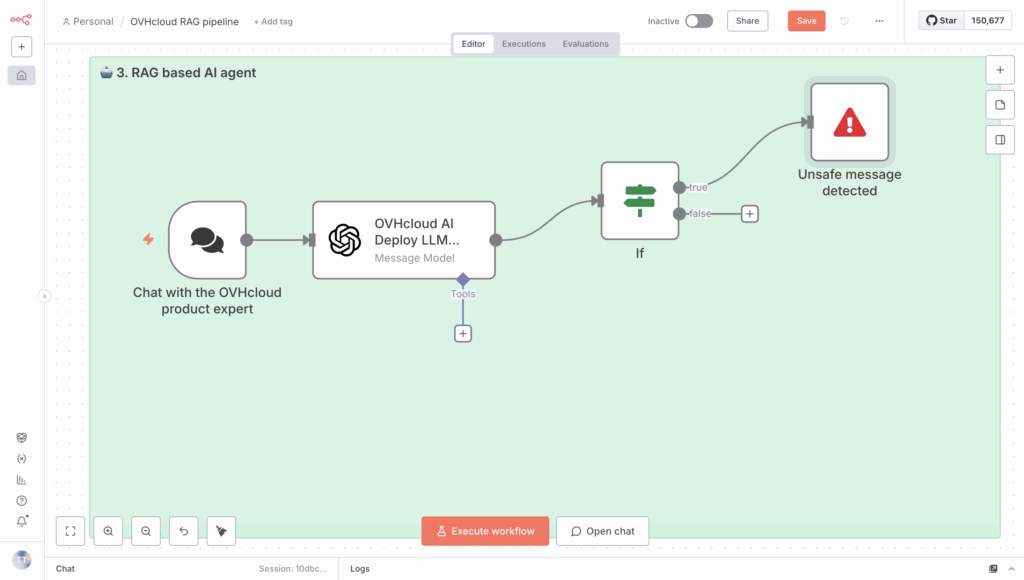
But if the message is safe, you can send the request to the AI Agent without issues 🔐.
3. Set up AI Agent
The AI Agent node in n8n acts as an intelligent orchestration layer that combines LLMs, memory, and external tools within an automated workflow.
It allows you to:
- Connect a Large Language Model using APIs (e.g., LLMs from AI Endpoints);
- Use tools such as HTTP requests, databases, or RAG retrievers so the agent can take actions or fetch real information;
- Maintain conversational memory via PostgreSQL databases;
- Integrate directly with chat platforms (e.g., Slack, Teams) for interactive assistants (optional).
Simply put, n8n becomes an agentic automation framework, enabling LLMs to not only provide answers, but also think, choose, and perform actions.
Please note that you can change and customise this n8n AI Agent node to fit your use cases, using features like function calling or structured output. This is the most basic configuration for the given use case. You can go even further with different agents.
🧑💻 How do I implement this RAG?
First, create an AI Agent node in n8n as follows:
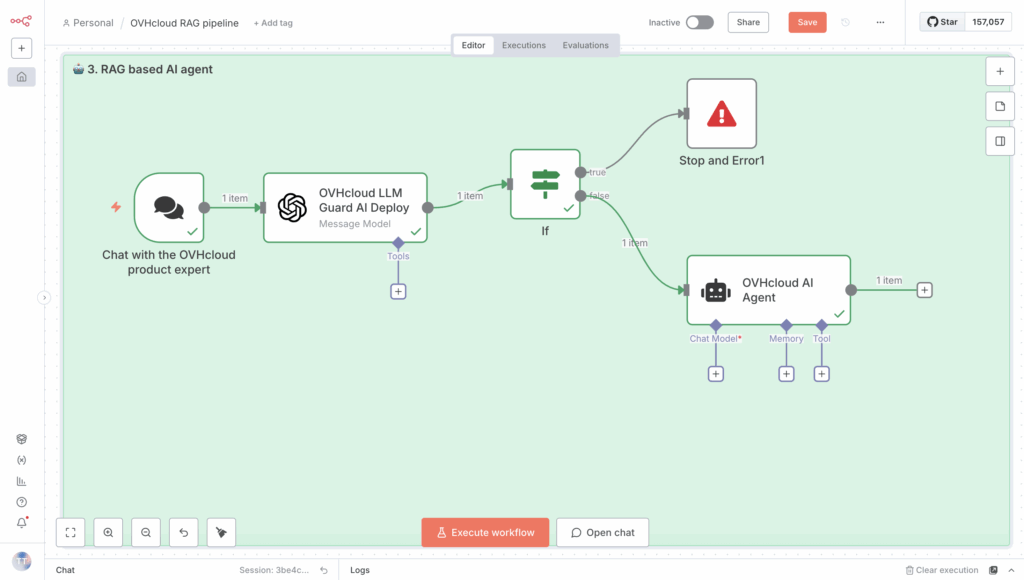
Then, a series of steps are required, the first of which is creating prompts.
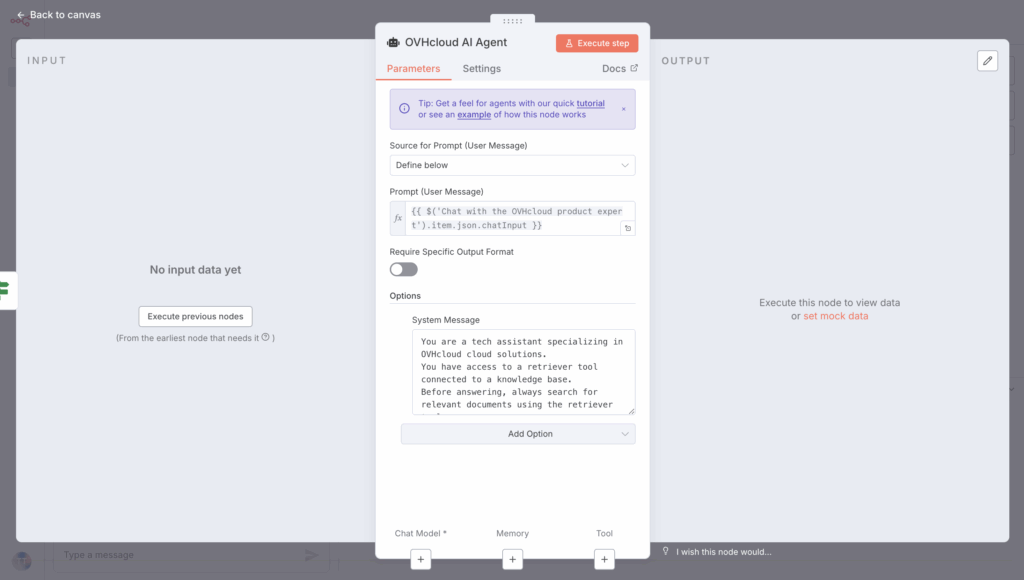
3.1 Create prompts
In the AI Agent node on your n8n workflow, edit the user and system prompts.
Begin by creating the prompt, which is also the user message:
{{ $('Chat with the OVHcloud product expert').item.json.chatInput }}Then create the System Message as shown below:
You have access to a retriever tool connected to a knowledge base.
Before answering, always search for relevant documents using the retriever tool.
Use the retrieved context to answer accurately.
If no relevant documents are found, say that you have no information about it.
You should get a configuration like this:
🤔 Well, an LLM is now needed for this to work!
3.2 Select LLM using AI Endpoints API
First, add an OpenAI Chat Model node, and then set it as the Chat Model for your agent.
Next, select one of the OVHcloud AI Endpoints from the list provided, because they are compatible with Open AI APIs.
✅ How? By using the right API https://oai.endpoints.kepler.ai.cloud.ovh.net/v1
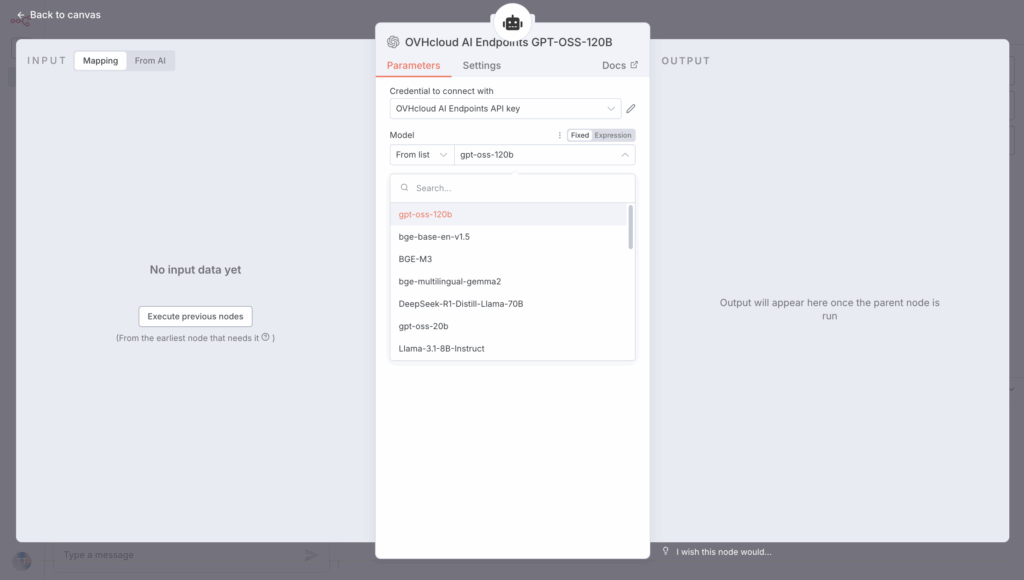
The GPT OSS 120B model has been selected for this use case. Other models, such as Llama, Mistral, and Qwen, are also available.
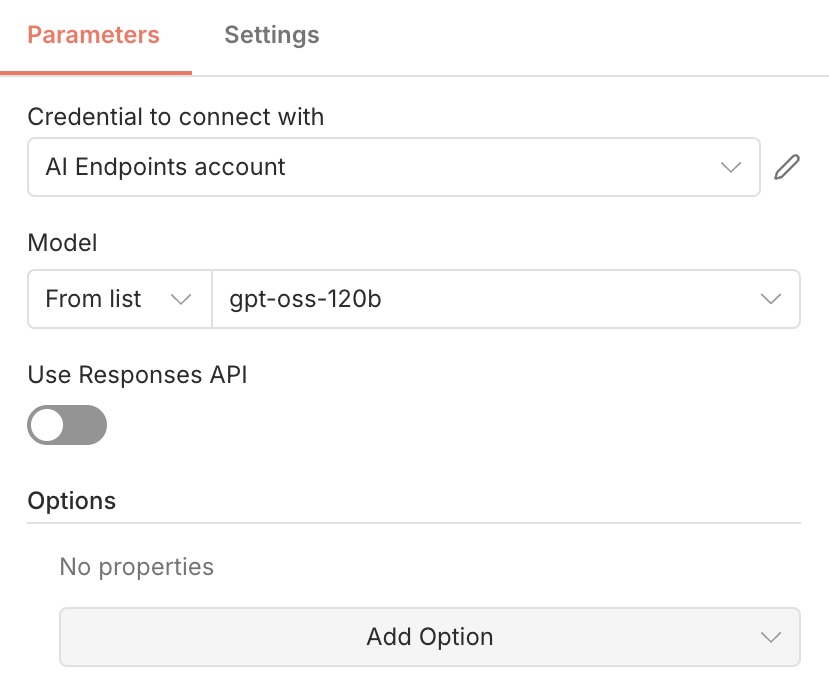
⚠️ WARNING ⚠️
If you are using a recent version of n8n, you will likely encounter the
/responsesissue (linked to OpenAI compatibility). To resolve this, you will need to disable the buttonUse Responses APIand everything will work correctly
Your LLM is now set to answer your questions! Don’t forget, it needs access to the knowledge base.
3.3 Connect the knowledge base to the RAG retriever
As usual, the first step is to create an n8n node called PGVector Vector Store node and enter your PGvector credentials.
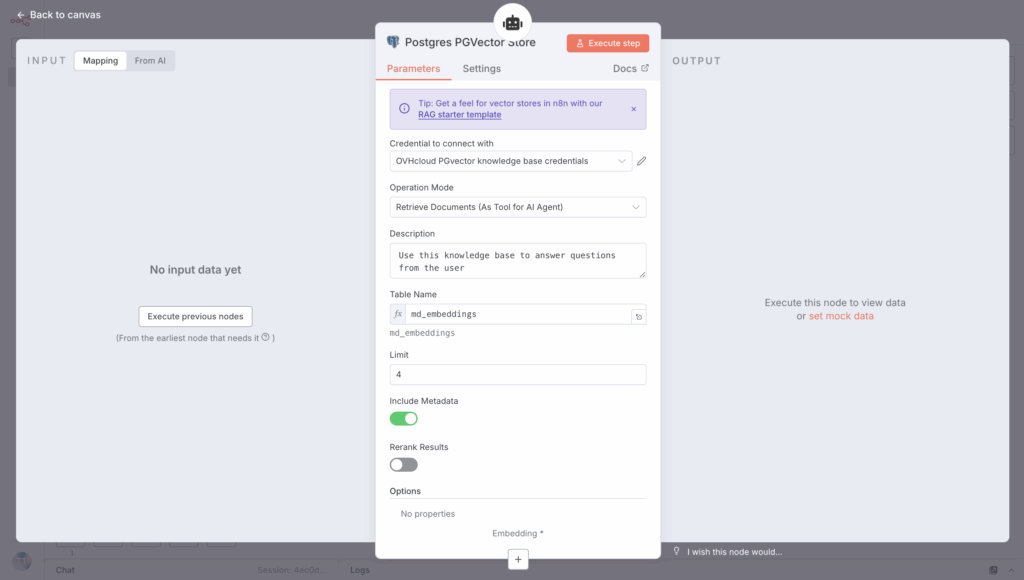
Next, link this element to the Tools section of the AI Agent node.
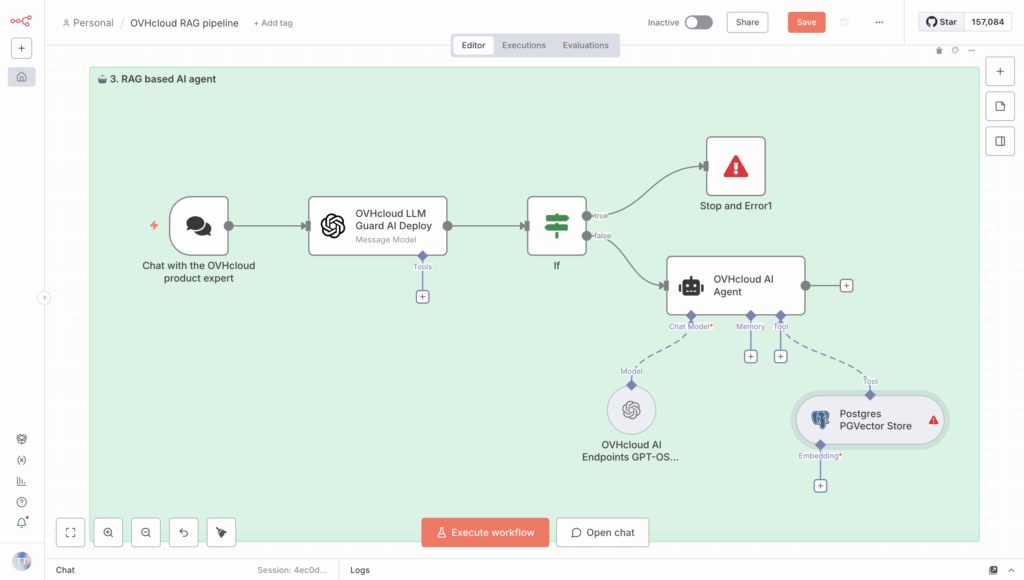
Remember to connect your PG vector database so that the retriever can access the previously generated embeddings. Here’s an overview of what you’ll get.
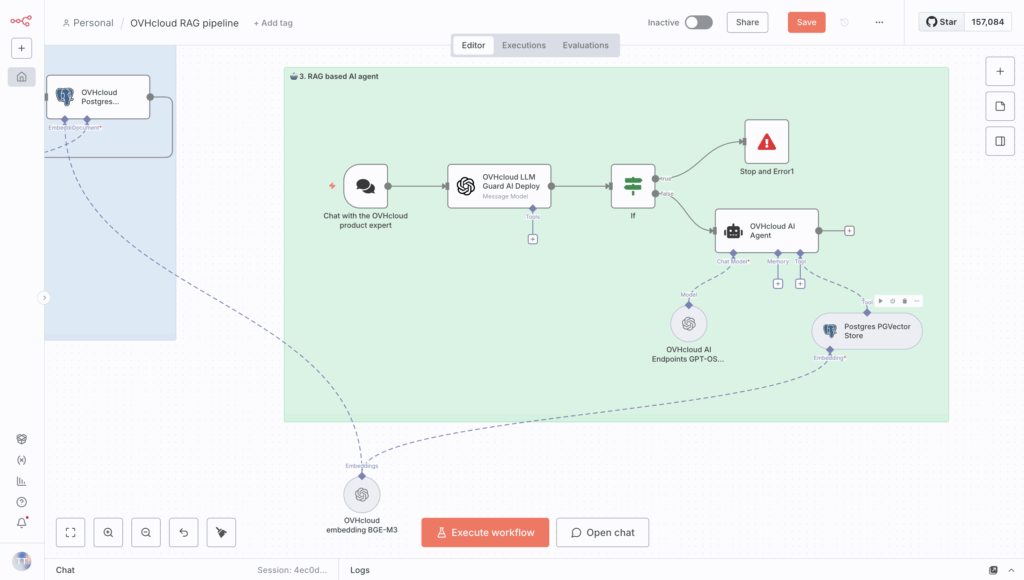
⏳Nearly done! The final step is to add the database memory.
3.4 Manage conversation history with database memory
Creating Database Memory node in n8n (PostgreSQL) lets you link it to your AI Agent, so it can store and retrieve past conversation history. This enables the model to remember and use context from multiple interactions.
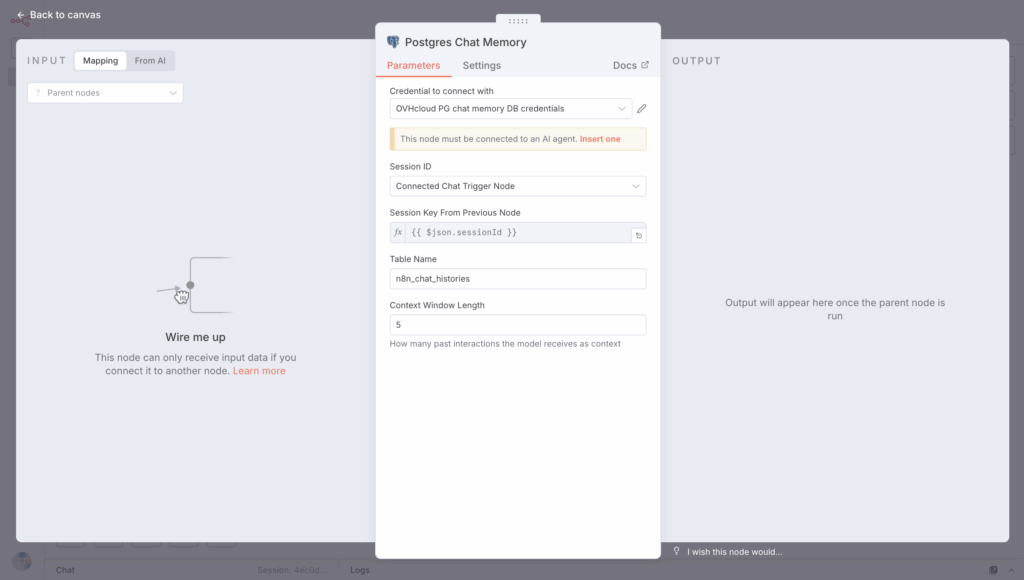
So link this PostgreSQL database to the Memory section of your AI agent.
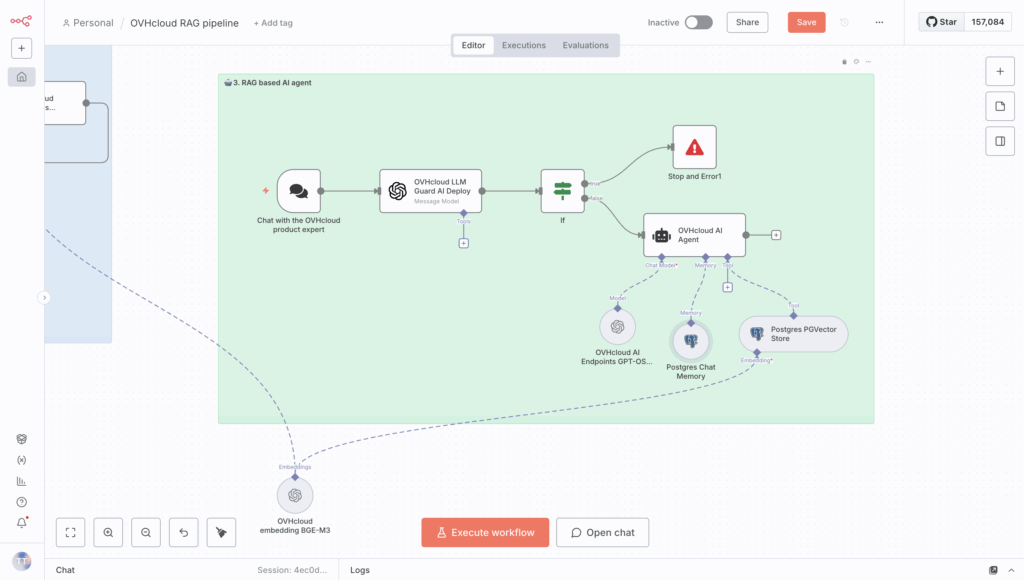
Congrats! 🥳 Your n8n RAG workflow is now complete. Ready to test it?
4. Make the most of your automated workflow
Want to try it? It’s easy!
By clicking the orange Open chat button, you can ask the AI agent questions about OVHcloud products, particularly where you need technical assistance.
For example, you can ask the LLM about rate limits in OVHcloud AI Endpoints and get the information in seconds.
You can now build your own autonomous RAG system using OVHcloud Public Cloud, suited for a wide range of applications.
What’s next?
To sum up, this reference architecture provides a guide on using n8n with OVHcloud AI Endpoints, AI Deploy, Object Storage, and PostgreSQL + pgvector to build a fully controlled, autonomous RAG AI system.
Teams can build scalable AI assistants that work securely and independently in their cloud environment by orchestrating ingestion, embedding generation, vector storage, retrieval, and LLM safety check, and reasoning within a single workflow.
With the core architecture in place, you can add more features to improve the capabilities and robustness of your agentic RAG system:
- Web search
- Images with OCR
- Audio files transcribed using the Whisper model
This delivers an extensive knowledge base and a wider variety of use cases!

Solution Architect @OVHcloud