
Context
OVHcloud AI Endpoints provides an OpenAI-compatible API that gives applications access to a broad catalogue of open-weight models, including Qwen, Llama, Mistral, gpt-oss, embedding, guard and speech models, without requiring teams to manage inference infrastructure. It is the usage-based inference layer monitored by this architecture.
OVHcloud Managed Kubernetes Service (MKS) removes the operational burden of running the Kubernetes control plane: node pools, upgrades and high availability are handled by OVHcloud, and you keep full control over what runs on the worker nodes. It’s the natural place to run a stateless application like Langfuse’s web and worker processes, while the stateful pieces (databases, object storage) live in OVHcloud’s managed services next to it.
Langfuse provides the observability layer for applications using AI Endpoints. Because its OpenAI SDK integration is a drop-in replacement (from langfuse.openai import openai instead of import openai), pointing an existing OpenAI-compatible codebase at AI Endpoints and getting full tracing out of it is a two-line change, not a rewrite.
Together, these three pieces give a self-hosted, cost-attributed observability stack for any application calling AI Endpoints, without sending a single token of prompt or completion data outside infrastructure you control.
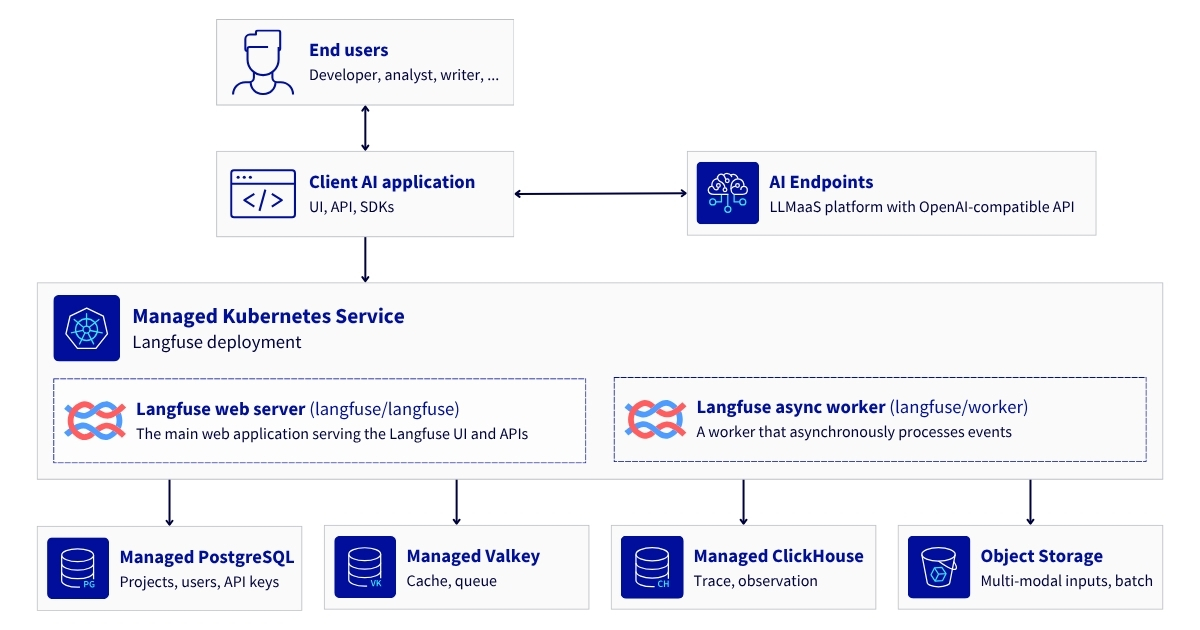
Langfuse on OVHcloud MKS for LLM observability and token consumption tracking
Architecture overview
Langfuse’s web and worker deployments run inside the MKS cluster. Ingress and certificate management run alongside them as separate, reusable cluster add-ons. Every stateful dependency – Postgres, Valkey, ClickHouse, object storage – is an OVHcloud managed service outside the cluster, reached over TLS.
1. Data flow
Putting the pieces together, a single traced request flows like this:
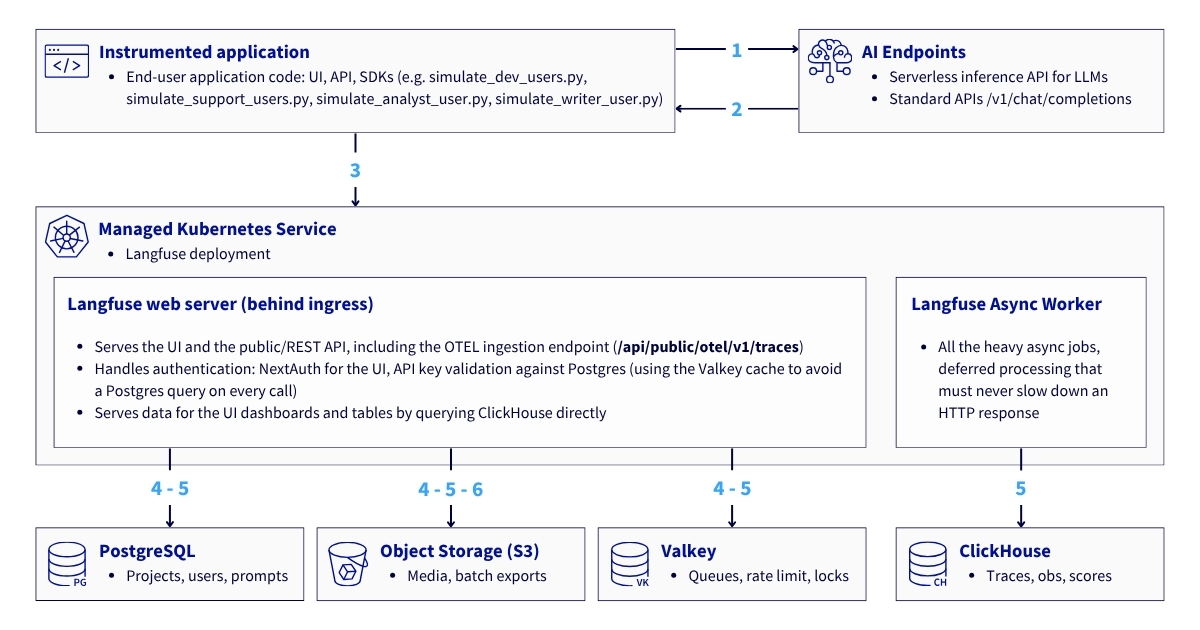
Data flow
1. The application calls AI Endpoints directly
The drop-in openai.OpenAI() client sends the request straight to the inference API – Langfuse sits outside this call entirely, so a Langfuse outage never affects whether the application can get a completion.
2. AI Endpoints streams the response back
The final chunk contains the token usage data.
3. The SDK exports what it just saw as an OpenTelemetry span batch
This is done asynchronously, via HTTPS, to /api/public/otel/v1/traces on the Langfuse instance.
This process runs in the background and adds no latency to the response the application has already received in step 2.
4. Langfuse web ingests the batch
It checks the request’s API key against its project in Postgres (a lookup cached in Valkey, not a fresh query on every call), writes the raw batch as-is to object storage, and pushes only a reference to it onto a Valkey queue.
5. The worker drains that queue on its own schedule, decoupled from any specific request
It pulls the reference from Valkey, fetches the full batch back from object storage, resolves the Prompt Management entry it’s linked to (if any) via Postgres, and persists the trace and generation records into ClickHouse (model, token counts, latency, prices)
6. The worker also handles anything scheduled or bulk
Batch exports and media uploads land in S3 independently of when the original request happened.
⚠️ Note: Nothing from step 3 onward can add latency to the application’s request in steps 1-2, that asynchronous handoff, and the fact that web never blocks on Postgres or ClickHouse to acknowledge a batch, is the entire reason tracing doesn’t cost anything on the critical path.
2. AI Endpoints APIs
Everything below calls one of two distinct OVHcloud AI Endpoints APIs:
- Inference API: https://oai.endpoints.kepler.ai.cloud.ovh.net/v1
This is the API your application actually talks to. It implements the OpenAI API surface, so any OpenAI-compatible SDK works against it by changing the base_url and the API key:
import openai
client = openai.OpenAI(
     api_key="<your-ai-endpoints-token>",
     base_url="https://oai.endpoints.kepler.ai.cloud.ovh.net/v1",
 )

 response = client.chat.completions.create(
     model="Qwen3.5-397B-A17B",
     messages=[{"role": "user", "content": "hello"}],
 )
If you retrieve the OpenAPI schema directly from the gateway (GET /openapi.json), you will see that the available interface goes well beyond chat suggestions.
It is useful to call the GET /v1/models API directly at least once: it returns all the models to which your token grants access.
The following section focuses on the catalog API, which allows you to obtain further information about the models, including pricing details, which are necessary for cost tracking.
This is the API that powers the “AI Endpoints” web catalogue page; It is a simple GET request requiring no authentication, which returns the full list of models along with the metadata displayed in the catalogue’s user interface: description, benchmark scores, publisher, licence, context size, links to the playground and documentation, as well as a usage_information.pricing block:
curl -s https://catalog.endpoints.ai.ovh.net/rest/v1/models_v2 | jq '.[0]'Returns:
{
   "id": "qwen-3-5-397b",
   "name": "Qwen3.5-397B-A17B",
   "category": "Visual LLM",
   "metadata": {
     "aliases": ["Qwen/Qwen3.5-397B-A17B", "qwen3.5-397b-a17b"],
     "context": "262k",
     "usage_information": {
       "pricing": [
         {"price": 0.6, "price_unit": "million_input_tokens"},
         {"price": 3.6, "price_unit": "million_output_tokens"}
       ]
     }
   }
 }
The two APIs are complementary:
- the catalog API is a one-off or periodic pull used to build local price tables and metadata
- the inference API is what a running application calls on every request
The two APIs are complementary:
- the catalog API is a one-off or periodic pull used to build local price tables and metadata
- the inference API is what a running application calls on every request
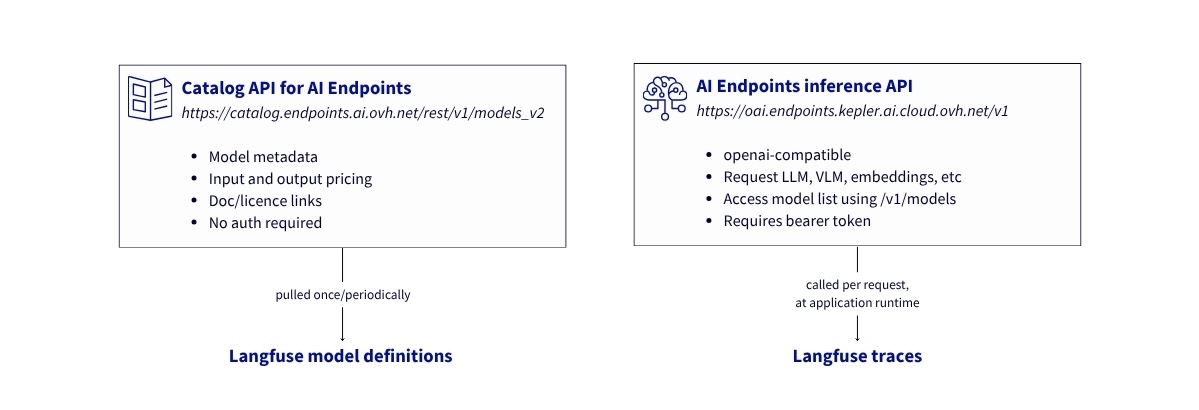
AI Endpoints inference and catalog APIs
⚠️ Note: Please note that AI Endpoints prices are in euros.
Prerequisites
Before you begin, ensure you have:
- An OVHcloud Public Cloud account
- An OpenStack user with the Administrator role
- An AI Endpoints API key
- A domain name you can point at a load balancer
- kubectl installed and helm installed (at least version 3.x)
Now you have all the ingredients, it’s time to deploy Langfuse using OVHcloud MKS, and other managed services!
Architecture guide: Deployment of Langfuse on OVHcloud Public Cloud managed services
Step 1 – Provision the Kubernetes cluster and OVHcloud managed services
Langfuse’s web and worker processes are lightweight in themselves. The choice of resources therefore depends almost entirely on the managed services surrounding them. The following explains the practical steps involved in setting up each of them.
Everything below is created in the OVHcloud Manager, under the Public Cloud section of your project.
1. Create MKS cluster and Node pools
1.1. Configure cluster
From OVHcloud Control Panel, create a Kubernetes cluster using the MKS:
- Name: langfuse-cluster
- Location: 1-AZ Region – Gravelines (GRA11)
- Plan: Free (or Standard)
- Network: attach a Private network (e.g. 0000 - AI Private Network)
- Version: Latest stable (e.g. 1.35)
1.2. Create Node pools
During the cluster creation, configure the 2 Node pools.
The first one is the np-system. It runs components at cluster level, including Traefik (ingress) and cert-manager (TLS certificates), as well as the default Kubernetes system daemonsets.
- Node pool name: np-system
- Flavor: B3-8
- Number of nodes: 3
- Autoscaling: Disabled (OFF)
The second one is the np-workload, dedicated to the Langfuse application pods (web + worker).
- Node pool name: np-workload
- Flavor: B3-16
- Number of nodes: 1
- Autoscaling: Disabled (OFF)
1.3. Configure Kubernetes access
Once your nodes have been provisioned, you can download the Kubeconfig file and configure kubectl with your MKS cluster.
# configure kubectl with your MKS cluster
 export KUBECONFIG=/path/to/your/kubeconfig-xxxxxx.yml

 # verify cluster connectivity
 kubectl cluster-info
 kubectl get nodes
Returns:
NAME STATUS ROLES AGE VERSION
 np-system-node-388e55 Ready <none> 12d v1.35.2
 np-system-node-4c5326 Ready <none> 12d v1.35.2
 np-system-node-93bc1c Ready <none> 12d v1.35.2
 np-workload-node-3a76f7 Ready <none> 12d v1.35.2
2. Configure databases
2.1. Postgre database for Langfuse transactional data
From Databases section in OVHcloud Public Cloud, click on Create a service and configure it as follows:
- Engine: PostgreSQL
- Version: 17
- Location: GRA
- Service plan: Business
- Instance: Db1-4
- Storage: 80 GB (default)
- Network: Public network (internet)
Please keep the following information safe before moving on to the next step:
- host
- port
- database name
- username
- password
- URI
2.2. Valkey database for job caching and queuing
From Databases section in OVHcloud Public Cloud, click on Create a service and configure it as follows:
- Engine: Valkey
- Version: 8.1
- Location: GRA
- Service plan: Business
- Instance: Db1-4
- Storage: 80 GB (default)
- Network: Public network (internet)
Please keep the following information safe before moving on to the next step:
- host
- port
- database name
- username
- password
- URI
2.3. ClickHouse, the heart of observability data
From Analytics section in OVHcloud Public Cloud, click on Create a service and configure it as follows:
- Engine: ClickHouse
- Version: 25.8
- Location: EU-WEST-PAR
- Service plan: Production
- Instance: B3-16
- Storage: 100 GB (default)
- Network: Public network (internet)
Please keep the following information safe before moving on to the next step:
- host
- port
- database name
- username
- password
- URI
⚠ Note: OVHcloud managed databases (Postgres, Valkey, ClickHouse) refuse all connections by default until you add allowed source IPs on each instance’s “IP restrictions” page in the OVHcloud Manager. Bear in mind that you need to add your MKS node pool’s public IPs to all three databases before deploying Langfuse, or every connection from the cluster will simply time out.
From the Configuration tab for each database, apply the IP whitelisting as shown in the example below:
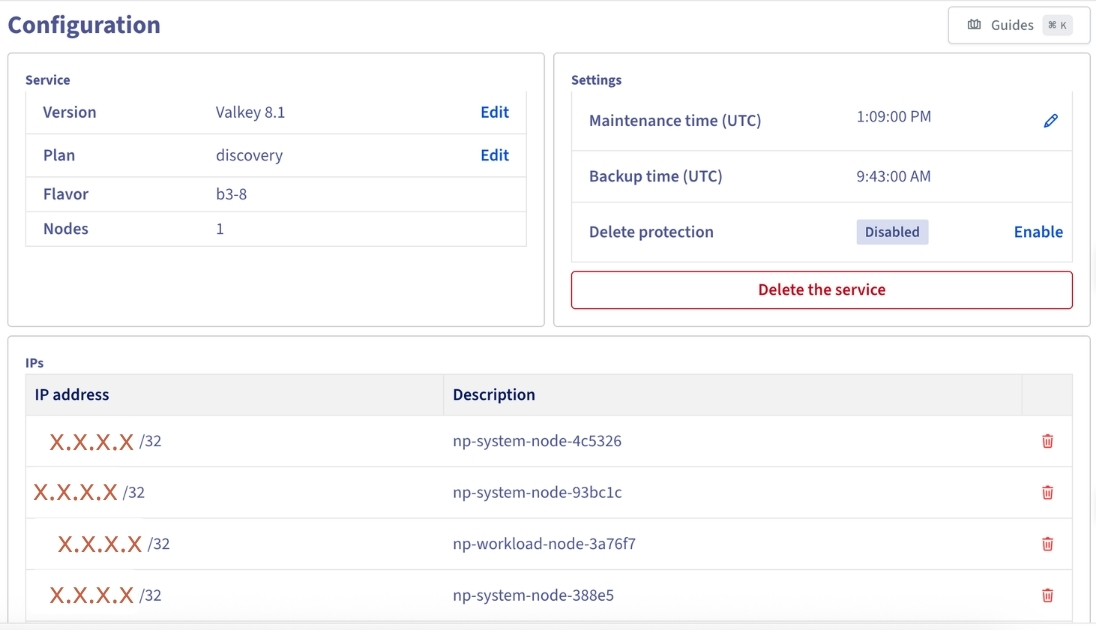
Whitelisting of MKS node pool’s public IPs
3. Create S3-compatible bucket as a storage backend
From Object Storage section in OVHcloud Public Cloud, create an object container:
- Container type: S3-compatible API
- Location: GRA
Please keep the following information safe before moving on to the next step:
- bucket name
- endpoint
- access key
- secret key
Step 2 – Bootstrap namespaces and quota
Create dedicated namespaces for the ingress controller, certificate manager and Langfuse itself, and cap what the Langfuse namespace can consume so a runaway workload can’t take down the rest of the cluster.
First, create:
Next, launch the deployment.
kubectl apply -f deploy/bootstrap/namespaces.yaml
kubectl apply -f deploy/bootstrap/resourcequota.yaml
Step 3 – Install the ingress controller and certificate manager
This architecture uses Traefik rather than ingress-nginx. rather than ingress-nginx.
The complete installation commands are included in deploy/ingress/install.sh. You can run:
bash deploy/ingress/install.shhelm upgrade --install provisions a new OVHcloud Load Balancer with a public IP automatically. Wait for it to be assigned before moving on:
kubectl -n traefik get svc traefik -wcert-manager handles certificate issuance and renewal. Install it from the OCI registry, which OVHcloud and upstream both now recommend over the legacy Helm repository.
Download the cert-manager/install.sh script and run:
bash cert-manager/install.shNext, create a ClusterIssuer for Let's Encrypt, using Traefik as the HTTP-01 “solver”.
First of all, define your own email address in the cert-manager/cluster-issuer.yaml file.
⚠️ Note: Let’s Encrypt uses this for expiry notifications, and the cert-manager registry will tacitly accept a default value if you forget to specify one. This step must wait until cert-manager is itself up and running and the Traefik ingress class is in place so that the resolver can reference it. Therefore, run it once the two installations described above are complete:
kubectl apply -f cert-manager/cluster-issuer.yaml⚠️ Note: You must pin the chart version explicitly (--version). Otherwise, the two commands above will, by default, use the most recent version available at the time of installation, which means the deployment cannot be reproduced exactly over time.
Step 4 – Configure the DNS to point to the load balancer
Once the Traefik service has an external IP, create an A record for the hostname Langfuse will be served on:
kubectl -n traefik get svc traefik -o jsonpath='{.status.loadBalancer.ingress[0].ip}'Create langfuse.<your-domain> -> that IP in your DNS zone, and confirm it resolves before continuing – cert-manager’s HTTP-01 challenge will otherwise fail silently and retry indefinitely.
Step 5 – Store credentials in a Kubernetes secret and configure the Helm values
Langfuse’s Helm chart reads every credential from a secret rather than from plain values, so nothing sensitive needs to live in the values file:
kubectl -n langfuse create secret generic langfuse-secrets \
   --from-literal=LANGFUSE_SALT="$(openssl rand -base64 32)" \
   --from-literal=LANGFUSE_SECRET_KEY="$(openssl rand -hex 32)" \
   --from-literal=NEXTAUTH_SECRET="$(openssl rand -base64 32)" \
   --from-literal=POSTGRES_PASSWORD="<your-postgres-password>" \
   --from-literal=VALKEY_PASSWORD="<your-valkey-password>" \
   --from-literal=CLICKHOUSE_PASSWORD="<your-clickhouse-password>" \
   --from-literal=S3_ACCESS_KEY="<your-s3-access-key>" \
   --from-literal=S3_SECRET_KEY="<your-s3-secret-key>"
The chart used is the official langfuse/langfuse-k8s chart. You can find the full file in the OVHcloud public-cloud-examples GitHub repository: deploy/langfuse/values.yaml
⚠️ Note: Every deploy: false tells the chart not to install its own Postgres/Valkey/ClickHouse/MinIO sub-charts and to connect to the OVHcloud managed instances instead. That’s what makes this a managed-services deployment rather than a self-managed one.
Step 6 – Install Langfuse
Fetch the deploy/langfuse/values.yaml file from the repository and make the necessary changes:
- <your-domain>
- <your-postgresql-host>
- <your-valkey-host>
- <your-clickhouse-host>
- <your-bucket>
Then save the updated values.yaml and finally run deploy/langfuse/install.sh:
bash deploy/langfuse/install.shThis is the final stage of the installation: it requires the namespace and secret from steps 2 and 5, the DNS resolution from step 4 (otherwise the TLS certificate cannot be issued), and the ClusterIssuer from step 3, which must already exist.
Next, check that the entire deployment process went smoothly:
kubectl -n langfuse get pods
curl -s https://langfuse.<your-domain>/api/public/health
{"status":"OK","version":"<chart appVersion>"} on the health endpoint, and both pods Running with no restarts, means the stack is up: ingress, TLS, Postgres, Valkey, ClickHouse and S3 are all reachable.
Step 7 – Instrumenting an application
1. Set up SDK in your application
Once Langfuse is reachable, pointing an application at it is a matter of an SDK swap, not a rewrite. For an application already using the openai Python SDK against AI Endpoints:
from dotenv import load_dotenv

 load_dotenv()  # OPENAI_API_KEY, OPENAI_BASE_URL, LANGFUSE_* must be loaded first

 from langfuse.openai import openai  # drop-in replacement for `import openai`

 client = openai.OpenAI()  # reads OPENAI_API_KEY / OPENAI_BASE_URL

 response = client.chat.completions.create(
     model="Qwen3.5-397B-A17B",
     messages=[{"role": "user", "content": "hello"}],
     stream=True,
     stream_options={"include_usage": True},
     name="chat-response",
     metadata={
         "langfuse_session_id": "session-123",
         "langfuse_user_id": "user-456",
         "langfuse_tags": ["feature:chat"],
     },
 )
⚠️ Note: Use examples/.env.example and edit this .env file with your own environment variables. Then load the environment variables and configure the Langfuse client before importing langfuse.openai.
For complete, tested reference implementations of this pattern – covering multi-turn conversations, session/user tagging and Prompt Management across four different usage profiles (code generation, FAQ, document summarization, long-form content), see:
- examples/simulate_dev_users.py
- examples/simulate_support_users.py
- examples/simulate_analyst_user.py
- examples/simulate_writer_user.py
⚠️ Warning: If you consume a streamed response, don’t stop iterating as soon as finish_reason == "stop". Several OpenAI-compatible providers, AI Endpoints included, send the chunk carrying token usage after that point; breaking early means Langfuse never sees it and the trace’s cost shows as zero even though tokens were actually spent.
A few additions turn a working integration into a useful one:
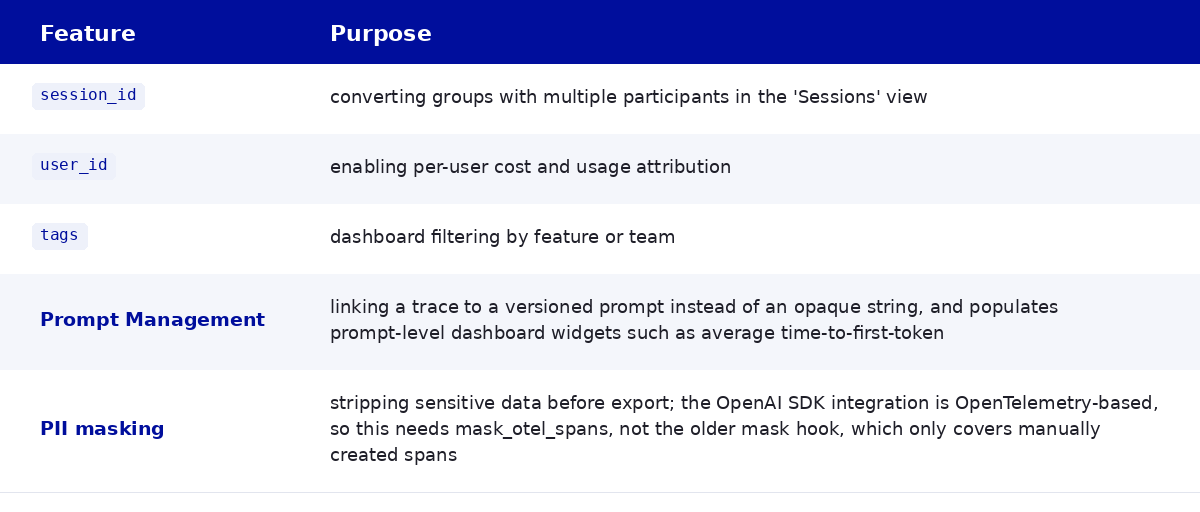
2. Cost tracking for AI Endpoints usage
Langfuse calculates cost per trace from a table of model prices, and it has no entry for OVHcloud-hosted models out of the box – every trace shows $0 in cost until you tell it what each model costs. That’s what the catalog API (“https://catalog.endpoints.ai.ovh.net/rest/v1/models_v2“) from earlier is for: pull it once, register each model’s price with Langfuse’s Models API, and cost starts calculating automatically for every subsequent call.
import os
 import requests

 LANGFUSE_BASE_URL = os.environ["LANGFUSE_BASE_URL"]
 LANGFUSE_PUBLIC_KEY = os.environ["LANGFUSE_PUBLIC_KEY"]
 LANGFUSE_SECRET_KEY = os.environ["LANGFUSE_SECRET_KEY"]

 catalog = requests.get(
     "https://catalog.endpoints.ai.ovh.net/rest/v1/models_v2"
 ).json()

 for model in catalog:
     pricing = model.get("metadata", {}).get("usage_information", {}).get("pricing")
     if not pricing:
         continue
     prices = {
         {"million_input_tokens": "inputPrice", "million_output_tokens": "outputPrice"}[p["price_unit"]]: p["price"] / 1_000_000
         for p in pricing
         if p["price_unit"] in ("million_input_tokens", "million_output_tokens")
     }
     if not prices:
         continue
     requests.post(
         f"{LANGFUSE_BASE_URL}/api/public/models",
         auth=(LANGFUSE_PUBLIC_KEY, LANGFUSE_SECRET_KEY),
         json={
             "modelName": f"ovh-ai-endpoints/{model['id']}",
             "matchPattern": f"(?i)^({model['name']})$",
             "unit": "TOKENS",
             **prices,
         },
     )
This is a one-time API call, not a script kept in this repository: once a model’s price is registered, it lives in Langfuse itself and any client can find it there. See examples/README.md for the full rationale, including why prices come out in euros despite Langfuse’s $ display.
Once a matching price definition exists, cost appears immediately on new traces.
On a real call against Qwen3.5-397B-A17B:
- 28 input tokens (0.60€ per million tokens)
- 1430 output tokens (3.60€ per million tokens)
Langfuse’s calculatedTotalCost came out to exactly: 28 * 0.0000006 + 1430 * 0.0000036 = 0.0051648€
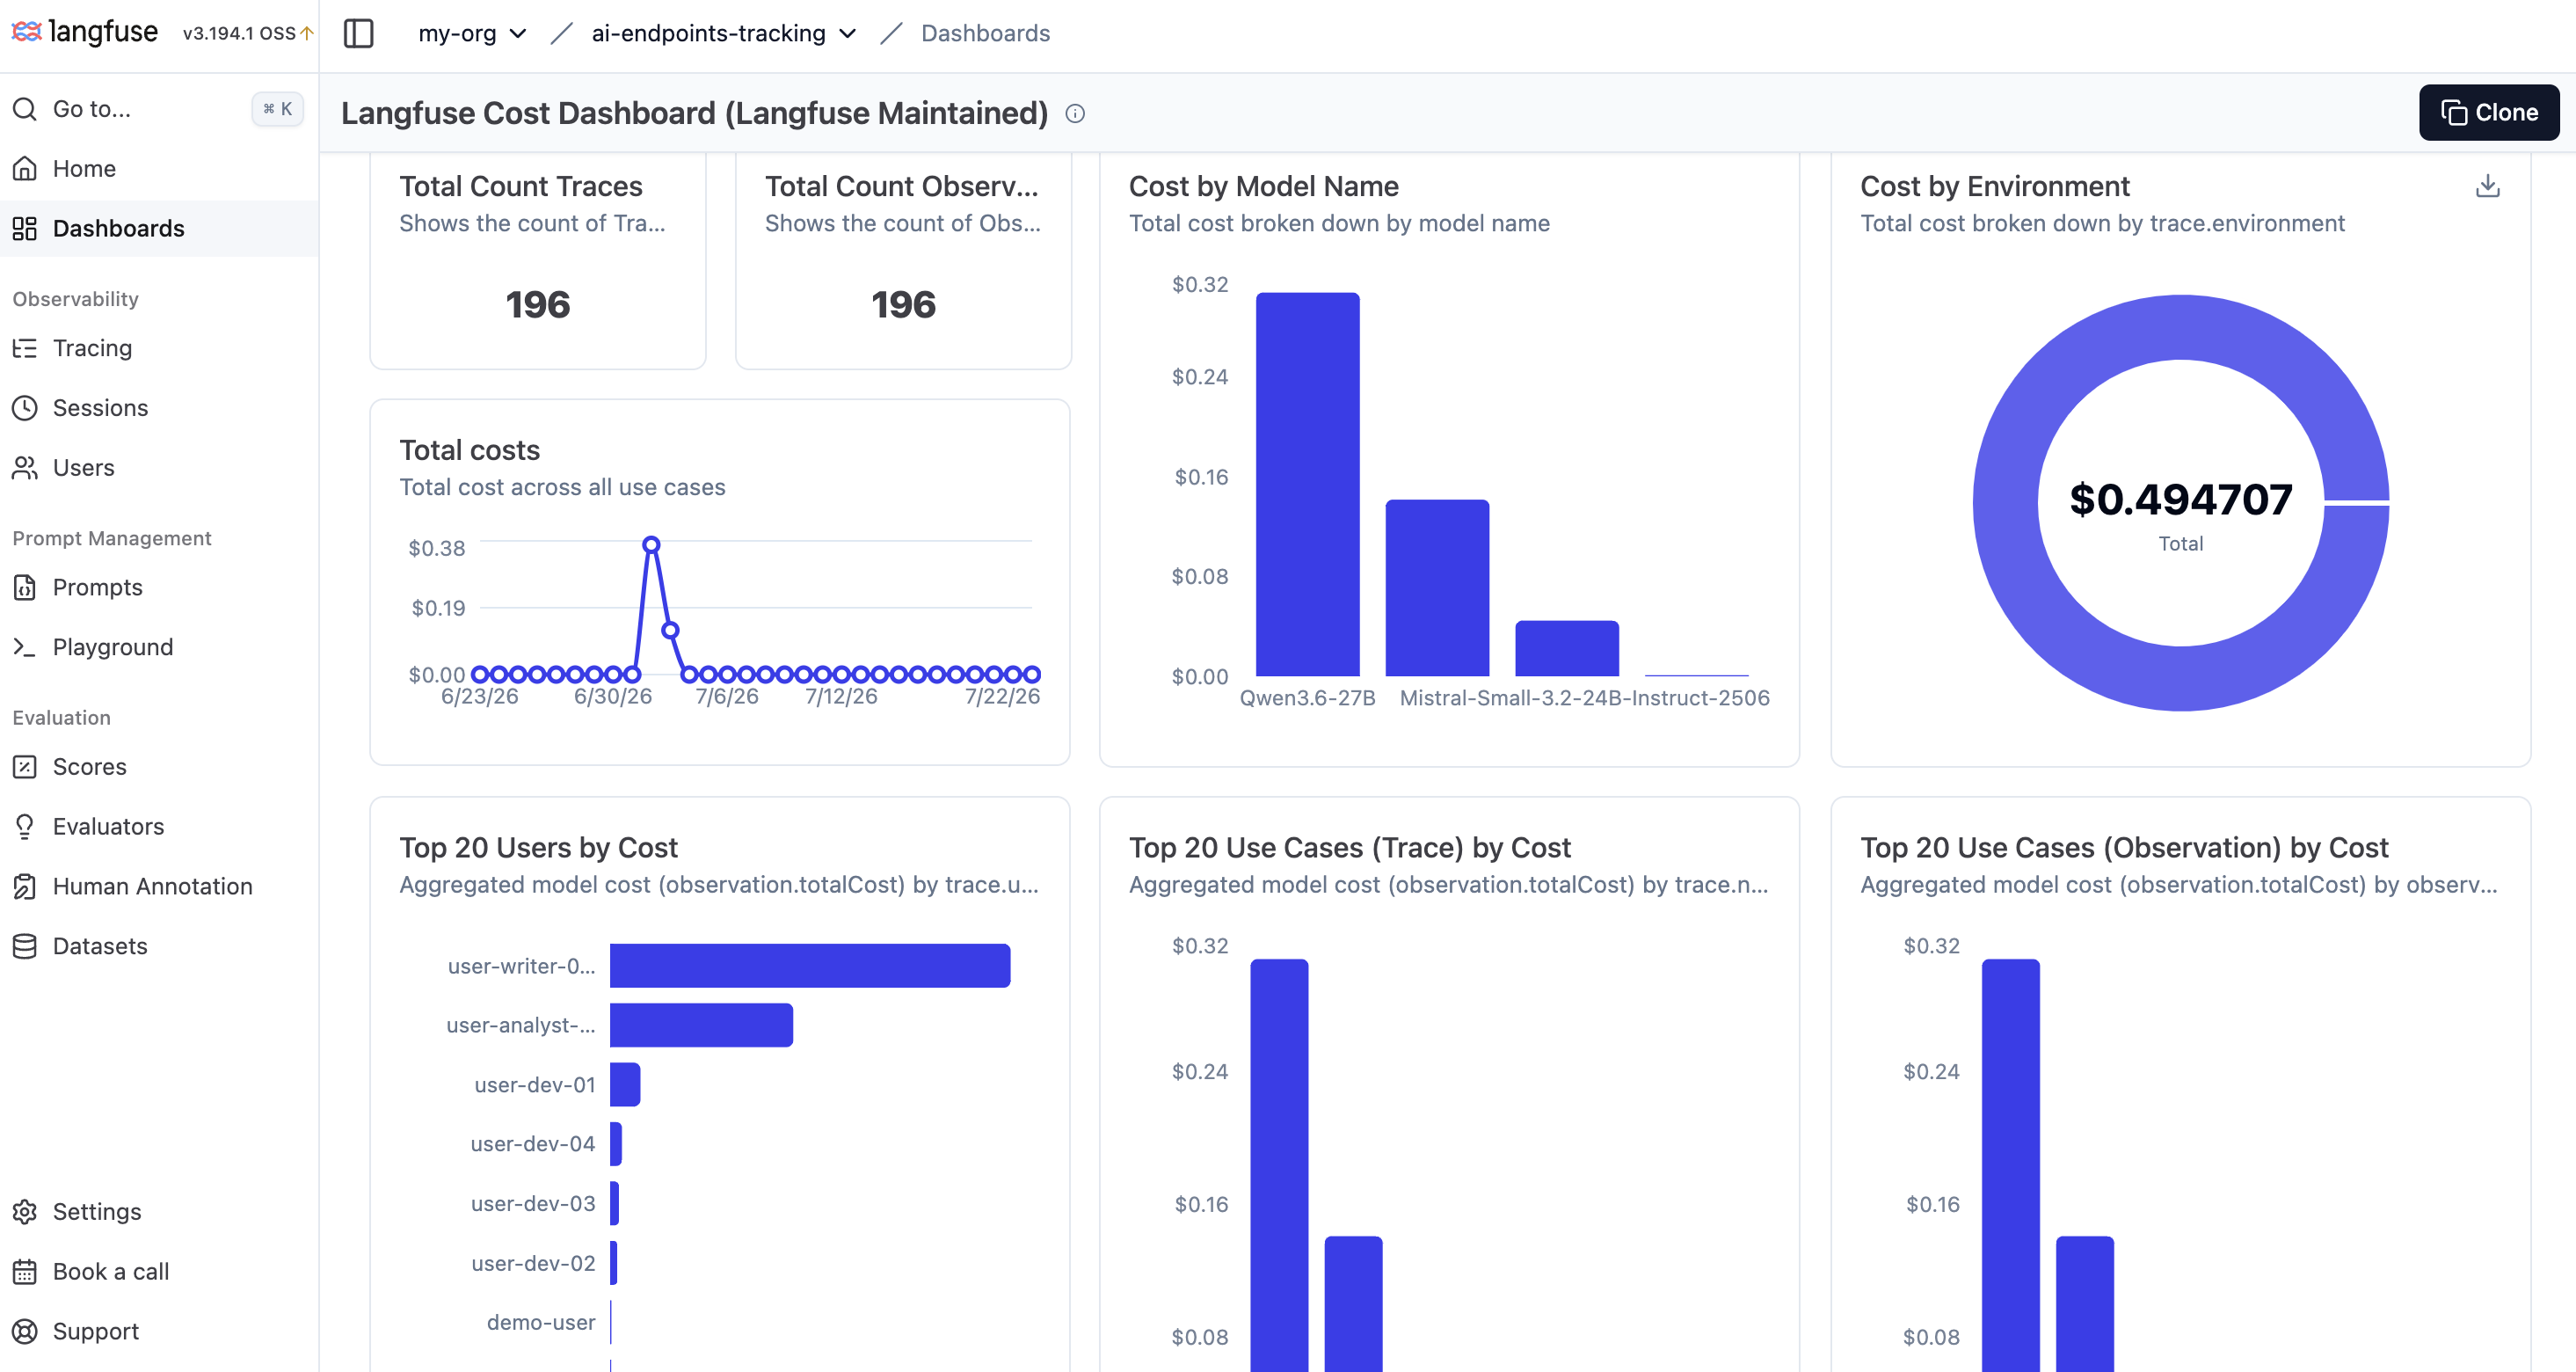
Langfuse Cost Dashboard
⚠️ Note: Langfuse always renders cost with a $ prefix; there is no per-project currency setting. If the price table you import is in euros, as OVHcloud AI Endpoints pricing is, every figure in the Langfuse UI is a euro amount displayed with a dollar sign.
You can also check the different metrics for model latency:
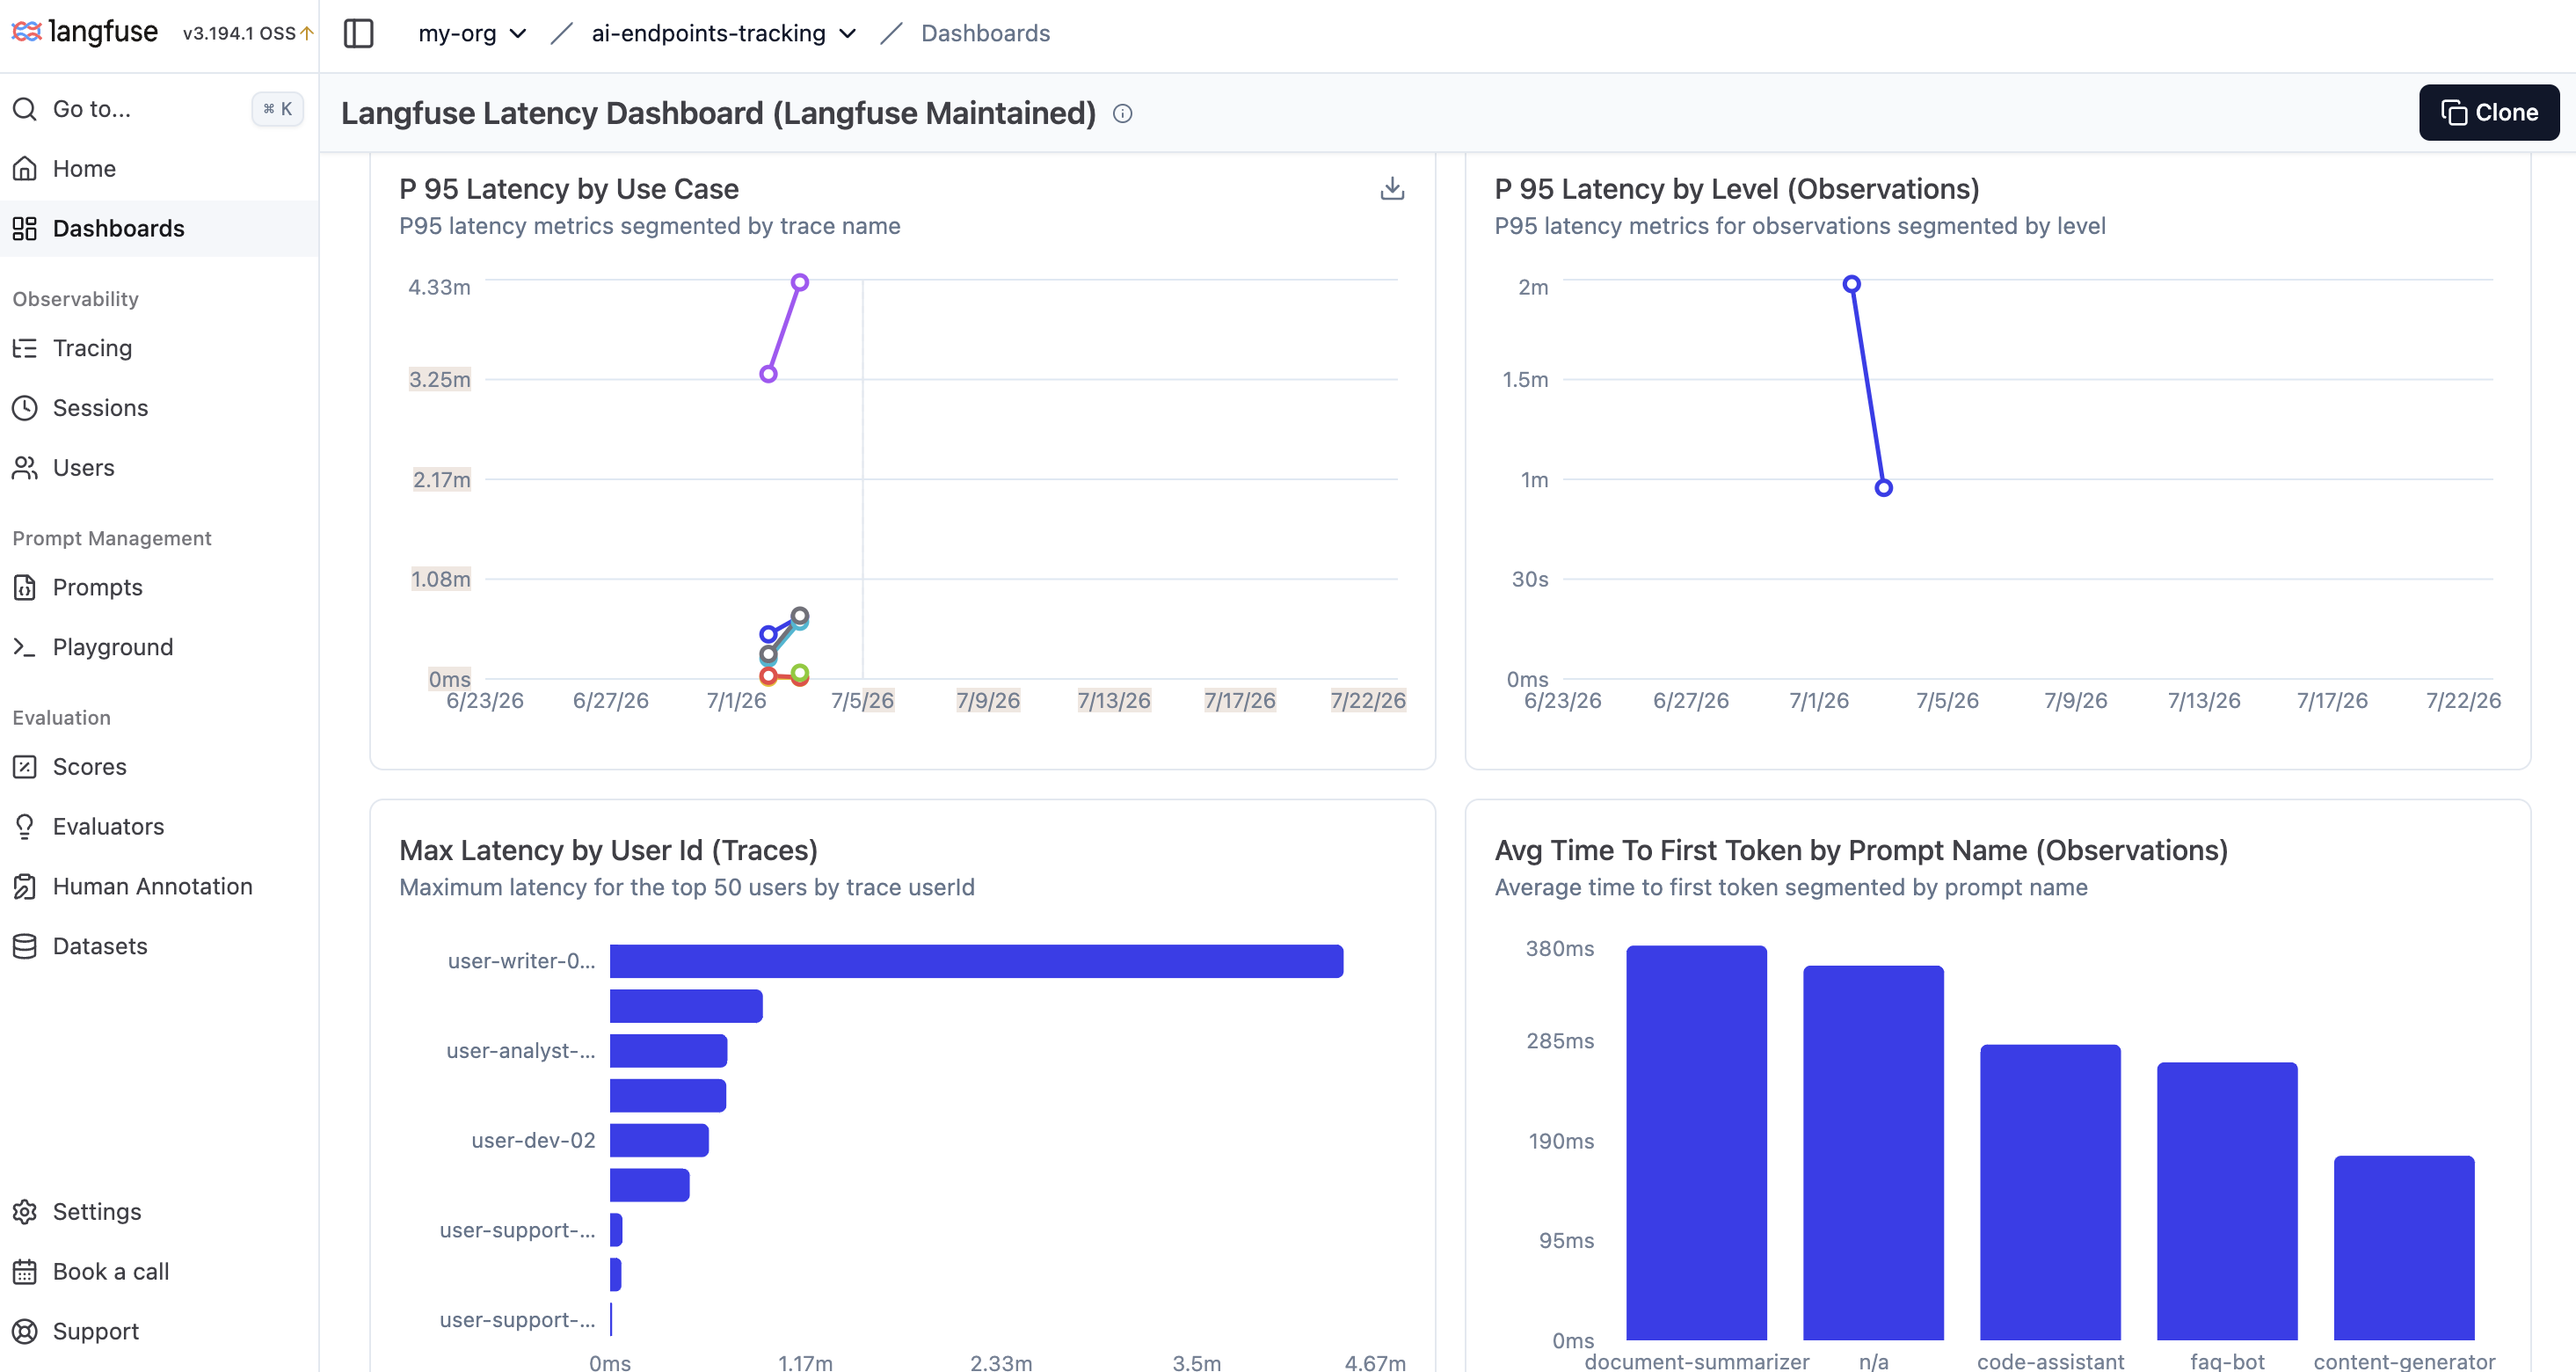
Langfuse Latency Dashboard
Go even further and analyze the traces, representing requests or operations.
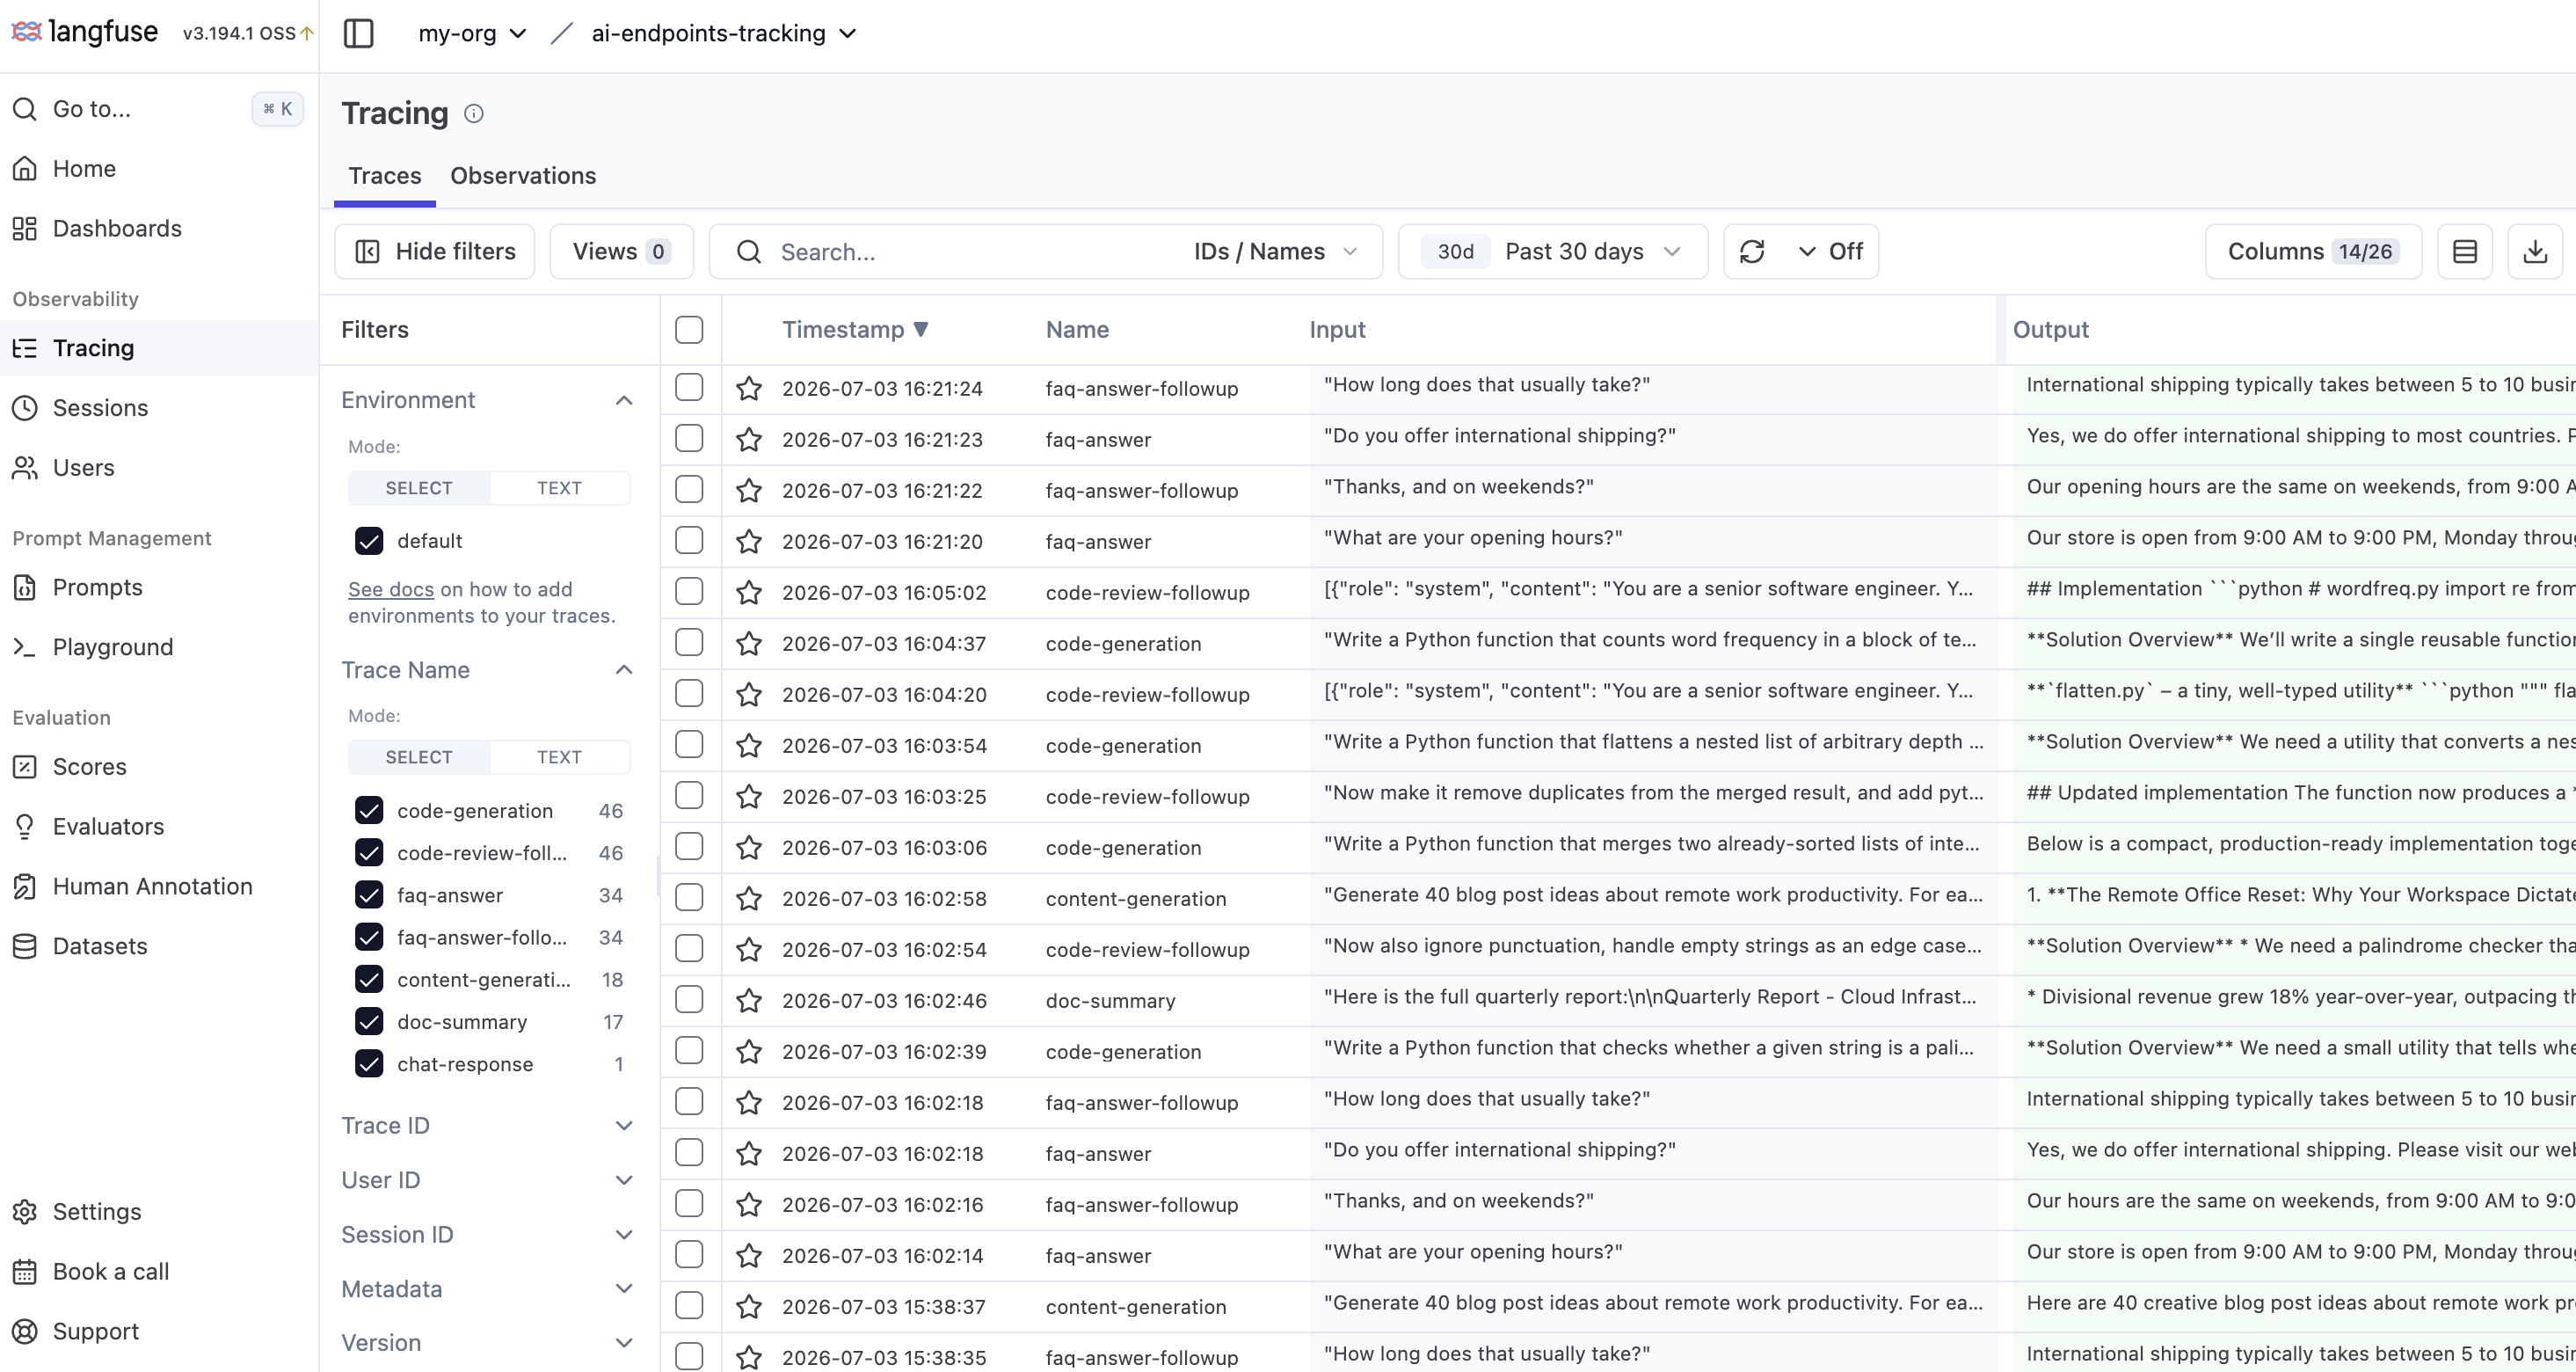
Langfuse tracing example
Congratulations! You now have access to all of Langfuse’s features in a controlled environment.
Going further
- High Availability: this architecture runs a single web and single worker replica, which is enough to validate the setup but leaves no room for a pod eviction without downtime. Bump replicas to 2 or more on web for a public-facing deployment, and add a PodDisruptionBudget sized to match – one configured against a single replica protects nothing.
- Autoscaling: neither HPA nor KEDA is enabled by default; enable one if request volume is unpredictable.
- Alerting on cost: the same models API used to seed prices can be queried back through Langfuse’s metrics API to build automated cost alerts per team or feature, rather than checking dashboards manually.
- Network policies: none are defined in this configuration; consider restricting egress from the Langfuse namespace to only the managed service endpoints it needs.
Conclusion
This architecture gives you a Langfuse deployment that:
- Runs on OVHcloud MKS with no self-managed databases – Postgres, Valkey, ClickHouse and Object Storage are all OVHcloud managed services
- Terminates TLS automatically through Traefik and cert-manager, renewing certificates without manual intervention
- Captures full traces, including token usage and latency, from any application calling OVHcloud AI Endpoints through a two-line SDK change
- Attributes cost per model, per user and per session, using AI Endpoints’ own catalog pricing rather than guesswork
- Keeps every prompt, completion and cost figure inside infrastructure you control