In our previous article, Infrastructure as Code (IaC) on OVHcloud – part 1: Terraform / OpenTofu, we saw that deploying manually take time and it’s complicated. That why Infrastructure as Code (IaC) is powerful and allow you to automate infrastructure provisioning. But do you know that Terraform/OpenTofu is not the only tool that exists?
In this blog post we will take a look at Pulumi.
Pulumi

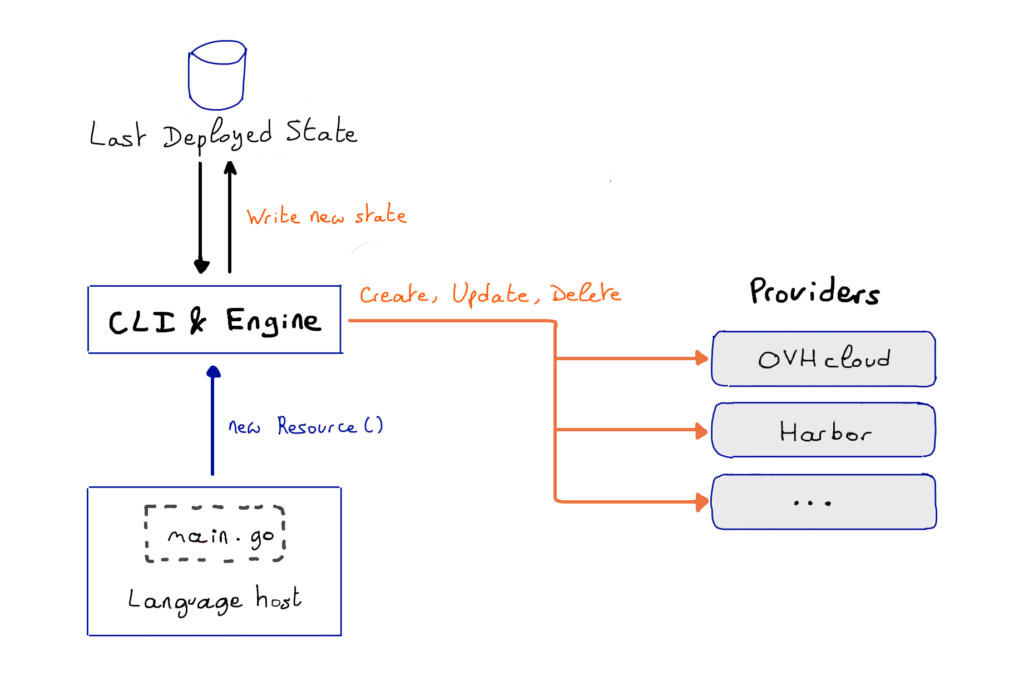
Pulumi is an Infrastructure as code (IaC) tool, open-sourced in 2018, that allows you to build your infrastructures with a programming language. Unlike Terraform which is more Ops oriented, Pulumi is more Developer oriented.
It supports a variety of programming languages: Go, Python, Node.js, Java, .Net…
How Pulumi is working?
Concretely, in a Pulumi program, users defined the desired state and Pulumi create the desired resources for a stack (environment).

To know more about how Pulumi works, you can go to the official documentation.
To provision, update or delete infrastructures, Pulumi have an intuitive Command Line Interface (CLI). If you are familiar with Docker Compose CLI and Terraform CLI, you will adopt Pulumi CLI too.
OVHcloud Pulumi provider
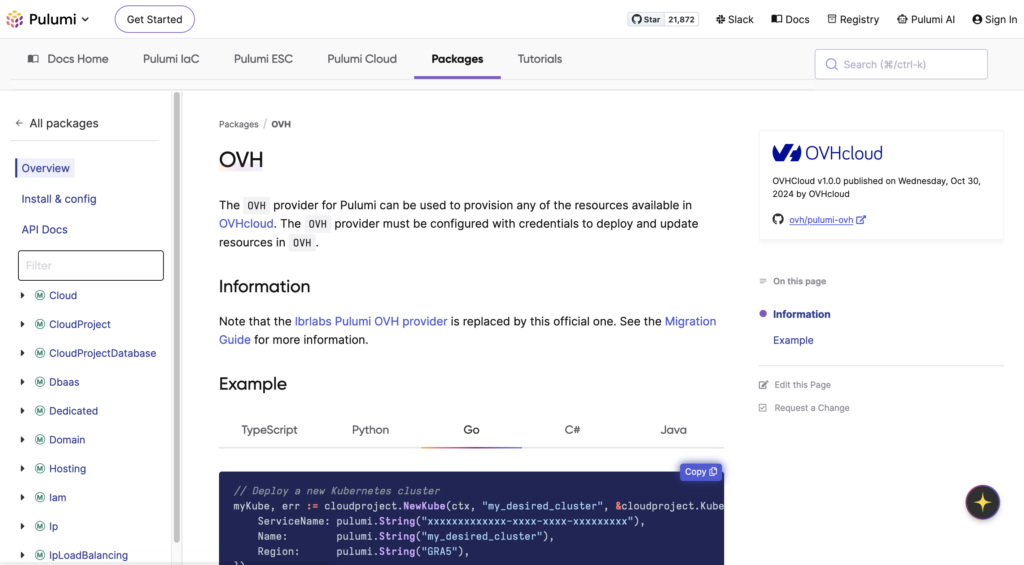
To easily provision your infrastructures, OVHcloud provides a Pulumi provider which is available in the official Pulumi registry.

The OVHcloud Pulumi provider is a sync of the existing OVHcloud Terraform provider. So it means that when we published a new release of the Terraform’s one, in the coming hours or days we publish a new version to the Pulumi’s one.
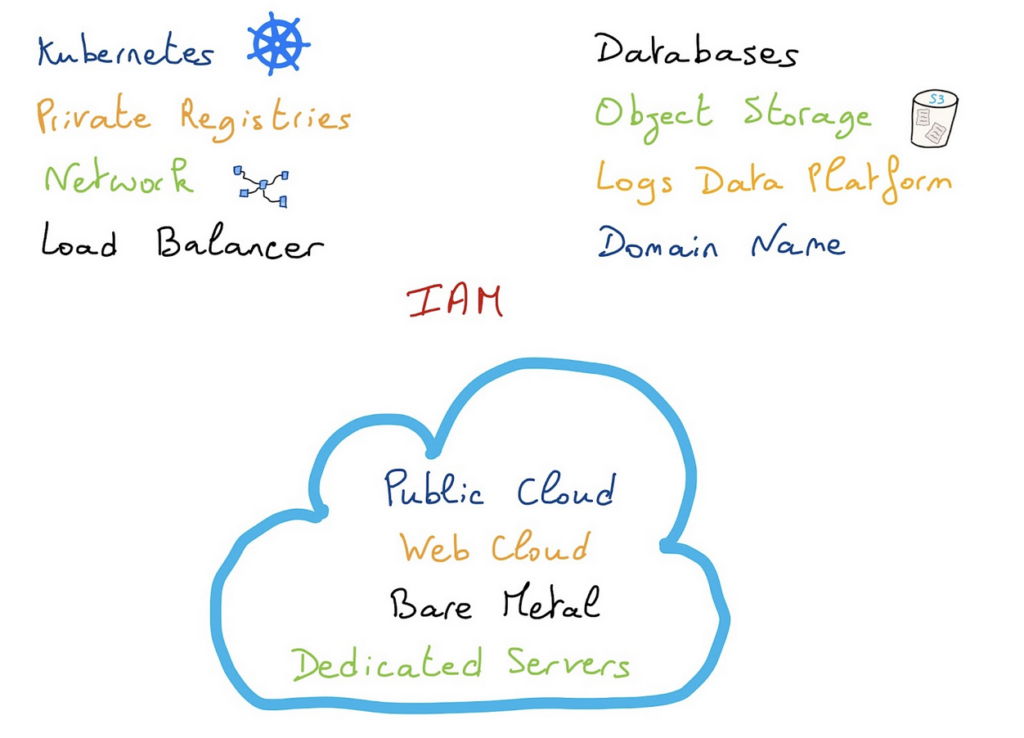
The Pulumi provider is synced to the Terraform provider so that means that with the OVHcloud Pulumi provider you can manage and deploy infrastructures for Public Cloud but also Bare Metal Cloud, Web Cloud and IAM. Depending on your needs, you can use a combinaison of several providers.

The provider is evolving every months, depending on the OVHcloud Terraform provider, so check the new releases changelog: https://github.com/ovh/pulumi-ovh/releases
The OVHcloud Pulumi provider is open source and available on GitHub, feel free to create issues or pull requests!
OVHcloud Pulumi templates
To help the users writing Pulumi programs, several existing templates exists. It’s the case for the programming language supported by Pulumi but also for Cloud providers.
To list the existing templates you can use, execute the following command:
$ pulumi new -l
Available Templates:
aiven-go A minimal Aiven Go Pulumi program
aiven-python A minimal Aiven Python Pulumi program
...
kubernetes-ovh-csharp A C# program to deploy a Kubernetes cluster on OVHcloud
kubernetes-ovh-go A Go program to deploy a Kubernetes cluster on OVHcloud
kubernetes-ovh-java A Java program to deploy a Kubernetes cluster on OVHcloud
kubernetes-ovh-python A Python program to deploy a Kubernetes cluster on OVHcloud
kubernetes-ovh-typescript A TypeScript program to deploy a Kubernetes cluster on OVHcloud
...
ovh-csharp A minimal OVHcloud C# Pulumi program
ovh-go A minimal OVHcloud Go Pulumi program
ovh-java A minimal OVHcloud Java Pulumi program
ovh-python A minimal OVHcloud Python Pulumi program
ovh-typescript A minimal OVHcloud TypeScript Pulumi program
...
As you can see, at OVHcloud we created several templates to help you to start your Pulumi journey in an easy way.
You can find all the templates listed with pulumi new -l command in the https://github.com/pulumi/templates/ GitHub repository.
Deploy a Managed Private Registry with Pulumi
To show you that you can deploy your infrastructures on OVHcloud with Pulumi, we will deploy a concrete example. In this blog post we will deploy a Managed Private Registry and configure it with all the minimum requirements:
- a user
- a (public) project
Prerequisites
You should have installed Pulumi CLI, on your machine. You can install it by following detailed installation instructions.
Get the credentials from the OVHCloud Public Cloud project:
application_keyapplication_secretconsumer_key
Get the service_name (Public Cloud project ID)
Export the OVHcloud credentials in environment variables:
$ export OVH_ENDPOINT="ovh-eu" # or ovh-ca or ovh-us
$ export OVH_APPLICATION_KEY="xxx"
$ export OVH_APPLICATION_SECRET="xxx"
$ export OVH_CONSUMER_KEY="xxx"
Let’s deploy our Private Registry!
Note that all the following source code are available on the OVHcloud Public Cloud examples GitHub repository.
In this blog post we will create an OVHcloud Managed Private Registry in Go/Golang programming language but if you want you can do the same things in Python, TypeScript, Java or C#.
Create a new folder, named ovh-registry-go which represents our project and go into it:
$ mkdir ovh-registry-go
$ cd ovh-registry-go
Log-in to Pulumi and store the state locally:
$ pulumi login --local

Logged in to xxxxxxxx as avache (file://~)
Initialize our project (with an existing template):
$ pulumi new ovh-go

This command will walk you through creating a new Pulumi project.

Enter a value or leave blank to accept the (default), and press .
Press ^C at any time to quit.

Project name (ovh-registry-go):
Project description (A minimal OVHcloud Go Pulumi program):
Created project 'ovh-registry-go'

Stack name (dev):
Created stack 'dev'
Enter your passphrase to protect config/secrets:
Re-enter your passphrase to confirm:

The OVHcloud region to deploy into (ovhRegion) (GRA):
The OVHcloud Public Cloud Project to deploy into (ovhServiceName): xxxxxxxxxxxxx
Name of the plan (planName) (SMALL):
Name of the private registry (registryName) (my-registry):
Email of the user (registryUserEmail) (myuser@ovh.com):
Login of the user (registryUserLogin) (myuser):
Name of the user (registryUserName) (user):
Saved config

Installing dependencies…
Finished installing dependencies
Your new project is ready to go! ✨

To perform an initial deployment, run pulumi up
This command displays a prompt that ask you several questions to initialize the project.
You can press the “Enter” button for every questions except the one asking you the ovhServiceName :).
The command creates a dev stack and the code organization of your project:
$ tree
.
├── Pulumi.dev.yaml
├── Pulumi.yaml
├── go.mod
├── go.sum
└── main.go
Let’s take a look at the generated main.go file:
package main

import (
	"github.com/ovh/pulumi-ovh/sdk/go/ovh/cloudproject"
	"github.com/pulumi/pulumi/sdk/v3/go/pulumi"
	"github.com/pulumi/pulumi/sdk/v3/go/pulumi/config"
)

func main() {
	pulumi.Run(func(ctx *pulumi.Context) error {
		// Get some configuration values or use defaults
		cfg := config.New(ctx, "")
		ovhServiceName := cfg.Require("ovhServiceName")
		ovhRegion, err := cfg.Try("ovhRegion")
		if err != nil {
			ovhRegion = "GRA"
		}

		planName, err := cfg.Try("planName")
		if err != nil {
			planName = "SMALL"
		}

		registryName, err := cfg.Try("registryName")
		if err != nil {
			registryName = "my-registry"
		}

		registryUserName, err := cfg.Try("registryUserName")
		if err != nil {
			registryUserName = "user"
		}

		registryUserEmail, err := cfg.Try("registryUserEmail")
		if err != nil {
			registryUserEmail = "myuser@ovh.com"
		}

		registryUserLogin, err := cfg.Try("registryUserLogin")
		if err != nil {
			registryUserLogin = "myuser"
		}

		// Initiate the configuration of the registry
		regcap, err := cloudproject.GetCapabilitiesContainerFilter(ctx, &cloudproject.GetCapabilitiesContainerFilterArgs{
			ServiceName: ovhServiceName,
			PlanName:    planName,
			Region:      ovhRegion,
		}, nil)
		if err != nil {
			return err
		}

		// Deploy a new Managed private registry
		myRegistry, err := cloudproject.NewContainerRegistry(ctx, registryName, &cloudproject.ContainerRegistryArgs{
			ServiceName: pulumi.String(regcap.ServiceName),
			PlanId:      pulumi.String(regcap.Id),
			Region:      pulumi.String(regcap.Region),
		})
		if err != nil {
			return err
		}

		// Create a Private Registry User
		myRegistryUser, err := cloudproject.NewContainerRegistryUser(ctx, registryUserName, &cloudproject.ContainerRegistryUserArgs{
			ServiceName: pulumi.String(regcap.ServiceName),
			RegistryId:  myRegistry.ID(),
			Email:       pulumi.String(registryUserEmail),
			Login:       pulumi.String(registryUserLogin),
		})
		if err != nil {
			return err
		}

		// Add as an output registry information
		ctx.Export("registryURL", myRegistry.Url)
		ctx.Export("registryUser", myRegistryUser.User)
		ctx.Export("registryPassword", myRegistryUser.Password)

		return nil
	})
}
The code above:
– initiate several variables (serviceName, region, registry’s information and registryUser’s informations)
– create an OVHcloud Managed Private Registry (based on Harbor)
– create a registry user
– display the useful informations to connect to the newly created private registry
Let’s add a public project
Before applying our Go program, we will add some lines of code to our base template in order to create a public project in the private registry using the Harbor.
Open and edit the main.go file.
In order to use the Harbor Pulumi provider, add the new dependency in the “import” block:
"github.com/pulumiverse/pulumi-harbor/sdk/v3/go/harbor"And before the return nil line, add the following block code:
	//Use the created regitry to initiate the Harbor provider
        harborProvider, err := harbor.NewProvider(ctx, "harbor", &harbor.ProviderArgs{
            Username: myRegistryUser.User,
            Password: myRegistryUser.Password,
            Url:      myRegistry.Url,
        }, pulumi.DependsOn([]pulumi.Resource{myRegistry, myRegistryUser}))
        if err != nil {
            return err
        }

        // Create a public project in your harbor registry
        project, err := harbor.NewProject(ctx, "project", &harbor.ProjectArgs{
            Name:   pulumi.String("my-new-project"),
	    Public: pulumi.Bool(true),
        }, pulumi.Provider(harborProvider))
        if err != nil {
            return err
        }

        ctx.Export("project", project.Name)
Run the go mod tidy command to ask Go to download and install the necessary Go providers and dependencies.
$ go mod tidy

go: finding module for package github.com/pulumiverse/pulumi-harbor/sdk/v3/go/harbor
go: downloading github.com/pulumiverse/pulumi-harbor v3.10.15+incompatible
go: downloading github.com/pulumiverse/pulumi-harbor/sdk/v3 v3.10.15
go: found github.com/pulumiverse/pulumi-harbor/sdk/v3/go/harbor in github.com/pulumiverse/pulumi-harbor/sdk/v3 v3.10.15
Preview/dry-run before applying the changes:
$ pulumi preview

Previewing update (dev):
     Type                                       Name                 Plan
 +   pulumi:pulumi:Stack                        ovh-registry-go-dev  create
 +   ├─ ovh:CloudProject:ContainerRegistry      my-registry          create
 +   ├─ ovh:CloudProject:ContainerRegistryUser  user                 create
 +   ├─ pulumi:providers:harbor                 harbor               create
 +   └─ harbor:index:Project                    project              create

Outputs:
    project         : output<string>
    registryPassword: output<string>
    registryURL     : output<string>
    registryUser    : output<string>

Resources:
    + 5 to create
Now let’s deploy our OVHcloud Managed Private Registry with Pulumi:
$ pulumi up

Previewing update (dev):
     Type                                       Name                 Plan
 +   pulumi:pulumi:Stack                        ovh-registry-go-dev  create
 +   ├─ ovh:CloudProject:ContainerRegistry      my-registry          create
 +   ├─ ovh:CloudProject:ContainerRegistryUser  user                 create
 +   ├─ pulumi:providers:harbor                 harbor               create
 +   └─ harbor:index:Project                    project              create

Outputs:
    project         : output<string>
    registryPassword: output<string>
    registryURL     : output<string>
    registryUser    : output<string>

Resources:
    + 5 to create

Do you want to perform this update? yes
Updating (dev):
     Type                                       Name                 Status
 +   pulumi:pulumi:Stack                        ovh-registry-go-dev  created (164s)
 +   ├─ ovh:CloudProject:ContainerRegistry      my-registry          created (162s)
 +   ├─ ovh:CloudProject:ContainerRegistryUser  user                 created (0.53s)
 +   ├─ pulumi:providers:harbor                 harbor               created (0.15s)
 +   └─ harbor:index:Project                    project              created (0.41s)

Outputs:
    project         : "my-new-project"
    registryPassword: [secret]
    registryURL     : "https://xxxxxxxx.xx.gra9.container-registry.ovh.net"
    registryUser    : "myuser"

Resources:
    + 5 created

Duration: 2m49s
Your private registry has now been deployed.
Access and connect to the Private Registry (Harbor UI)
Your registry have been created with a user, so you have all the information to connect to it.
In order to do this, retrieve the registry URL, login and password from the dev Pulumi stack:
$ pulumi stack output registryURL -s dev
$ pulumi stack output registryUser -s dev
$ pulumi stack output registryPassword --show-secrets -s dev
Now you can use these informations to connect to the Managed Private Registry.
Conclusion
As you have seen in this blog post, thanks to the OVHcloud Pulumi provider you can automatise the deployment of your infrastructures. The provider is evolving so feel free to take a look to the new releases changelog. You can also quickly deploy several resources like an OVHcloud Managed Kubernetes cluster and a Private Registry thanks to the Pulumi official templates.
We used the Go programming language but you can do the same things in TypeScript, Python, Java and C#.
In the next blog post of this series, we will see the usage on OVHcloud of another IaC tool (yes!).
Developer Advocate at OVHcloud, specialized in Cloud Native, Infrastructure as Code (IaC) & Developer eXperience (DX).
She is recognized as a Docker Captain, CNCF ambassador, GDE & Women techmakers Ambassador.
She has been working as a Developer and Ops for over 20 years. Cloud enthusiast and advocates DevOps/Cloud/Golang best practices.
Technical writer, a sketchnoter and a speaker at international conferences.
Book author, she created a new visual way for people to learn and understand Cloud technologies: "Understanding Kubernetes / Docker / Istio in a visual way" in sketchnotes, books and videos.
