

There are many ways to train a model,📚 using detailed instructions, system prompts, Retrieval Augmented Generation, or function calling
One way is fine-tuning, which is what this blog is about! ✨
Two years back we posted a blog on fine-tuning Llama models—it’s not nearly as complicated as it was before 😉. This time we’re using the Framework Axolotl, so hopefully there’s less to manage.
So what’s the plan?
For this blog, I’d like to fine-tune a small model, Llama-3.2-1B-Instruct, and then test it out on a few questions about our OVHcloud AI Endpoints product 📝.
Before we fine-tune, let’s try it out! Deploying a Hugging Face model is super easy with AI Deploy from AI Machine Learning Services 🥳.
And thanks to a previous blog post, we know how to use vLLM and AI Deploy.
ovhai app run --name $1 \
	--flavor l40s-1-gpu \
	--gpu 2 \
	--default-http-port 8000 \
	--env OUTLINES_CACHE_DIR=/tmp/.outlines \
	--env HF_TOKEN=$MY_HUGGING_FACE_TOKEN \
	--env HF_HOME=/hub \
	--env HF_DATASETS_TRUST_REMOTE_CODE=1 \
	--env HF_HUB_ENABLE_HF_TRANSFER=0 \
	--volume standalone:/hub:rw \
	--volume standalone:/workspace:rw \
	vllm/vllm-openai:v0.8.2 \
	-- bash	-c "vllm serve meta-llama/Llama-3.2-1B-Instruct"
⚠️ Make sure you’ve agreed to the terms of use for the model’s license from Hugging Face ⚠️
Check out the blog I mentioned earlier for all the details you need on the command and its parameters.
To test our different chatbots we will use a simple Gradio application:
# Application to compare answers generation from OVHcloud AI Endpoints exposed model and fine tuned model.
# ⚠️ Do not used in production!! ⚠️
import gradio as gr
import os
from langchain_openai import ChatOpenAI
from langchain_core.prompts import ChatPromptTemplate
# 📜 Prompts templates 📜
prompt_template = ChatPromptTemplate.from_messages(
[
("system", "{system_prompt}"),
("human", "{user_prompt}"),
]
)
def chat(prompt, system_prompt, temperature, top_p, model_name, model_url, api_key):
"""
Function to generate a chat response using the provided prompt, system prompt, temperature, top_p, model name, model URL and API key.
"""
# ⚙️ Initialize the OpenAI model ⚙️
llm = ChatOpenAI(api_key=api_key,
model=model_name,
base_url=model_url,
temperature=temperature,
top_p=top_p
)
# 📜 Apply the prompt to the model 📜
chain = prompt_template | llm
ai_msg = chain.invoke(
{
"system_prompt": system_prompt,
"user_prompt": prompt
}
)
# 🤖 Return answer in a compatible format for Gradio component.
return [{"role": "user", "content": prompt}, {"role": "assistant", "content": ai_msg.content}]
# 🖥️ Main application 🖥️
with gr.Blocks() as demo:
with gr.Row():
with gr.Column():
system_prompt = gr.Textbox(value="""You are a specialist on OVHcloud products.
If you can't find any sure and relevant information about the product asked, answer with "This product doesn't exist in OVHcloud""",
label="🧑🏫 System Prompt 🧑🏫")
temperature = gr.Slider(minimum=0.0, maximum=2.0, step=0.01, label="Temperature", value=0.5)
top_p = gr.Slider(minimum=0.0, maximum=1.0, step=0.01, label="Top P", value=0.0)
model_name = gr.Textbox(label="🧠 Model Name 🧠", value='Llama-3.1-8B-Instruct')
model_url = gr.Textbox(label="🔗 Model URL 🔗", value='https://oai.endpoints.kepler.ai.cloud.ovh.net/v1')
api_key = gr.Textbox(label="🔑 OVH AI Endpoints Access Token 🔑", value=os.getenv("OVH_AI_ENDPOINTS_ACCESS_TOKEN"), type="password")
with gr.Column():
chatbot = gr.Chatbot(type="messages", label="🤖 Response 🤖")
prompt = gr.Textbox(label="📝 Prompt 📝", value='How many requests by minutes can I do with AI Endpoints?')
submit = gr.Button("Submit")
submit.click(chat, inputs=[prompt, system_prompt, temperature, top_p, model_name, model_url, api_key], outputs=chatbot)
demo.launch()ℹ️ You can find all resources to build and run this application in the dedicated folder in the GitHub repository.
Let’s test with a simple question: “How many requests by minutes can I do with AI Endpoints?”.
The first test is with Llama-3.2-1B-Instruct from Hugging Face deployed with vLLM and OVHcloud AI Deploy.
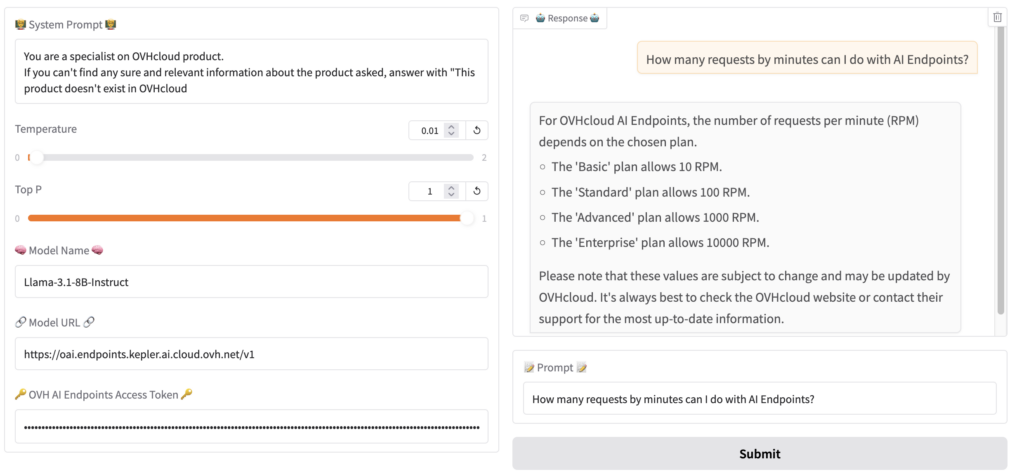
The response isn’t exactly what we expected. 😅
FYI, according to the official OVHcloud guide, the correct answer is:
– Anonymous: 2 requests per minute, per IP and per model.
– Authenticated with an API access key: 400 requests per minute, per Public Cloud project and per model.
What’s the best way to feed the model fresh data?
I bet you already know this—you can use some data during the inference step, using Retrieval Augmented Generation (RAG). You can learn how to set up RAG by reading our past blog post. 📗
Another way to feed a model fresh data by fine-tuning. ✨
In a nutshell, fine-tuning is when you take a pre-trained machine learning model and train it further on additional data, so it can do a specific job. It’s quicker and easier than building a model yourself, or from scratch. 😉
For this, I’m picking Llama-3.2-1B-Instruct from Hugging Face as the base model.
ℹ️ The more parameters your base model has, the more computing power you need. In this case, this model needs between 3GB and 4GB of memory, which is why we’ll be using a single L4 GPU (we need Ampere compatible architecture).
When data is your gold
To train a model, you need enough good-quality data.
The first part is easy; I get the OVHcloud AI Endpoints official documentation in a markdown format from our public cloud documentation repository (by the way, would you like to contribute?). 📚
First, create a dataset with the right format, Axolotl offers varying dataset formats. I prefer the conversation format because it’s the easiest for my use case, so I’m going with that. 😉
{
   "messages": [
     {"role": "...", "content": "..."},
     {"role": "...", "content": "..."},
     ...]
}
And to create it manually and add the relevant information, I use an LLM to convert the markdown data into a well-formed dataset. 🤖
Here we’re using Python script 🐍:
import os
from pathlib import Path
from langchain_openai import ChatOpenAI
from langchain.schema import HumanMessage

# 🗺️ Define the JSON schema for the response 🗺️
message_schema = {
    "type": "object",
    "properties": {
        "role": {"type": "string"},
        "content": {"type": "string"}
    },
    "required": ["role", "content"]
}

response_format = {
    "type": "json_object",
    "json_schema": {
        "name": "Messages",
        "description": "A list of messages with role and content",
        "properties": {
            "messages": {
                "type": "array",
                "items": message_schema
            }
        }
    }
}

# ⚙️ Initialize the chat model with AI Endpoints configuration ⚙️
chat_model = ChatOpenAI(
    api_key=os.getenv("OVH_AI_ENDPOINTS_ACCESS_TOKEN"),
    base_url=os.getenv("OVH_AI_ENDPOINTS_MODEL_URL"),
    model_name=os.getenv("OVH_AI_ENDPOINTS_MODEL_NAME"),
    temperature=0.0
)

# 📂 Define the directory path 📂
directory_path = "docs/pages/public_cloud/ai_machine_learning"
directory = Path(directory_path)

# 🗃️ Walk through the directory and its subdirectories 🗃️
for path in directory.rglob("*"):
    # Check if the current path is a directory
    if path.is_dir():
        # Get the name of the subdirectory
        sub_directory = path.name

        # Construct the path to the "guide.en-gb.md" file in the subdirectory
        guide_file_path = path / "guide.en-gb.md"

        # Check if the "guide.en-gb.md" file exists in the subdirectory
        if "endpoints" in sub_directory and guide_file_path.exists():
            print(f"📗 Guide processed: {sub_directory}")
            with open(guide_file_path, 'r', encoding='utf-8') as file:
                raw_data = file.read()

            user_message = HumanMessage(content=f"""
With the markdown following, generate a JSON file composed as follows: a list named "messages" composed of tuples with a key "role" which can have the value "user" when it's the question and "assistant" when it's the response. To split the document, base it on the markdown chapter titles to create the question, seems like a good idea.
Keep the language English.
I don't need to know the code to do it but I want the JSON result file.
For the "user" field, don't just repeat the title but make a real question, for example "What are the requirements for OVHcloud AI Endpoints?"
Be sure to add OVHcloud with AI Endpoints so that it's clear that OVHcloud creates AI Endpoints.
Generate the entire JSON file.
An example of what it should look like: messages [{{"role":"user", "content":"What is AI Endpoints?"}}]
There must always be a question followed by an answer, never two questions or two answers in a row.
The source markdown file:
{raw_data}
""")
            chat_response = chat_model.invoke([user_message], response_format=response_format)

            with open(f"./generated/{sub_directory}.json", 'w', encoding='utf-8') as output_file:
                output_file.write(chat_response.content)
                print(f"✅ Dataset generated: ./generated/{sub_directory}.json")
ℹ️ You can find all resources to build and run this application in the dedicated folder in the GitHub repository.
Here’s a sample of the file created as the dataset:
[
  {
    "role": "user",
    "content": "What are the requirements for using OVHcloud AI Endpoints?"
  },
  {
    "role": "assistant",
    "content": "To use OVHcloud AI Endpoints, you need the following: \n1. A Public Cloud project in your OVHcloud account \n2. A payment method defined on your Public Cloud project. Access keys created from Public Cloud projects in Discovery mode (without a payment method) cannot use the service."
  },
  {
    "role": "user",
    "content": "What are the rate limits for using OVHcloud AI Endpoints?"
  },
  {
    "role": "assistant",
    "content": "The rate limits for OVHcloud AI Endpoints are as follows:\n- Anonymous: 2 requests per minute, per IP and per model.\n- Authenticated with an API access key: 400 requests per minute, per PCI project and per model."
  },
   ...]
}
As for quantity, it’s a bit tricky. How can we generate the right data for training without lowering data quality?
To do this, I’ve created synthetic data using an LLM to create it from the original data. The trick is to generate more data on the same topic by rephrasing it differently but with the same idea.
Here is the Python script 🐍 to do the data augmentation:
import os
import json
import uuid
from pathlib import Path
from langchain_openai import ChatOpenAI
from langchain.schema import HumanMessage
from jsonschema import validate, ValidationError

# 🗺️ Define the JSON schema for the response 🗺️
message_schema = {
    "type": "object",
    "properties": {
        "role": {"type": "string"},
        "content": {"type": "string"}
    },
    "required": ["role", "content"]
}

response_format = {
    "type": "json_object",
    "json_schema": {
        "name": "Messages",
        "description": "A list of messages with role and content",
        "properties": {
            "messages": {
                "type": "array",
                "items": message_schema
            }
        }
    }
}

# ✅ JSON validity verification ❌
def is_valid(json_data):
    """
    Test the validity of the JSON data against the schema.
    Argument:
        json_data (dict): The JSON data to validate.
    Raises:
        ValidationError: If the JSON data does not conform to the specified schema.
    """
    try:
        validate(instance=json_data, schema=response_format["json_schema"])
        return True
    except ValidationError as e:
        print(f"❌ Validation error: {e}")
        return False

# ⚙️ Initialize the chat model with AI Endpoints configuration ⚙️
chat_model = ChatOpenAI(
    api_key=os.getenv("OVH_AI_ENDPOINTS_ACCESS_TOKEN"),
    base_url=os.getenv("OVH_AI_ENDPOINTS_MODEL_URL"),
    model_name=os.getenv("OVH_AI_ENDPOINTS_MODEL_NAME"),
    temperature=0.0
)

# 📂 Define the directory path 📂
directory_path = "generated"
print(f"📂 Directory path: {directory_path}")
directory = Path(directory_path)

# 🗃️ Walk through the directory and its subdirectories 🗃️
for path in directory.rglob("*"):
    print(f"📜 Processing file: {path}")
    # Check if the current path is a valid file
    if path.is_file() and path.name.__contains__ ("endpoints"):
        # Read the raw data from the file
        with open(path, 'r', encoding='utf-8') as file:
            raw_data = file.read()

        try:
            json_data = json.loads(raw_data)
        except json.JSONDecodeError:
            print(f"❌ Failed to decode JSON from file: {path.name}")
            continue

        if not is_valid(json_data):
            print(f"❌ Dataset non valide: {path.name}")
            continue
        print(f"✅ Input dataset valide: {path.name}")

        user_message = HumanMessage(content=f"""
        Given the following JSON, generate a similar JSON file where you paraphrase each question in the content attribute
        (when the role attribute is user) and also paraphrase the value of the response to the question stored in the content attribute
        when the role attribute is assistant.
        The objective is to create synthetic datasets based on existing datasets.
        I do not need to know the code to do this, but I want the resulting JSON file.
        It is important that the term OVHcloud is present as much as possible, especially when the terms AI Endpoints are mentioned
        either in the question or in the response.
        There must always be a question followed by an answer, never two questions or two answers in a row.
        It is IMPERATIVE to keep the language in English.
        The source JSON file:
        {raw_data}
        """)

        chat_response = chat_model.invoke([user_message], response_format=response_format)

        output = chat_response.content

        # Replace unauthorized characters
        output = output.replace("\\t", " ")

        generated_file_name = f"{uuid.uuid4()}_{path.name}"
        with open(f"./generated/synthetic/{generated_file_name}", 'w', encoding='utf-8') as output_file:
            output_file.write(output)

        if not is_valid(json.loads(output)):
            print(f"❌ ERROR: File {generated_file_name} is not valid")
        else:
            print(f"✅ Successfully generated file: {generated_file_name}")
ℹ️ Again, you can find all resources to build and run this application in the dedicated folder in the GitHub repository.
Fine-tune the model
We now have enough training data, let’s fine-tune!
ℹ️ It’s hard to say exactly how much data is needed to train a model properly. It all depends on the model, the data, the topic, and so on.
The only option is to test and adapt. 🔁.
I use Jupyter notebook, created with OVHcloud AI Notebooks, to fine-tune my models.
ovhai notebook run conda jupyterlab \
	--name axolto-llm-fine-tune \
	--framework-version 25.3.1-py312-cudadevel128-gpu \
	--flavor l4-1-gpu \
	--gpu 1 \
	--envvar HF_TOKEN=$MY_HF_TOKEN \
	--envvar WANDB_TOKEN=$MY_WANDB_TOKEN \
	--unsecure-http
ℹ️ For more details on how to create Jupyter notebook with AI Notebooks, read the documentation.
⚙️ The HF_TOKEN environment variable is used to pull and push the trained model to Hugging Face
⚙️ The WANDB_TOKEN environment variable helps you track training quality in Weight & Biases
Once the notebook is set up, you can start coding the model’s training with Axolotl.
To start, install Axolotl CLI and its dependencies. 🧰
# Axolotl need these dependencies
!pip install torch==2.6.0 torchvision==0.21.0 torchaudio==2.6.0 --index-url https://download.pytorch.org/whl/cu126

# Axolotl CLI installation
!pip install --no-build-isolation axolotl[flash-attn,deepspeed]

# Verify Axolotl version and installation
!axolotl --version
The next step is to configure the Hugging Face CLI. 🤗
!pip install -U "huggingface_hub[cli]"

!huggingface-cli --version
import os
from huggingface_hub import login
login(os.getenv("HF_TOKEN"))Then, configure your Weight & Biases access.
pip install wandb

!wandb login $WANDB_TOKEN
Once all that’s done, it’s time to train the model.
!axolotl train /workspace/instruct-lora-1b-ai-endpoints.ymlYou only need to type this one line to train it, how cool is that? 😎
ℹ️ With one L4 card, 10 epochs, and roughly 2000 questions and answers in the datasets, it ran for about 90 minutes.
Basically, the command line needs just one parameter: the Axolotl config file. You can find everything you need to set up Axolotl in the official documentation.📜
Here’s what the model was trained on:
base_model: meta-llama/Llama-3.2-1B-Instruct
# optionally might have model_type or tokenizer_type
model_type: LlamaForCausalLM
tokenizer_type: AutoTokenizer
# Automatically upload checkpoint and final model to HF
# hub_model_id: username/custom_model_name

load_in_8bit: true
load_in_4bit: false

datasets:
  - path: /workspace/ai-endpoints-doc/
    type: chat_template

    field_messages: messages
    message_property_mappings:
      role: role
      content: content
    roles:
      user:
        - user
      assistant:
        - assistant

dataset_prepared_path:
val_set_size: 0.01
output_dir: /workspace/out/llama-3.2-1b-ai-endpoints

sequence_len: 4096
sample_packing: false
pad_to_sequence_len: true

adapter: lora
lora_model_dir:
lora_r: 32
lora_alpha: 16
lora_dropout: 0.05
lora_target_linear: true

wandb_project: ai_endpoints_training
wandb_entity: <user id>
wandb_mode:
wandb_watch:
wandb_name:
wandb_log_model:

gradient_accumulation_steps: 4
micro_batch_size: 2
num_epochs: 10
optimizer: adamw_bnb_8bit
lr_scheduler: cosine
learning_rate: 0.0002

bf16: auto
tf32: false

gradient_checkpointing: true
resume_from_checkpoint:
logging_steps: 1
flash_attention: true

warmup_steps: 10
evals_per_epoch: 4
saves_per_epoch: 1
weight_decay: 0.0
special_tokens:
   pad_token: <|end_of_text|>
🔎 Some key points (only the fields modified from the given templates):
– base_model: meta-llama/Llama-3.2-1B-Instruct: before you download the base model from Hugging Face, be sure to accept the licence’s terms of use [JD1]
– path: /workspace/ai-endpoints-doc/: folder to upload the generated dataset
– wandb_project: ai_endpoints_training & wandb_entity: <user id>: to configure weights and biases
– num_epochs: 10: number of epochs for the training
After the training, you can test the new model 🤖:
!echo "What is OVHcloud AI Endpoints and how to use it?" | axolotl inference /workspace/instruct-lora-1b-ai-endpoints.yml --lora-model-dir="/workspace/out/llama-3.2-1b-ai-endpoints" When you’re satisfied with the result, merge the weights and upload the new model to Hugging Face:
!axolotl merge-lora /workspace/instruct-lora-1b-ai-endpoints.yml

%cd /workspace/out/llama-3.2-1b-ai-endpoints/merged

!huggingface-cli upload wildagsx/Llama-3.2-1B-Instruct-AI-Endpoints-v0.6 .
ℹ️ You can find all resources to create and run the notebook in the dedicated folder in the GitHub repository.
Test the new model
Once you have pushed your model in Hugging Face you can, again, deploy it with vLLM and AI Deploy to test it ⚡️.
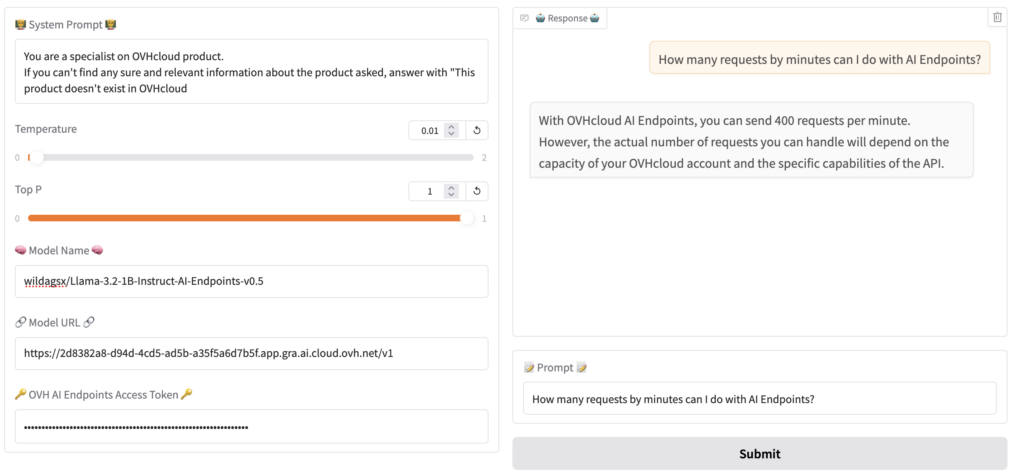
Ta-da! 🥳 Our little Llama model is now an OVHcloud AI Endpoints pro!
Feel free to try out OVHcloud Machine Learning products, and share your thoughts on our Discord server (https://discord.gg/ovhcloud), see you soon! 👋
Once a developer, always a developer!
Java developer for many years, I have the joy of knowing JDK 1.1, JEE, Struts, ... and now Spring, Quarkus, (core, boot, batch), Angular, Groovy, Golang, ...
For more than ten years I was a Software Architect, a job that allowed me to face many problems inherent to the complex information systems in large groups.
I also had other lives, notably in automation and delivery with the implementation of CI/CD chains based on Jenkins pipelines.
I particularly like sharing and relationships with developers and I became a Developer Relation at OVHcloud.
This new adventure allows me to continue to use technologies that I like such as Kubernetes or AI for example but also to continue to learn and discover a lot of new things.
All the while keeping in mind one of my main motivations as a Developer Relation: making developers happy.
Always sharing, I am the co-creator of the TADx Meetup in Tours, allowing discovery and sharing around different tech topics.