Container orchestration is now essential for modern application deployment, providing scalability, flexibility, and resource efficiency. It has become common to have to manage several Kubernetes clusters, but doing so effectively requires the right tools. Fortunately, OVHcloud offers a solution that enables you to manage all your Kubernetes clusters from a single, centralized management tool: Managed Rancher Service (MRS).
In this blog post we will see what is MRS and how to create several different Kubernetes clusters through the Rancher UI.
Managed Rancher Service

Managed Rancher Services (MRS), in General Availability since September 2024, is based on Rancher, an open-source container management platform, that simplifies the deployment and management of Kubernetes clusters. Managed Rancher Service by OVHcloud provides a powerful platform for orchestrating Kubernetes clusters seamlessly.
With the Managed Rancher Service it becomes easy to manage and create multiple Kubernetes clusters on any platform and location including:
- Hosted Kubernetes provider (e.g. OVHcloud MKS, AWS EKS, GCP GKE, etc).
- Infrastructure Provider – Public Cloud or Private Cloud (vSphere, Nutanix, etc).
- Bare-metal servers, cloud hosted or on premise.
- Virtual machines, cloud hosted or on premise
You can also import your existing Kubernetes clusters and then manage them for a multi-cloud purpose:
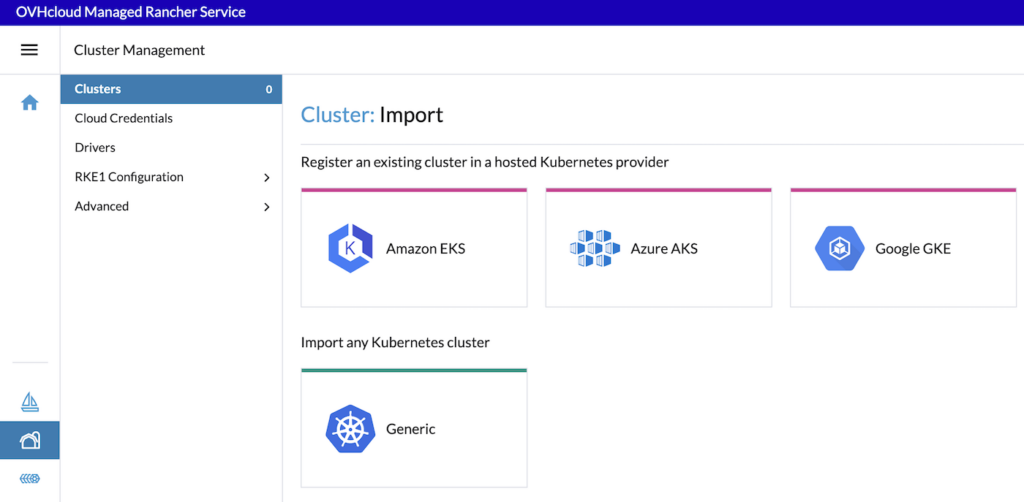
Find more information on our dedicated Managed Rancher Services page.
How To
Through this blog post we will show how to create several Kubernetes clusters:
- a Managed Kubernetes (MKS) cluster (Hosted Kubernetes provider)
- a Kubernetes cluster running on OVHcloud Public Cloud Compute Instances (PCI) (Infrastructure Provider)
- a K3s Kubernetes cluster using existing nodes (Custom driver)
Create an OVHcloud Managed Kubernetes (MKS) cluster
In this part of this blog post, we will create a MKS cluster with 3 nodes based on b3-8 flavor:
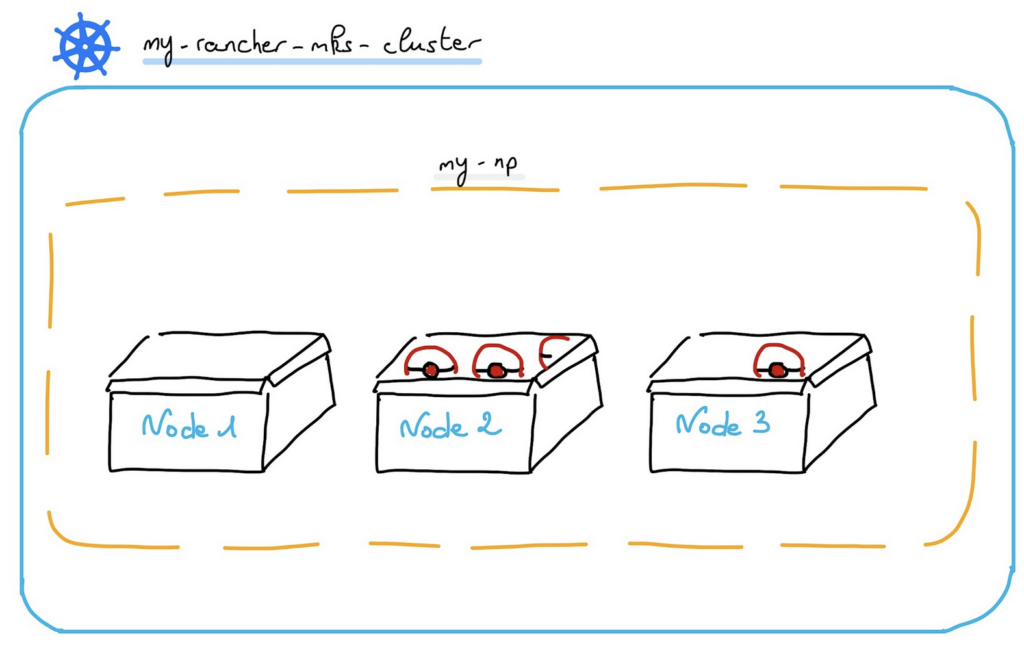
Log in to your Managed Rancher Service UI and then click on Create button.

To create an MKS cluster, use the hosted Kubernetes provider way and click on the OVHcloud MKS driver.
First, enter an MKS cluster name, for example my-rancher-mks-cluster:

At this step, you can optionally configure Member Roles or Labels & Annotations, follow our guide to know more.
For the Account Configuration, you need to provide your OVHcloud API credentials (Application Key, Application Secret and Consumer Key). If you don’t have OVHcloud API credentials, you can follow our guide on how to Generate your OVHcloud API keys.
Also provide your Public Cloud project ID. The project ID is where your Managed Kubernetes Service (MKS) cluster will be deployed. You can follow the guide on How to create your first Project or if already existing, you can copy/paste it from the OVHcloud Control Panel or API.
And finally select the OVHcloud API endpoint, depending on your location: ovh-eu, ovh-ca or ovh-us.
For the Cluster Configuration, you need to select the Region where your cluster will be deployed. Then, select the Kubernetes Version. Then, select Update Policy information. If you want further information, refer to the Managed Kubernetes Update Policies guide.

For the Network Configuration, in the Private Network ID field, select an existing OVHcloud Public Cloud private network or choose None if you want to create a cluster with nodes using only public interfaces.
For the NodePools Configuration, for every NodePool you want to:
- Enter the Name of the NodePool. The name must be unique inside a same MKS cluster.
- Choose an OVHcloud instance Flavor used by this NodePool.
- Enable or disable the Autoscaling.
- Enter the number of nodes you want, it’s the Size of your NodePool. If the autoscaling is enabled, then choose the minimum and maximum number of nodes.
- Enable the Monthly Billing (Hourly billing by default).
- Click on the
Add Node Poolbutton to add the node pool in the list below.

Click on the Finish & Create Cluster button.
Your MKS cluster is provisioning, the creation will take around 3-4 minutes for the cluster creation and 3-4 minutes for the node pool with 3 nodes and the Rancher agent deployed into them.

Create a Kubernetes cluster based on OVHcloud Public Cloud Compute Instances
In this part of this blog post, we will create a Kubernetes cluster with 3 nodes based on b3-16 flavor for etcd & control-plane & 2 nodes based on b3-8 flavor for workers.
In the Rancher UI, you have to first create OVHcloud Public Cloud credentials.
Then, go back to the Rancher UI Home and click on the Create button.
This time, you will create a Kubernetes cluster running in Compute Instances, so you have to provision new nodes and create a cluster using RKE2/K3s through the Infrastructure provider and specifically the OVHcloud Public Cloud driver:
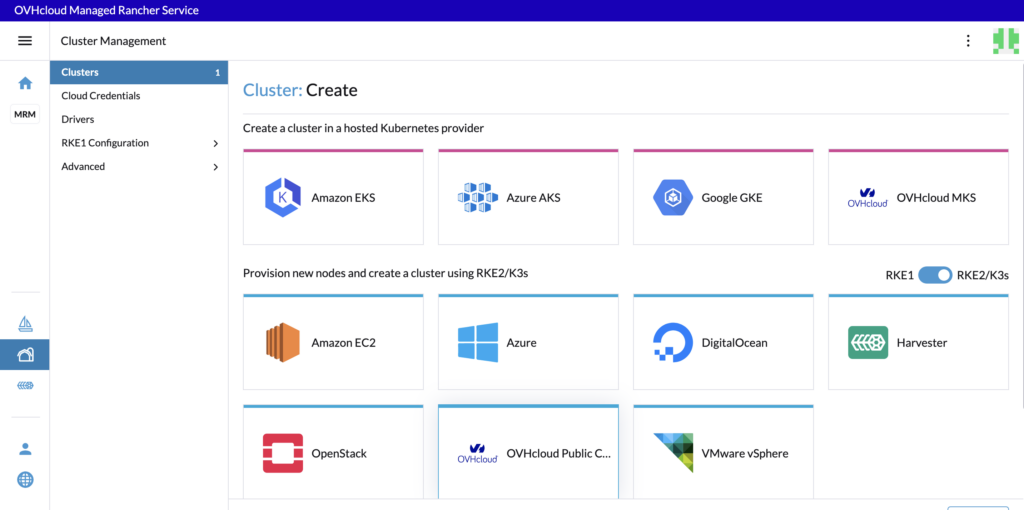
Select the OVHcloud Public Cloud credential created earlier in this blog post:

Then, define the cluster name, my-rancher-k8s-pci for example.

In the Machine Pools section you will configure your cluster. When you configure a machine pool in Rancher, there are three roles that can be assigned to nodes: etcd, Control Plane and Worker.
Note:
In Rancher when you configure a node, there are three roles that can be assigned to nodes: etcd, controlplane and worker.
There are some good practices:
- At least 3 machines/nodes with the role
etcdare needed to survive a loss of 1 node and have a minimum high availability configuration for etcd. 3etcdnodes are generally sufficient for smaller and medium clusters, and 5etcdnodes for large clusters. - At least 2 machines/nodes with the role
Control Planefor master component high availability. - You can set both the
etcdandControl Planeroles for one instance. - The
Workerrole should not be used or added to nodes with theetcdorControl Planerole. - At least 2 machines/nodes with the
Workerrole for workload rescheduling upon node failure.
For each of the machine pools, you have to:
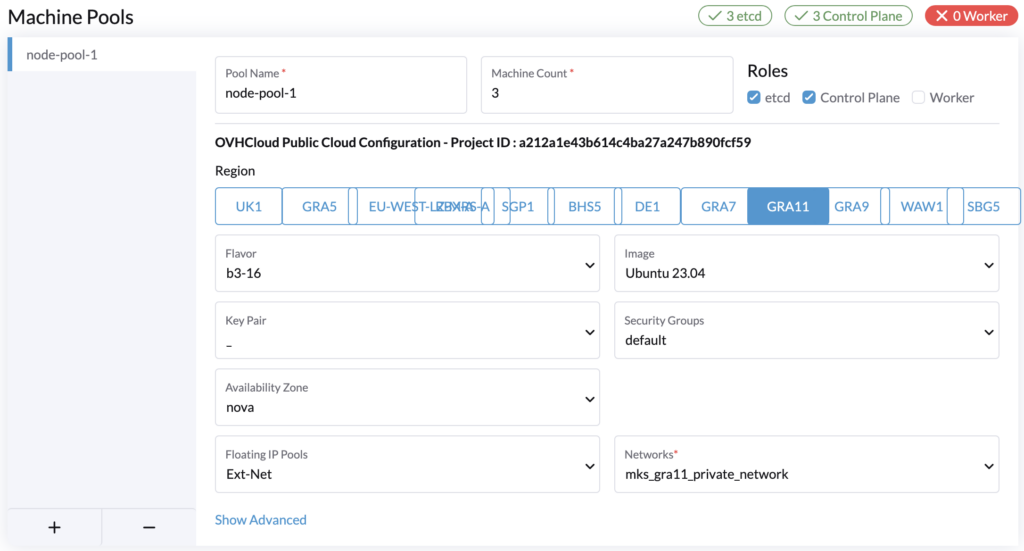
- Define the pool name (
node-pool-1for example for the first machine pool). - Define machine count (3 for example for the first machine pool).
- Select roles (check
etcdandControl Planefor the first machine pool)/ - Choose the region (
GRA11 for example for the first machine pool). If you want to check the availability of specific products that you plan to use alongside Kubernetes, you can refer to the Availability of Public Cloud Product page. - Choose the flavor (
b3-16for example). You can refer to the OVHcloud Flavor list. - Choose the image for the Operating System (OS) used for your machines/nodes. Please refer to Rancher Operating Systems and Container Runtime Requirements.
- Choose a Key Pair (optional). It’s the SSH Key Pair that will be used to access your nodes. Please refer to this guide on how to create a SSH KeyPair and add it to your Public Cloud project. If you leave this field empty, a new keypair will be generated automatically.
- Choose the Security Group that will be applied to created instances. You can leave the field empty.
- Choose the Availability Zone (only
novais supported at the moment). - Choose the Floating IP Pools (only
Ext-Netis supported at the moment). - Choose the Networks. You need to choose a private network (with a gateway). The compute instances will be created in this private network.
At the bottom of the Machine Pools section, click on the + button to add the second machine pool with 2 workers machines/nodes and the same configuration.
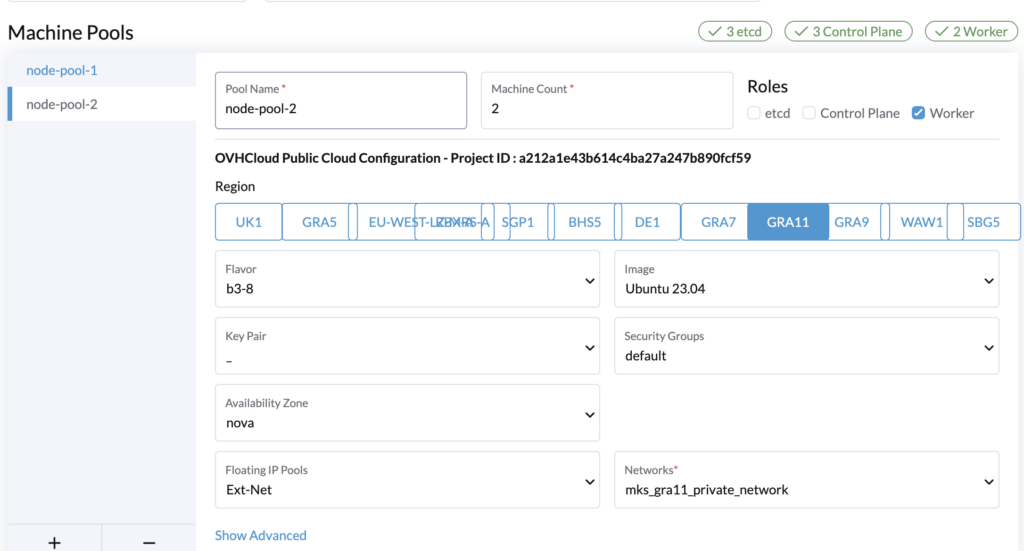
As you can see, we can choose another flavor type for worker machines/nodes.
In the Cluster Configuration section, choose the Kubernetes version. You need to choose between RKE2 and K3s Kubernetes Operating System (OS). For a production environment, we recommend choosing RKE2.
You need also to choose the container network (CNI), we decided to choose CIlium for this blog post but you can select calico or canal instead depending on your needs.
Select the Container Network, choose if you want to activate a Project Network isolation and the System Services tooling you want to install in your cluster.
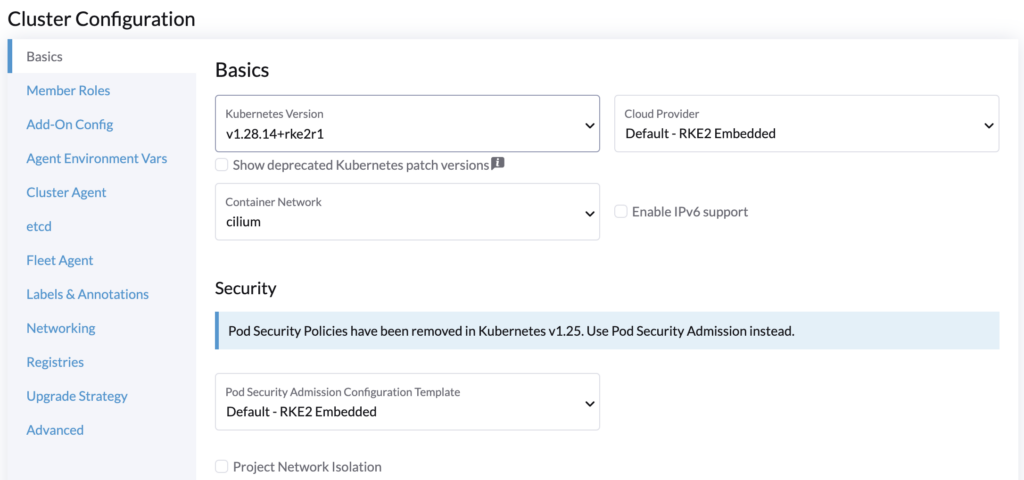
Follow the RKE2 cluster configuration reference for the Cluster Configuration.
In the Member Roles tab, you can add members for users that need to access the cluster. After creating the cluster, you can also add members.
Finally, click the Create button to create your Kubernetes cluster with OVHcloud PCI driver.
The cluster creation can take several minutes (depending on the OS and on the number of nodes you want).

Create a Kubernetes cluster with existing nodes
Another possibility through MRS is to create a Kubernetes cluster based on existing nodes. You can bring your own nodes and create a Kubernetes cluster running on them 🙂
For that the pre-requisite is to have existing machines (virtual or physical) accessible through SSH.
In the Rancher UI create on the Create button, scroll down and select the Custom driver:
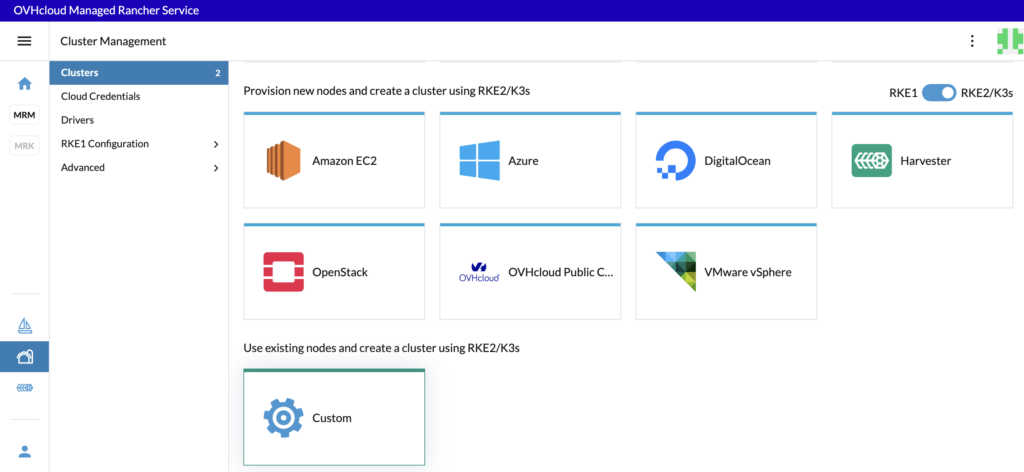
Fill in a cluster name (custom-kube-cluster for example) and choose the Kubernetes version You can choose between K3s and RKE2. For production needs we recommend RKE2. And choose the container network (calico by default).

Click on the different tabs to configure your cluster depending on your needs and then click on the Create button.
As we already said in the previous chapter, in Rancher, there are three roles that can be assigned to nodes: etcd, Control Plane and Worker.
For the configuration of our etcd + Control Plane nodes, check only the etcd and Control Plane Nodes Roles:


SSH to your machines/nodes you created for etcd and Control Plane and copy/paste the registration command.
ssh xxxxx@xxx.xxx.xxx.xxx

curl -fL https://xxxxxx.xxxx.rancher.ovh.net/system-agent-install.sh | sudo  sh -s - --server https://xxxxxx.xxxx.rancher.ovh.net --label 'cattle.io/os=linux' --token z2r458coqudhfilgdsifgdsqilgfqsdigfidsufgoisdnvzj --etcd --controlplane
For the configuration of our Worker nodes, uncheck the checkboxes and check only the Worker checkbox:


SSH to your machines/nodes you created for etcd and controlpane and copy/paste the registration command.
ssh xxxxx@xxx.xxx.xxx.xxx

curl -fL https://xxxxxx.xxxx.rancher.ovh.net/system-agent-install.sh | sudo  sh -s - --server https://xxxxxx.xxxx.rancher.ovh.net --label 'cattle.io/os=linux' --token z2r458coqudhfilgdsifgdsqilgfqsdigfidsufgoisdnvzj --worker
After executing these commands to the machines/nodes, wait until the cluster is in Active state in the Rancher UI.
Conclusion
Managed Rancher Service can help you to create, import and manage your new and existing Kubernetes clusters with a centralised interface. You saw in this blog posts three ways to create a Kubernetes clusters but we encourage you to test the other possibilities and explore the Rancher UI.
Want to go further?
Visit our technical guides and how to about OVHcloud Managed Rancher Service.
Developer Advocate at OVHcloud, specialized in Cloud Native, Infrastructure as Code (IaC) & Developer eXperience (DX).
She is recognized as a Docker Captain, CNCF ambassador, GDE & Women techmakers Ambassador.
She has been working as a Developer and Ops for over 20 years. Cloud enthusiast and advocates DevOps/Cloud/Golang best practices.
Technical writer, a sketchnoter and a speaker at international conferences.
Book author, she created a new visual way for people to learn and understand Cloud technologies: "Understanding Kubernetes / Docker / Istio in a visual way" in sketchnotes, books and videos.
