
DevOps is based on 4 principles:
- Culture
- Automation
- Measurement
- Sharing
Infrastructure as Code is part of the Automation principle.
Deploying manually take time and it’s complicated. You have to setup servers, configure network, storage, softwares… And of course you have to maintain and update all of this infrastructures, deploy new versions, backup and restore applications, again and again. For all the environments you have.
Infrastructure as Code (IaC) is a modern approach that allows you to automate infrastructure provisioning through machine-readable definition files.
By treating infrastructure as software, organisations can leverage the same principles of version control, testing, and continuous integration that have been successful in software development, resulting in faster, more reliable, and more consistent deployments.
IaC has different tools. In this blog posts series we will cover several of the best IaC tools like Terraform, OpenTofu, Pulumi, CDK for Terraform, Crossplane… and we will start by Terraform and OpenTofu.
If, in this blog posts series, you don’t see an IaC tool you are using with OVHcloud, feel free to contact us.
Terraform

Terraform has begun the de-facto standard for infrastructure as code (IaC), created by Hashicorp in 2014, written in Go. The tool was formerly open-source then under Business Source License (BSL) license since 2023. It aims to build, change and version control your infrastructure. You can define and provision your infrastructure by writing the definition of your resources in Hashicorp Configuration Language (HCL).
With Terraform you can Build, Modify and Version an immutable infrastructure. It ensures creation and consistency and allows you to apply incremental changes.
Concretely, Terraform allows you to automatically create your infrastructure, in three steps:

- Write: writing the definition of the resources in HCL (Hashicorp Configuration Language) in files in
*.tfformat; - Plan: a plan of the resources to be created/modified and deleted is displayed, before any changes;
- Create : The desired infrastructure is in place, and reproducible in all desired environments.
This tool has a powerful and very intuitive command line interface (CLI). If you are interested in leveraging your knowledge about Terraform CLI, a Cheat Sheet exists.
OpenTofu

OpenTofu is a fork of Terraform that is open-source, community-driven, and managed by the Linux Foundation.
So, like Terraform, OpenTofu is an infrastructure as code tool that lets you define both cloud and on-premise resources in human-readable configuration files that you can version, reuse, and share. You can then use a consistent workflow to provision and manage all of your infrastructure throughout its lifecycle.
As OpenTofu is a fork of Terraform, HCL is also used and the users can use their HCL files written for Terraform and execute opentofu CLI to ask for a plan or to apply modifications to provision their infrastructures.
They are similarities with Terraform but also new features. Check on the OpenTofu website to see what’s new in OpenTofu 1.8 for example.
OVHcloud Terraform provider
To easily provision your infrastructures, OVHcloud provides a Terraform provider which is available in the official Terraform registry.

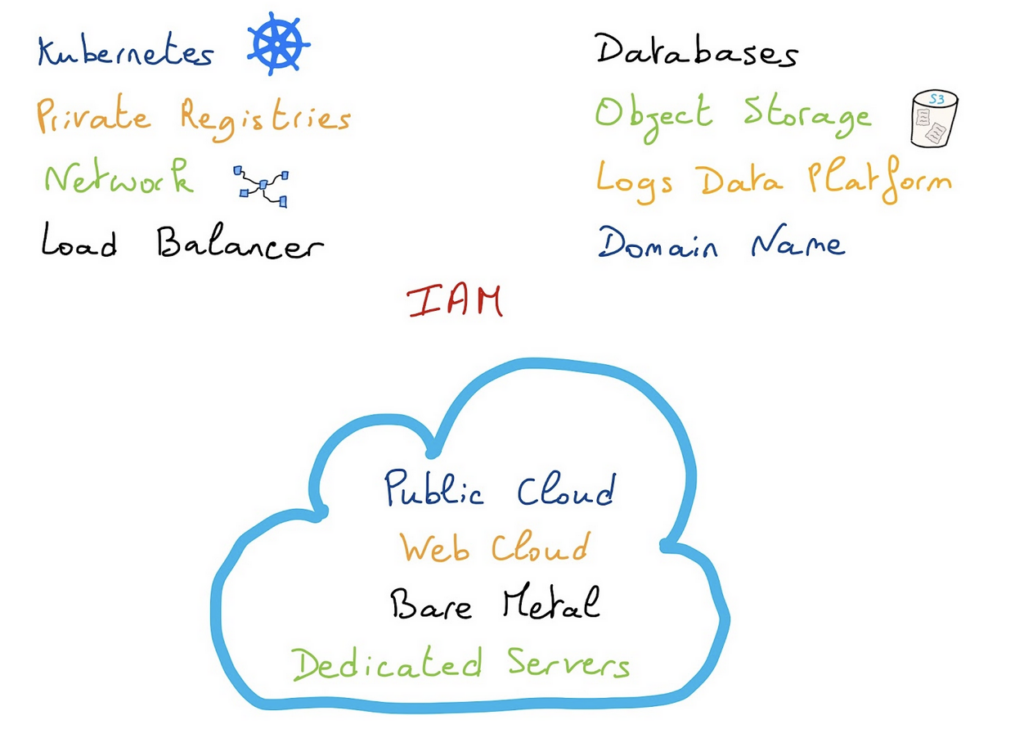
The OVHcloud Terraform provider, that is maintained since 4 years, allows you to manage and deploy infrastructures for Public Cloud but also Bare Metal Cloud, Web Cloud and IAM. Depending on your needs, you can use a combinaison of several providers. To see which Terraform providers you need to use for which usage, please follow the Using Terraform with OVHcloud guide.
The provider is evolving every months so check the new releases changelog: https://github.com/ovh/terraform-provider-ovh/releases
The OVHcloud provider is open source and available on GitHub, feel free to create issues or pull requests!
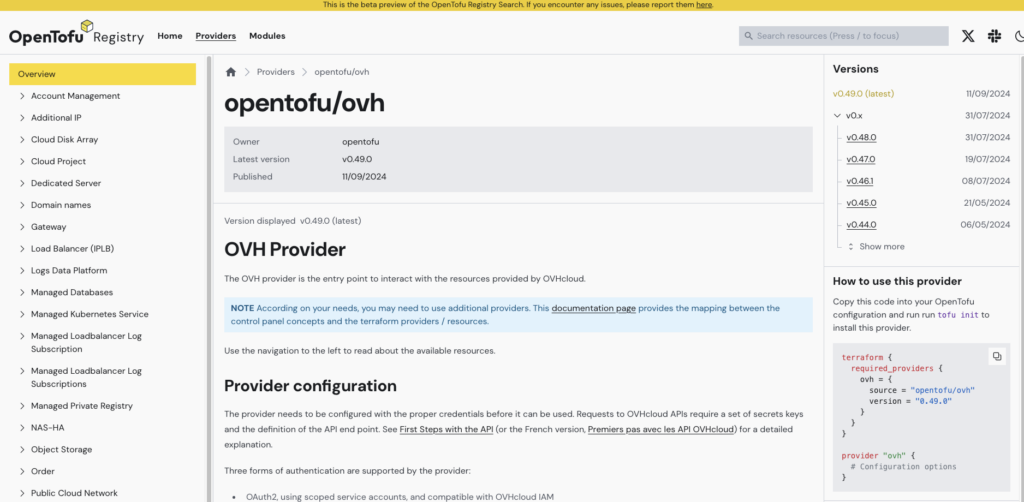
OVHcloud Terraform provider… on OpenTofu registry
The provider is also available on the OpenTofu registry. Indeed, when the OVHcloud Terraform provider is published on the Hashicorp registry, a synchronization is done on the OpenTofu registry.
Deploy a Managed Kubernetes cluster in a private network with Terraform
To show you that you can deploy your infrastructures on OVHcloud with Terraform / OpenTofu, we will deploy a concrete example. In this blog post we will deploy a Managed Kubernetes cluster and all the requirements for the new Public Cloud Load Balancer:
- a vRack
- attach the vRack to your Public Cloud project
- a private network
- a subnet
- a Managed Kubernetes Service (MKS) cluster
- with a node pool
Prerequisites
You should have installed Terraform CLI, on your machine. You can install it by following detailed installation instructions or with the tool tfenv.
You should have installed kubectl CLI too.
Get the credentials from the OVHCloud Public Cloud project:
application_keyapplication_secretconsumer_key
Get the service_name (Public Cloud project ID)
Terraform or Tofu CLI?
In the rest of this blog post we will use the terraform CLI but if you prefer to use OpenTofu, feel free to replace it by tofu command.
Let’s deploy our MKS cluster!
Note that all the following source code are available on the OVHcloud Public Cloud examples GitHub repository.
First, create a provider.tf file with the minimum version, european endpoint (“ovh-eu”) and keys you previously got in this guide:
terraform {
  required_providers {
    ovh = {
      source  = "ovh/ovh"
    }
  }
}

provider "ovh" {
  endpoint           = "ovh-eu" # change the endpoint if you are not in europe: ovh-us, ovh-ca
  application_key    = "<your_access_key>"
  application_secret = "<your_application_secret>"
  consumer_key       = "<your_consumer_key>"
}
Alternatively the secret keys can be retrieved from your environment.
OVH_ENDPOINTOVH_APPLICATION_KEYOVH_APPLICATION_SECRETOVH_CONSUMER_KEY
Then, create a variables.tf file with service_name:
variable service_name {
  type        = string
  default     = "<your_service_name>"
}
Define the resources you want to create in a new file called ovh_kube_cluster_private.tf:
# Deploy a Kubernetes cluster that have all the needed requirements for new Public Cloud Load Balancer

# 0. Create a vRack (comment this part if you have an existing one)
#
# data "ovh_me" "myaccount" {}
#
# data "ovh_order_cart" "mycart" {
#   ovh_subsidiary = data.ovh_me.myaccount.ovh_subsidiary
# }
#
# data "ovh_order_cart_product_plan" "vrack" {
#  cart_id        = data.ovh_order_cart.mycart.id
#  price_capacity = "renew"
#  product        = "vrack"
#  plan_code      = "vrack"
# }
#
# resource "ovh_vrack" "vrack" {
#  ovh_subsidiary = data.ovh_order_cart.mycart.ovh_subsidiary
#  name          = "my-vrack"
#  description   = "my vrack"
#
#  plan {
#    duration     = data.ovh_order_cart_product_plan.vrack.selected_price.0.duration
#    plan_code    = data.ovh_order_cart_product_plan.vrack.plan_code
#    pricing_mode = data.ovh_order_cart_product_plan.vrack.selected_price.0.pricing_mode
#  }
# }

# 1. Attach your vRack to your Public Cloud project (comment this part if your vRack is already attached to your Public Cloud project)
#
# resource "ovh_vrack_cloudproject" "attach" {
#   service_name = ovh_vrack.vrack.id
# 	project_id   = var.service_name
# }

# 2. Create a private network
resource "ovh_cloud_project_network_private" "network" {
  service_name = var.service_name
  vlan_id    = 666 # the VLAN ID is unique
  name       = "mks_gra11_private_network"
  regions    = ["GRA11"]
}

# And a subnet
resource "ovh_cloud_project_network_private_subnet" "networksubnet" {
  service_name = ovh_cloud_project_network_private.network.service_name
  network_id   = ovh_cloud_project_network_private.network.id

  # whatever region, for test purpose
  region     = "GRA11"
  start      = "192.168.168.100"
  end        = "192.168.168.200"
  network    = "192.168.168.0/24"
  dhcp       = true
  no_gateway = false

  depends_on   = [ovh_cloud_project_network_private.network]
}

output "openstackID" {
  value = one(ovh_cloud_project_network_private.network.regions_attributes[*].openstackid)
}

# 3. Create a MKS in the private network attached to a vRack

resource "ovh_cloud_project_kube" "mycluster" {
  service_name  = var.service_name
  name          = "my-kube-gra"
  region        = "GRA11"

  private_network_id = tolist(ovh_cloud_project_network_private.network.regions_attributes[*].openstackid)[0]

  private_network_configuration {
      default_vrack_gateway              = ""
      private_network_routing_as_default = false
  }

  depends_on = [ovh_cloud_project_network_private_subnet.networksubnet]
}

output "kubeconfig" {
  value = ovh_cloud_project_kube.mycluster.kubeconfig
  sensitive = true
}

# 4. Create a node pool for the MKS cluster
resource "ovh_cloud_project_kube_nodepool" "node_pool" {
  service_name  = var.service_name
  kube_id       = ovh_cloud_project_kube.mycluster.id
  name          = "my-pool-1" //Warning: "_" char is not allowed!
  flavor_name   = "b3-8"
  desired_nodes = 1
  max_nodes     = 1
  min_nodes     = 1
}
Depending on your environment, you can uncomment the creation of the vRack (if you don’t have one) and the attachment of it to your Public Cloud project.
Now we need to initialise Terraform, generate a plan, and apply it.
$ terraform init

Initializing the backend...

Initializing provider plugins...
- Finding latest version of ovh/ovh...
- Installing ovh/ovh v0.49.0...
- Installed ovh/ovh v0.49.0 (signed by a HashiCorp partner, key ID F56D1A6CBDAAADA5)

Partner and community providers are signed by their developers.
If you'd like to know more about provider signing, you can read about it here:
https://www.terraform.io/docs/cli/plugins/signing.html

Terraform has created a lock file .terraform.lock.hcl to record the provider
selections it made above. Include this file in your version control repository
so that Terraform can guarantee to make the same selections by default when
you run "terraform init" in the future.

Terraform has been successfully initialized!

You may now begin working with Terraform. Try running "terraform plan" to see
any changes that are required for your infrastructure. All Terraform commands
should now work.

If you ever set or change modules or backend configuration for Terraform,
rerun this command to reinitialize your working directory. If you forget, other
commands will detect it and remind you to do so if necessary.
Note: Instead of saving the Terraform state locally, you can use OVHcloud High Performance (S3) Object Storage as Terraform Backend to store your Terraform state, follow the guide to know how to do it.
Generate the plan and apply it:
$ terraform apply

Terraform used the selected providers to generate the following execution plan. Resource actions are indicated with the following symbols:
  + create

Terraform will perform the following actions:

  # ovh_cloud_project_kube.mycluster will be created
  + resource "ovh_cloud_project_kube" "mycluster" {
      + control_plane_is_up_to_date = (known after apply)
      + id                          = (known after apply)
      + is_up_to_date               = (known after apply)
      + kube_proxy_mode             = (known after apply)
      + kubeconfig                  = (sensitive value)
      + kubeconfig_attributes       = (sensitive value)
      + name                        = "my-kube-gra"
      + next_upgrade_versions       = (known after apply)
      + nodes_subnet_id             = (known after apply)
      + nodes_url                   = (known after apply)
      + private_network_id          = (known after apply)
      + region                      = "GRA11"
      + service_name                = "xxxxxxxxxxxxxxxxxx"
      + status                      = (known after apply)
      + update_policy               = (known after apply)
      + url                         = (known after apply)
      + version                     = (known after apply)

      + private_network_configuration {
          + private_network_routing_as_default = false
        }
    }

  # ovh_cloud_project_kube_nodepool.node_pool will be created
  + resource "ovh_cloud_project_kube_nodepool" "node_pool" {
      + anti_affinity                                = (known after apply)
      + autoscale                                    = (known after apply)
      + autoscaling_scale_down_unneeded_time_seconds = (known after apply)
      + autoscaling_scale_down_unready_time_seconds  = (known after apply)
      + autoscaling_scale_down_utilization_threshold = (known after apply)
      + available_nodes                              = (known after apply)
      + created_at                                   = (known after apply)
      + current_nodes                                = (known after apply)
      + desired_nodes                                = 1
      + flavor                                       = (known after apply)
      + flavor_name                                  = "b3-8"
      + id                                           = (known after apply)
      + kube_id                                      = (known after apply)
      + max_nodes                                    = 1
      + min_nodes                                    = 1
      + monthly_billed                               = (known after apply)
      + name                                         = "my-pool-1"
      + project_id                                   = (known after apply)
      + service_name                                 = "xxxxxxxxxxxxxxxxxx"
      + size_status                                  = (known after apply)
      + status                                       = (known after apply)
      + up_to_date_nodes                             = (known after apply)
      + updated_at                                   = (known after apply)
    }

  # ovh_cloud_project_network_private.network will be created
  + resource "ovh_cloud_project_network_private" "network" {
      + id                 = (known after apply)
      + name               = "mks_gra11_private_network"
      + regions            = [
          + "GRA11",
        ]
      + regions_attributes = (known after apply)
      + regions_status     = (known after apply)
      + service_name       = "xxxxxxxxxxxxxxxxxx"
      + status             = (known after apply)
      + type               = (known after apply)
      + vlan_id            = 666
    }

  # ovh_cloud_project_network_private_subnet.networksubnet will be created
  + resource "ovh_cloud_project_network_private_subnet" "networksubnet" {
      + cidr         = (known after apply)
      + dhcp         = true
      + end          = "192.168.168.200"
      + gateway_ip   = (known after apply)
      + id           = (known after apply)
      + ip_pools     = (known after apply)
      + network      = "192.168.168.0/24"
      + network_id   = (known after apply)
      + no_gateway   = false
      + region       = "GRA11"
      + service_name = "xxxxxxxxxxxxxxxxxx"
      + start        = "192.168.168.100"
    }

Plan: 4 to add, 0 to change, 0 to destroy.

Changes to Outputs:
  + kubeconfig  = (sensitive value)
  + openstackID = (known after apply)

Do you want to perform these actions?
  Terraform will perform the actions described above.
  Only 'yes' will be accepted to approve.

  Enter a value: yes

ovh_cloud_project_network_private.network: Creating...
ovh_cloud_project_network_private.network: Still creating... [10s elapsed]
ovh_cloud_project_network_private.network: Still creating... [20s elapsed]
ovh_cloud_project_network_private.network: Still creating... [30s elapsed]
ovh_cloud_project_network_private.network: Still creating... [40s elapsed]
ovh_cloud_project_network_private.network: Creation complete after 44s [id=pn-xxxxxxx_666]
ovh_cloud_project_network_private_subnet.networksubnet: Creating...
ovh_cloud_project_network_private_subnet.networksubnet: Creation complete after 8s [id=xxxxxxx-xxxx-xxxx-xxxx-xxxxxxxxxxx]
ovh_cloud_project_kube.mycluster: Creating...
ovh_cloud_project_kube.mycluster: Still creating... [10s elapsed]
ovh_cloud_project_kube.mycluster: Still creating... [20s elapsed]
ovh_cloud_project_kube.mycluster: Still creating... [30s elapsed]
ovh_cloud_project_kube.mycluster: Still creating... [40s elapsed]
ovh_cloud_project_kube.mycluster: Still creating... [50s elapsed]
ovh_cloud_project_kube.mycluster: Still creating... [1m0s elapsed]
ovh_cloud_project_kube.mycluster: Still creating... [1m10s elapsed]
ovh_cloud_project_kube.mycluster: Still creating... [1m20s elapsed]
ovh_cloud_project_kube.mycluster: Still creating... [1m30s elapsed]
ovh_cloud_project_kube.mycluster: Still creating... [1m40s elapsed]
ovh_cloud_project_kube.mycluster: Still creating... [1m50s elapsed]
ovh_cloud_project_kube.mycluster: Still creating... [2m0s elapsed]
ovh_cloud_project_kube.mycluster: Still creating... [2m10s elapsed]
ovh_cloud_project_kube.mycluster: Still creating... [2m20s elapsed]
ovh_cloud_project_kube.mycluster: Still creating... [2m30s elapsed]
ovh_cloud_project_kube.mycluster: Still creating... [2m40s elapsed]
ovh_cloud_project_kube.mycluster: Still creating... [2m50s elapsed]
ovh_cloud_project_kube.mycluster: Creation complete after 2m55s [id=xxxxxxx-xxxx-xxxx-xxxx-xxxxxxxxxxx]
ovh_cloud_project_kube_nodepool.node_pool: Creating...
ovh_cloud_project_kube_nodepool.node_pool: Still creating... [10s elapsed]
ovh_cloud_project_kube_nodepool.node_pool: Still creating... [20s elapsed]
ovh_cloud_project_kube_nodepool.node_pool: Still creating... [30s elapsed]
ovh_cloud_project_kube_nodepool.node_pool: Still creating... [40s elapsed]
ovh_cloud_project_kube_nodepool.node_pool: Still creating... [50s elapsed]
ovh_cloud_project_kube_nodepool.node_pool: Still creating... [1m0s elapsed]
ovh_cloud_project_kube_nodepool.node_pool: Still creating... [1m10s elapsed]
ovh_cloud_project_kube_nodepool.node_pool: Still creating... [1m20s elapsed]
ovh_cloud_project_kube_nodepool.node_pool: Still creating... [1m30s elapsed]
ovh_cloud_project_kube_nodepool.node_pool: Still creating... [1m40s elapsed]
ovh_cloud_project_kube_nodepool.node_pool: Still creating... [1m50s elapsed]
ovh_cloud_project_kube_nodepool.node_pool: Still creating... [2m0s elapsed]
ovh_cloud_project_kube_nodepool.node_pool: Still creating... [2m10s elapsed]
ovh_cloud_project_kube_nodepool.node_pool: Still creating... [2m20s elapsed]
ovh_cloud_project_kube_nodepool.node_pool: Still creating... [2m30s elapsed]
ovh_cloud_project_kube_nodepool.node_pool: Still creating... [2m40s elapsed]
ovh_cloud_project_kube_nodepool.node_pool: Creation complete after 2m42s [id=xxxxxxx-xxxx-xxxx-xxxx-xxxxxxxxxxx]

Apply complete! Resources: 4 added, 0 changed, 0 destroyed.

Outputs:

kubeconfig = <sensitive>
openstackID = "xxxxxxx-xxxx-xxxx-xxxx-xxxxxxxxxxx"
Your Kubernetes cluster has now been deployed and is running inside a private network.
To connect into it, retrieve the kubeconfig file locally:
$ terraform output -raw kubeconfig > /Users/<your-user>/.kube/my_kube_cluster_private.ymlDisplay the Node Pools:
$ kubectl --kubeconfig=/Users/<your-user>/.kube/my_kube_cluster_private.yml get np
NAME        FLAVOR   AUTOSCALED   MONTHLYBILLED   ANTIAFFINITY   DESIRED   CURRENT   UP-TO-DATE   AVAILABLE   MIN   MAX   AGE
my-pool-1   b3-8     false        false           false          1         1         1            1           1     1     9m24s
Perfect! 🙂
Conclusion
As you have seen in this blog post, thanks to the OVHcloud terraform provider you can automatise the deployment of your infrastructures. The provider is evolving so feel free to take a look to the new releases changelog.
In the next blog post we will see the usage on OVHcloud of another IaC tool.
Developer Advocate at OVHcloud, specializing in Cloud Native, Infrastructure as Code, and Developer Experience.
Docker Captain, CNCF Ambassador, Google Developer Expert, and Women Techmakers Ambassador, she has spent more than 20 years helping developers and operators build reliable cloud-native platforms. Passionate about DevOps, Kubernetes, and Go, she shares best practices through technical writing, international conferences, and visual learning resources.
Author of the Understanding Kubernetes, Understanding Docker, and Understanding Istio series, she pioneered a visual approach to learning cloud technologies through sketchnotes, books, and videos.